Showing posts with label sewing. Show all posts

Thursday, January 28, 2021

A Few Things

 So, due to the lack of conventions, I don't really get an opportunity to do a lot of big projects and it's making. Me. Crazy. But I'm always full of other smaller projects to keep me occupied. I just have to remember to post them in batches so I don't get buried under too many things I want to post. So here we are.

So I made myself another yoga bolster. I already had one that I made before, but it was getting used as a knee pillow at night to try and keep my hips aligned while I slept and try to avoid my ever present back issues, so I never got to use it for yoga. So I made a new one this time stuffed with a rolled up comforter from the thrift store to be a little lighter and fluffier than the other but still dense enough to not go flat like a regular pillow. I'm not going to go over what I did and I don't have any pictures, the bolster isn't the point of this, but if you want some information, I used this as a basic plan:

https://bestfabricstore.com/blog/rectangular-yoga-bolster/?epik=dj0yJnU9Mnc4UkJXRDhJdlYxZVZoT3BZZVkzZDI1STNKSnA4MXomcD0wJm49bFJVaFpOOHg3NVNPTUI1ckFyRmxDZyZ0PUFBQUFBR0FUZi00

It's pretty straight forward.

Anyways. Doing this got me thinking about how I would really like a nice boho blanket that I keep downstairs in my little yoga/book/crafting room. And I thought it would be neat and true to the spirit of yoga and earth friendliness if I could thrift it as much as possible.

So, a while back I bought a bunch of recycled sari silk curtains because their thrifty boho look is everything I want in life:


https://www.mexicaliblues.com/collections/textiles/products/recycled-silk-panel-curtain

I love them so much I bought 10 of them, knowing I didn't need that many curtains, but I would find other uses for the fabric. And this was perfect, a nice brightly colored blanket of recycled sari silk was just what I wanted.

I also got really lucky on a thrift store run and found some large chunks of quilt batting. Hilariously enough it proved to be exactly the correct amount of batting for the size of two of these curtains sewn together, although I did have to Frankenstein stitch the chunks of batting together to get the size and shape of batting I wanted.


I basically just pressed the edges of the batting pieces right up against each other and then ran a wide zigzag stitch along the seams to hold it together. 

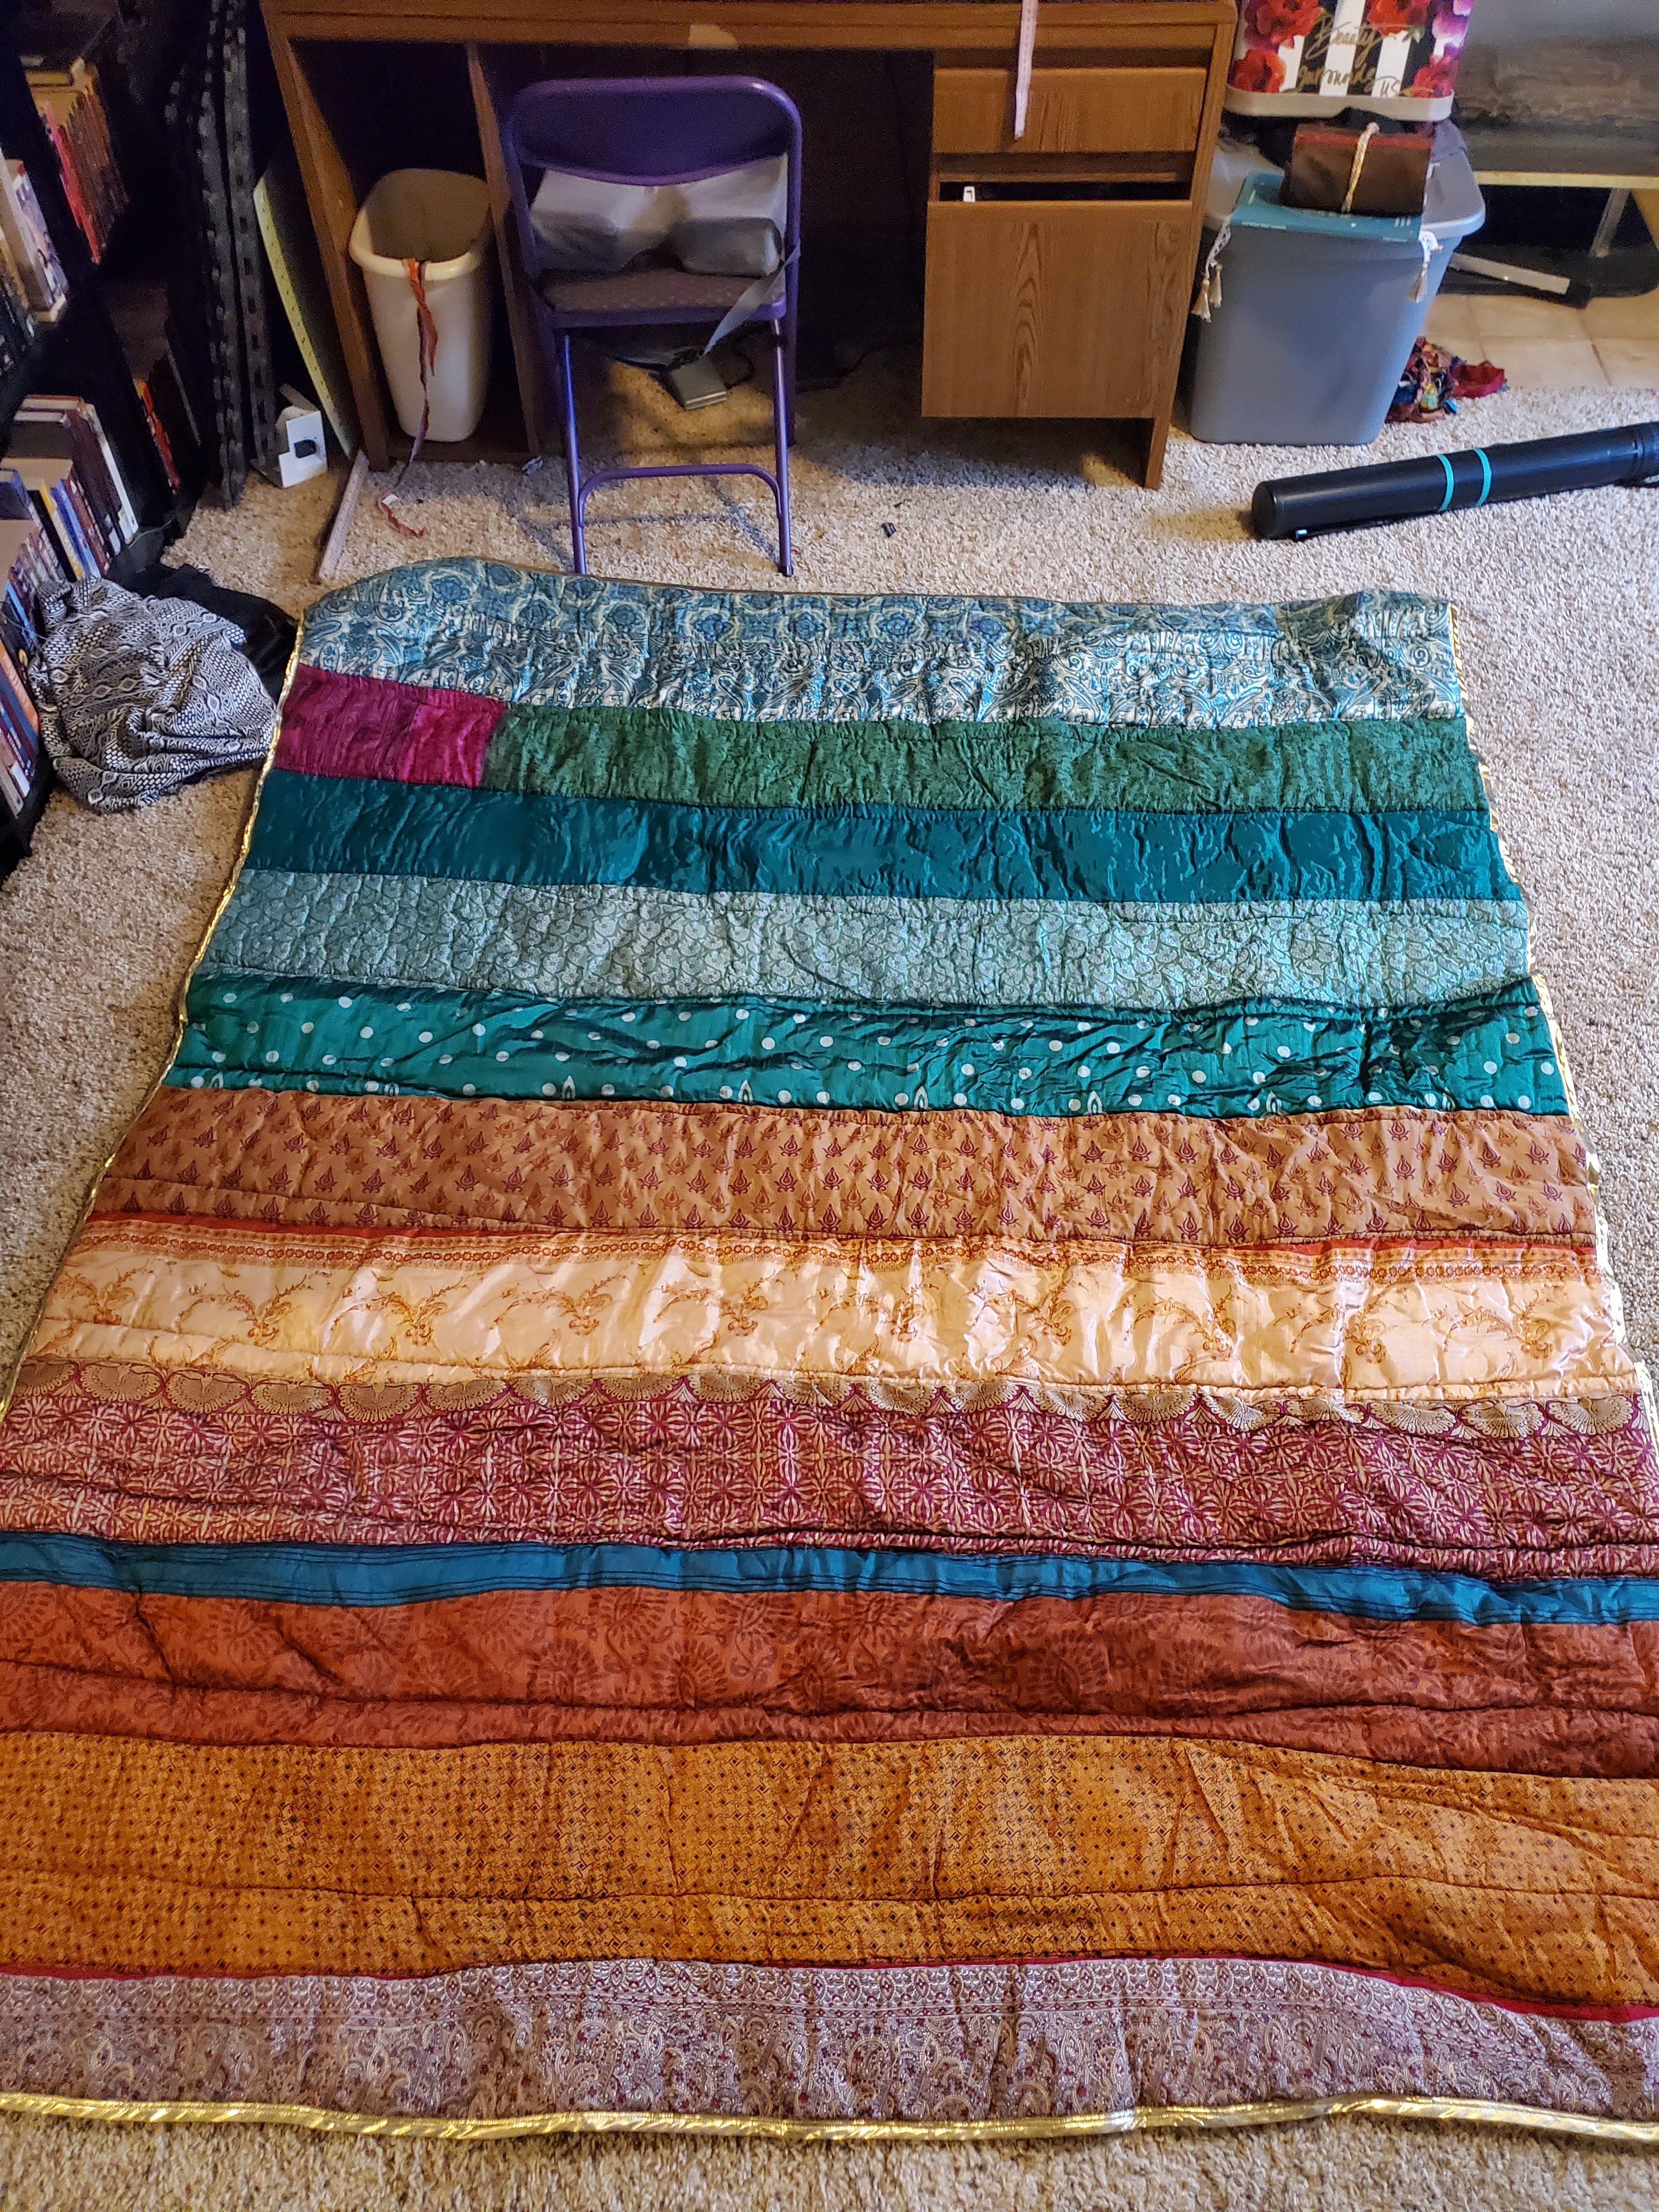
The quilt top and bottom were easy enough, I trimmed off the loops intended for hanging them as curtains and then just stitched two together for each side. I used basting spray to stick the fabric to the batting on the top and bottom and then for "quilting" I just stitched along the lines of each strip of color on the curtains. Due to the nature of them they did not line up with each other, so I quilted the seams on the top and bottom. It's.... eclectic, let's say. Also, if you're a for realsies quilter.... maybe.... don't look. 

I don't like quilting. I'm not good at it. I don't try very hard. I get my job done well enough and I get out.

To finish I bound the edges with a gold lame binding, I had a decent amount left over from I believe my Captain Hook costume, so I got a little more to have enough and sewed it on. It was the perfect flashy trim for all the bright colors.


It's crazy and colorful and flashy and I love it. It's not large, probably roughly twin comforter sized, maybe a little smaller, but it's a perfect one person blanket.

While I was at it, I wanted some boho pillows for my couch downstairs as well. I bought some thrift store couch pillows, cut off the bottom half of one of the curtains and made new covers for the pillows.


The couch looks very cozy and boho now.


It might not seem like much but it makes me happy. 

I was even able to take the top half of the curtain I cut for the pillows and hang it in my laundry room over a previously uncovered window, it turned out to be exactly the perfect length.


Haha, what a dingy looking picture. Apologies for the bad photo, folks. It's not that bad, I promise.

I also recently finished a crochet shawl for myself, I wanted something very light and hippie looking I could wear with maxi dresses in the spring and summer. I found a gorgeous pattern called Edlothia:

https://www.ravelry.com/patterns/library/edlothia

That was exactly what I wanted. Technically I finished it before Christmas but I hadn't gotten around to blocking it until now.

Here's mine:


The yarn I used was intended for some self patterned socks, and now that it's done I think using patterned yarn like that wasn't the best choice, I think some of the pattern detail was lost in the random seeming color changes. But I don't hate it, it has a nice fall earthy feel to it, that's not a bad thing.

I also added tassels to all the points:


And I LOVE how that turned out. I have a sleeveless black maxi dress that this is going to look great with once it's warm enough to wear it. 

I'm working on a rectangular shawl now, and I have another woodworking project that is a bit more involved, but it's not done yet, so you'll have to wait to hear about that one. That's mostly why I made this post, so I can make a whole separate post for that. I'll be back when that's done!

Wednesday, October 2, 2019

In a time of ancient gods, warlords and kings, a land in turmoil cried out for a hero.

She was Xena, a mighty princess forged in the heat of battle. The power...the passion...the danger. Her courage will change the world.


It's finally time. I've wanted to make Xena's outfit for a long time, but I've always been intimidated by the armor pieces and the weapons. Prop making is hard, man. And I've struggled with both the props I've made, but I feel like they came out well in the end and I learned a lot. So I'm going for it. I even have a Gabrielle, Amanda and I have always wanted to do a costume together, and I'm tall and dark and she's small and blonde. It's gonna be so great. If I don't lose my mind in the details.

Good god, the details.

I gave myself a week off after con, because con is always a pretty major thing, and then I got to work. If I was gonna get all this done, I needed as much time as I could manage. Back in February when my group was waffling on our costumes for Emerald City Comicon and I was itching for a project, I had bought some pleather fabric, some boots, beads and hardware for the costume, and found a few online tutorials and even some printable patterns for the armor that I was pretty excited about. I had a decent plan. I didn't get any real work done because then I had con, and then we moved over the summer, and with my previous job being a dumpster fire all the time, I just didn't have the energy for anything else. But things are better now and Halloween is coming!

So, to get started, I made a duct tape pattern for the corset with Stu's help- you know the drill, covered my torso in duct tape and drew the desired seamlines on it and cut it out. I used that for a pattern to make a mockup, which fit pretty well, just a little big all around because I hadn't made the seams quite wide enough, an easy fix when I sewed the final thing together. 


I also drew a circle around the boob of the side I didn't use for a pattern and cut that out to be the pattern for the cup of the breatplate.  I had to make a few adjustments to the way the bust fit, but everything looks pretty good. I've got it cut out of the pleather now, waiting to be sewn. I plan to construct it like a regular corset, I made the pattern while I was wearing a corset, fully boned and lined.

Next, I had to make sure all my patterns were the correct size. I got the patterns from here:

https://www.instructables.com/id/Xena-Costume/

She has a pattern for the corset, but she must have a short AF torso, because there was never a chance that would fit me. I didn't even look at it twice, I always knew I'd have to take the duct tape pattern route.  She also had a lot of construction ideas, but I don't like the way she did the armor. I plan to follow Kamui Cosplay's armor strategy, that I got here:

https://www.youtube.com/watch?v=CvTOZ3-guoc&t=222s

So. To make the patterns the right size for me, I took some measurements on myself to figure out  how big I wanted them, and then, using the information I got from the internet telling me that 96 pixels is 1 inch, resized the images to the correct proportions. I'm sure there's better ways to do this, I just don't know them so this is how I figured it out. I then took my images to https://rasterbator.net/ that would split my images into a multi-page PDF that I could then print off and use as a pattern printed out life size. All this really made me wish I had real Photoshop, because I'm pretty sure all of this is really easy to do with that.  Oh well. I got there. 

I printed out my patterns at Staples, since I no longer work in an office with a printer I can borrow, and I don't have a printer of my own.


Using some fancy math and looking at proportions of Xena holding her weapons, I figured out her sword should be about 27 inches for me, and the chakram should be 10, so those images were resized as well. I traced those designs onto some paper, took them outside and sprayed expanding foam all over them.

There's two so I could do top and bottom at the same time, since a can of spray foam is really a one time deal, there's no capping it off and using the rest later, it will seal itself. 


Well, I had miscalculated by using paper as the base. When the foam had fully cured, it looked like this:


It warped like CRAZY. I guess the top dried first and then the foam still wanted to expand so it went downwards and the paper didn't resist. I looked at that, and just thought, no. I don't have the skills, tools or patience to try and straighten that mess out. I went to Walmart and bought a plastic prop sword and figured I'd just use it as a base and overhaul it like I did for my Captain Hook hook.


Look at that sweet wolf head, man. That I'm going to completely remove. It was a child's toy, so too small for me, but that's just fine. I traced it on some EVA foam, and drew the outline of Xena's sword around that with the pattern I had made, I had to widen it a bit since this toy sword blade is a little wider than Xena's, but no big deal. I glued the foam to the edges with contact cement. Weirdly enough the edge of the blade was the same thickness as the foam. I planned to dremel down the edges to give it an actual sharp edge.


I think this also ended up closer to 30" long, but when I did 27", it felt short. So I exaggerated it a bit. 

I then ran a line of hot glue down the middle of the front and back to raise the center a bit so it could taper more to the edges, and then filled it in with Kwikseal bathroom and kitchen sealant, carefully smoothed down gradually to the edges on both sides. I cut off the wolf head and replaced it with a ball of thermoplastic beads carefully shaped into an oblong ball that I glued to the bottom. I don't feel the glue is super secure, despite it being e6000, but I plan to cover everything in Worbla to blend it all together, so that will hold it on. I think I'm gonna add some foam bits to the hilt before that though just to make the shape more accurate.


The chakram foam I had sprayed on posterboard and wasn't warped as badly, so I figured I could work with it. I started carving and it was going sort of okay, but there were some huuuuuuuuge bubbles in the foam. I started hot gluing discarded chunks of foam in the bubbles to get a more solid piece, but it was still really uneven. I started looking at covering everything in a layer of thin craft foam but it was still so bumpy and really, thicker than I wanted.


Uhhg. It's so ugly. 

I was about to try cutting it thinner, when I realized the thickness I wanted was about the same thickness of the floor tile EVA foam I'd been working with. So... I could... you know.... just cut a circle out of that.... and call it good.  And it would already be flat and everything. 


I felt so dumb. In the end I wasted an entire can of expanding foam. Not like it's expensive, it's just annoying. 

I cut some awkward triangle shaped strips that I glued around the edge with more contact cement just to give myself some vaguely pointed extra material to work with so I could sharpen it with my dremel as well. I did that and then ran more Kwikseal around the edge to smooth out the unevenness in places where the foam didn't match up well.


So, I mentioned I had bought some hardware and beads and things for this costume. About this time I decided I should pull that stuff out and keep all my costume supplies together. You might also remember I mentioned we moved over the summer.

Now, before we moved, we lived in a pretty big house with roommates, and there was an otherwise unused front room where I kept my massive bookshelves and all my crafting supplies. It was basically my workroom. I had an extra bookshelf with a bunch of baskets for organizing my various crafts, and one was dedicated for all the stuff I had bought for Xena and wanted to keep track of since it was going to be months until I made it.

And then we moved. To a small apartment where my workspace is a corner of the living room and my craft supplies are shoved into two small bookshelves in the laundry room. And my Xena hardware and beads were just... gone. I swear, I tore the apartment apart looking for that stuff. I spent hours looking everywhere, digging up hard to get to storage boxes just to rifle through them, going through my craft supplies over and over again. Nothing. My darling boyfriend could see I was distressed by the loss, both because of my own carelessness at somehow not putting this stuff in a safe place and the expense of replacing it, so he offered to rebuy the hardware kit for me. Isn't he great?

The hardware kit is here, by the way:

https://www.toddscostumes.com/costumes/xena-warrior-princess-costumes/xena-costume/xena-dress-hardware-kit/

Most of the hardware you need for the dress. I still need some stuff for the armor, but I already had a lot of what I needed, because I just collect stuff, and was able to order whatever else. I rebought the beads myself, they weren't as expensive. I needed abalone shell beads for the decorations on the sword and the chakram. It ended up not being the worst thing ever to rebuy, I had come to realize the sword had much larger shells on it. I'd have just dealt with it with the ones I bought before, but buying more meant I could throw some bigger ones in there. So not so bad. But I am still annoyed with myself for completely losing something so important. So careless.

The shell beads are here by the way:
https://www.ebay.com/itm/Natural-Abalone-Shell-Gemstone-Beads-15-5-Oval-Square-Coin-Oblong-Etc/372091050451?ssPageName=STRK%3AMEBIDX%3AIT&var=640978824390&_trksid=p2057872.m2749.l2649


So I've mostly been working on getting things cut out and ready to go. I cut out a waistband for the skirt, just measuring around my hips where I wanted the skirt to sit, and three inches wide, gradually widening to 4 at the middle, because Xena's skirt looks to have that kind of extra length in the front to me. I plan to use grommets and lacing to close the back, with some black booty shorts underneath.

I also cut out 13 big wide strips for the bottom layer of the skirt, about 15 inches long and 3 inches wide. (Protip: If you're making this yourself, the width of the strip with vary depending on your hips measurement. Just divide that measurement by 13.) Now, 15 inches is almost knee length on me, so I may shorten it. We'll see. I wouldn't want the skirt to get in the way while fighting, after all.


 I wanted each strip of petal thingies to be 11 pieces long, and I plan to allow 1.25" between the end of one petal to the end of the next petal. I have made myself a small square of wrapped up tape that is exactly that length, it was a trick I came up with when arranging the gold trim on my Captain Hook coat, having a small square of tape that was exactly the width I wanted between each piece of trim was way easier to maneuver than using a ruler or a tape measure.

I traced and cut out 146 small petals using the pattern from the instructable, which was no small feat, let me tell you what. And yes, I know that 13 strips of 11 means I need 143 petals, but I had just enough space on the strips of fabric I had cut for the petals to do three extras, and it seemed like a good idea, just in case I fuck something up.

Now about this time I was really getting bothered by the grey fabric back of the pleather I was using. For some reason, I was just haunted by how ugly it would look when I'm wearing it and moving around and the flaps of the skirt flipping over and showing that grey. It would be so out of place and clashy! And I realize I'm the only crazy bitch that would care about this! But it's my costume, I'll do what I want. And what I want is to spend several hours painting the back of all these pieces black. All thirteen strips and 146 petals. Technically 14 strips, because I was cutting them out 2 at a time on folded fabric and didn't see any reason to go to the effort of unfolding fabric, it wouldn't hurt to have an extra, for the same reason I cut out the extra petals. 


But look at the difference! I know there's no comparison for the petals, but look at the strips! The black looks so much better than the grey. 

I vaguely considered lining the strips and attaching the petals to a strip of black felt or something, but I didn't have any felt and didn't want to go buy anything else, this costume has cost me way more than it should have at this point considering how much I'd already bought for it. And I already had a bottle of black fabric paint, plus the textile medium I'd bought for Princess Peach and the gold paint details- I didn't have to worry about the issues I had with Peach's gold details, since I was painting the back of pleather. 

I've had some drama with the metal studs that go all over Xena's costume in various places. I found some that were the right color and size but dome shaped. I tried to convince myself that would be fine, but I just.... couldn't.... do it. It wasn't right. Xena's studs are flat. And I wanted the nailhead style with prongs, rather than traditional rivets, because I have to put a lot of these in this costume and rivets require hammering and I live in an upstairs apartment with asshole ceiling pounding downstairs neighbors. Now, because they're assholes, I don't go out of my way to be quiet, but I do try not to be a dick back, in case they ever want to complain about my noise. I don't want to give them a real solid complaint. Like hammering things on the floor. So when it comes time to hammer in grommets, I will go to Sarah's or Cari's or something and hang out there and do my hammering. But there are just... so many rivets in this costume. I need to be able to work on it at home, especially since my main crafting time is late at night while finishing my workday after Stu goes to bed. So I need to be able to quietly bend prongs. I also knew what size I wanted, I wanted something about 8mm, that was what size the dot was on the pattern for the petals I had printed out from the instructable.

And, apparently, 8 mm, flat, round, antique gold/bronze pronged nailhead studs just. Don't. Exist. I spent ALL DAY looking for them. In the end, the best I could do was everything right but the size, but I could find 9mm. And really, one millimeter is almost nothing. And my petals have ended up slightly larger than the pattern anyways. So it's fine. It's fine. IT'S FINE. 

God, I'm so crazy. 

The studs I got are here:

https://www.ebay.com/itm/PRONG-NAIL-HEAD-RIVETS-ALL-METAL-MANY-COLOR-SHAPE-SIZE-TO-CHOOSE-FROM-SHIP-USA/122001349788?ssPageName=STRK%3AMEBIDX%3AIT&var=421002752634&_trksid=p2057872.m2749.l2649


I have also spent a not insignificant amount of time making some patterns for things that the instructable didn't have. Luckily, some time ago I bought all of Xena on DVD so in the evenings I just put that on and craft away.

So first of all, I needed a pattern for the knee guards. You might notice, the instructable
 doesn't include a pattern for those. So I just had to sort of figure it out. I guessed roughly how long they were from point to top and cut out a piece of paper and covered it with duct tape, rounded the top edge and brought the bottom to a point. I did it all as one piece, but I believe I'll separate them when I actually make them. 


The picture of my pattern isn't very good, I have two circles, and three small curvy spiky things that are approximately the right shape to be arranged around the circles for both the top and bottom half. I don't really have any process info for you here, I really just freehanded it and trimmed the pieces of tape covered paper until they looked right. Technically my pattern isn't finished, I need to actually arrange and trace the design pieces so I know where everything is going to be placed, maybe I'll do that tonight once I'm done blogging. Also, I don't think it needs that strip down the middle, I think that's just where the row of zigzaggy rivets go. I think I'm going to use elastic on the back of this. I'd like to use grommets and lacing, but I don't think that will stay up, and will be really uncomfortable on the back of my knee. I think I'd like some kind of attachment to the boots as well to prevent slipping, but I haven't figured out that part yet.

So, I no longer have easy access to a scanner or anything to digitize this pattern and add it to the collection, so if you're making this costume and want the pattern, leave a comment. I'm not going to bother going to the effort to make a digital pattern just for display purposes, but if someone needs it for actual use, let me know.

So, a natural followup to the knee guards, the boots!  I did manage to keep track of the boots I bought way back in February, somehow. That and the pleather fabric are the only things I didn't lose.


They used to have a buckle and strap across the top, but I've already removed that. And put it in a safe place. Those buckles might be useful when adding straps to attach my armor.  I knew I was going to make boot covers to make them look like Xena's, and to add lacing up the front, so I took the basic duct tape pattern tactic.


I didn't even make a mockup. I was feeling lazy and boots are a pretty simple shape. I'll sew these together, glue them to the boots, along with an extra strip up the middle front for the lacing to go across, and add some rivets and lacing in the back for accuracy. And yes, I realize I'm going to seal the zippers on the sides of the boots shut, and yes I already tested to make sure I could slip them on without unzipping them, so I don't need the zippers. 


Like that.

And of course I plan to spend a thousand years painting and weathering everything so it looks like it actually belonged to a warrior princess. I actually bought baby's first airbrush and plan to learn to use it for exactly that purpose.

I had more pattern work, of course. I spent a not small amount of time cutting out all the details on the patterns with an xacto knife. And I came to realize I'd been thinking about the armband pattern wrong. I've also realized that either Lucy Lawless has some hella thick wrists, or thin upper forearms. Probably thick wrists, all that sword fighting, you know. Anyways, the pattern for the wristband is very straight and my wrists just taper too much. I originally tried to print it as a narrow long image to just go across the top of the forearms, but I hated how that warped the designs. So I resized it, and came up with a much better shape that wraps around my arm more. I still had to pull the bottom edges more, which I just did with the distort tool on pixlr.com, but it's way better now.


Left is the first version, right is the new better version.

Next, I needed to work on the cup pattern, general shape and all the embellishments. That was... not so easy.

The cup I had cut out from my duct tape pattern ended up being weirdly flat, when I really wanted a more spherical shape.

Yes, I KNOW boobs aren't spherical, but it's armor. It's not perfect. Back when I was buying supplies for this costume, I had bought a foam ball to shape my breastplate around, so I actually ended up making a painter's tape model of the foam ball, and then trimming and adjusting it until it ended up as a rounded cup shape that was somewhat right for my bust. Then using many images of Xena's armor, I roughly sketched out the decorations on the cup, taped them to the cup and traced them, peeled the tape off and cut it out to make a pattern for them.


That's what the blue and green things are. 

The last thing I had to do is an extra piece on the breastplate. On the side of the breastplate there is a little curly bit off the sides that attaches to the straps that hold the armor on.


You can see it there.

Again, I just freehanded it. Again, and again, and again.


That's how many times I redid it. The last one on the left is the final. And it's still not as perfect as it could be, but it's very close and I like the shape. So I'm done redoing it. 

So, ummmm. I think that's all I've done so far. I still have many, many things to do. I'm making Amanda's Gabrielle costume as well, but that should be easy, it's just a crop top, skirt, boots and a staff. I already bought a length of PVC pipe I'm going to paint and decorate, and I got almost perfect fabric from the thrift store, I just need to get her to come over so I can make some duct tape patterns. Should be easy. 

Should be.

Friday, August 31, 2018

Rose City ComiCon!

So. I don't think I've mentioned this, by some time ago, I was invited to go to Rose City Comicon in Portland with Matt and Cari. I obviously jumped right on top of that. That was kind of part of why I went to Wizard World Con, as a kind of baby training wheels con experience. Which I think worked out for me.

Anyways, I buy my passes and talk to Matt and Cari about plans and I find out that they have a group costume in mind. And of course I want to be part of that, why wouldn't I?  It turns out that John Barrowman:


God, he's pretty.

Is going to be there. And they want to do a costume to entertain him. So rather than choosing one of his obvious roles from like Doctor Who or Arrow, naturally they go with his bit part from The Producers:


  Sexiest. Gay. Nazi. Ever.

Damn.

So, basically we were all picking characters from this movie. There was lots of mind changing and switching around, but eventually everyone settled. Initially, I was going to be doing a Girl in Pearls:


And Danny was going to do a different Girl in Pearls a rather hilarious misfit girl with a big mop of red hair, that I cannot for the life of me find a picture of. 

It would have been hilarious and wonderful. But such a freaking chore to make. I was not looking forward to the time and expense, so I'm not gonna lie, I was a little relieved when that plan got changed to try to include more main characters.  So I wasn't sure exactly what I wanted to do. And then I remembered in our recent drunken watching of the movie, Cari had been pushing me hard to do the blue dress that Uma Thurman's character Ulla wears during the "That Face" number.


It is a beautiful dress. Really, what Cari wanted was for Stu and I to do that as a couples costume, but we all know how he feels about dressing up. Even if it's just a suit. And he has ended up deciding not to come anyways, which doesn't surprise me. A con is not at all something he would enjoy. However, I knew that Cari was doing a different Ulla outfit and I refused to do Ulla too. I felt like I would be hijacking her character. But then when I needed a new outfit I decided maybe it wouldn't be the end of the world. I checked with Cari and she said she was fine with it. I also debated doing Ulla's white dress from the beginning:


And I decided I would choose based on which one I was able to find supplies for easiest and cheapest. Although I was definitely leaning towards the blue dress, that thing is gorgeous.

So Cari and I made plans to go fabric shopping together. Neither one of us have ever had someone to geek out over costume making with before so it was pretty exciting. I still had a $25 gift card for Joann's that Stu's parents had given me for Christmas, I figured this would be a perfect use for this. Plus Joann's had a 25% off total purchase coupon as well. Very convenient. And then even more convenient, I had a company meeting at work where they had a raffle and I got lucky and won a $50 Visa card. My budget for my costume is now really good.

So Cari and I get to Joann's. We start at the pattern table because Cari still needs to find a good pattern for her outfit. I'm pretty sure I have a good pattern for the blue dress, and the white one is a pretty simple design, so I'm not too worried about finding a pattern, but there's no reason not to look, and maybe I can help Cari.

So, we've been sitting at the table for like 5 minutes, max. I flip straight to the formal wear section. And almost immediately, I find this.


I mean. Look at that.


It's the same. Damn. Dress. I mean, sure, it's missing the drape at the front and I'd need to take out the waist seam, but LOOK AT IT. I've never found such a perfect pattern for a costume. And of course, it just happens to be the brand of patterns that are on sale for $2 at the time. Cari even grabbed one for herself because she's always loved that blue dress too. So that pretty much sells me, I'm doing the blue dress. We spend some more time looking for patterns for Cari, and we find some stuff that's close enough, with some alterations. She's doing the version of Ulla from the Springtime for Hitler play where she's dressed up like a Nazi.

Now it's time to look for fabric.

So we wandered over to the special occasions fabric, figuring we'll start there. We walk down the aisle, Cari reaches up and grabs a bolt of blue mesh fabric, and throws it in the cart. "That's your top layer." She says. And she was right, it was exactly the color and drapey-ness I needed and it wasn't even super expensive. It was perfect. And we've been searching for fabric for less than a minute. We have a little more time trouble finding the bottom layer, and fabric for Cari, but eventually I stumble across a big bolt of some kind of athletic weave blue fabric that will work wonderfully. The texture is a little odd, but the mesh will cover that, no problem. And it's on clearance!

We found some things for Cari, and as we're standing around waiting to get our fabric cut, suddenly I spot this absolutely beautiful electric blue jersey. It's drapey and beautiful and exactly the right color, and also not expensive. It's hard to describe how perfect it was, I instantly fell in love like the clearance bolt never existed. It was everything I wanted. It's only flaw was that there ended up not being enough of it to get as much as I needed for the full length dress, so I decided to go with the knee length version, which was fine. The long one is amazing, but the short one is something I can legitimately just add to my regular wardrobe, it's just a pretty dress.

So we go to checkout with our fabric and various sewing notions and whatnot. They ring me up, scan my coupons, and it comes to $77 and change. And I don't know if you were paying attention, but with my gift cards, that means this cost me $2. Man, Cari was so mad at me. I've never had a costume or any project just fall into place like that. It was just the best feeling in the world. I couldn't believe it.
So, after that, I needed the rest of the accessories. For the wig, I had intentions of using polyester fabric dye to dye a white wig I had yellow, but that kinda turned out awful.


Yuck.

But then I happened to stumble across the perfect wig with the perfect hairstyle:


It even arrived in two days with free shipping. Just need to soften the curls a bit, which I did by gently running my fingers through it. I also plan to hang it upside down and lightly warm it with my hair dryer just to get a little more lift at the scalp, and it should work perfectly. Plus, in the meantime I get to freak put everyone I live with by attaching my with head to a stool and pinning the wig to it and leaving it standing around all creepy like. :D


For shoes, at Cari's suggestion I bought a pair of dance heels with the thought that dance heels are intended to not be painful since dancers kinda need their feet to function. And of course I find the perfect pair on sale while they're running a free shipping promotion. I wore them to work a few times just to break them in a little, and they really are the most comfortable heels ever. I'm gonna get two more pairs in black just for general wear.


I was able to find a pair of nude thigh high stockings super easy, those are common. And then I realize I'm gonna need a garter belt. It's visible in the slit on the right side of the dress. I wasn't really able to find a good one that I liked, so I decided to make one. And right about that time I get an email from Joann's with a $10 gift card because when I made my previous purchase they were running a "reward dollars" promotion if you spend so much money. So I run to Joann's and with that and more coupons and spend more nothing on the supplies for a simple elastic garter belt.

I also realized I wasn't sure if Ulla is wearing earrings in that scene. We ended up having a second movie viewing party where I was able to determine that there is something sparkly and blue on her ears, but it's impossible to really say what. Which I guess makes it easy. Digging into my own craft supplies I found a few options for sparkly blue jewels:


I ended up going with the oval ones because I liked that color better. I used some small stick on gems around the edge that I painted blue to add a little extra sparkle, and glued on earring posts. Bam. Done. 


It was nice because I made up my mind not to stress about the earrings, since you can barely tell she's wearing any.

So next was just actually putting the dress together. I started by making a mock-up out of a thrift store sheet because I needed to figure out how I was going to remove the waist seam. I ended up actually cutting the back bodice piece in half so that there was one bodice piece for each skirt piece. I taped them together and just eased across that part while cutting to smooth it out. It worked pretty well. I just sort of roughly cut it off at the knee, I wasn't too worried about length at this point.


I was shocked by how much extra fabric I had when I laid it out on the final fabric. The pattern called for about 9 yards, and I was only able to get 6, but look at this:


It's totally long enough to do the long dress! The skirt pieces are a little wide, but I'm almost positive that if I could unfolded the fabric and lay it out flat I could puzzle piece it together and have enough fabric. But that would have been a huuuuuuge pain in the ass, so I didn't. There's a tiny part of me that kind of regrets not doing that, the long dress is so elegant. But the rest of me that doesn't want to spend several painful hours crawling around on the floor and wants a nice regular wear dress knows it was the right decision. Especially since it has two layers. God, can you imagine if I was doing a lining too? Uuuuuuuuuuhhhhg.

So, I don't have a lot of progress pictures of actually sewing the dress, it was pretty straightforward, just connecting all the pieces. The only part that was weird was that I was adding an extra "seam" down the middle of each piece, because you can clearly see that Ulla's dress has more seams than my pattern. It made me feel a little like a crazy person, the first hour of my sewing was just sewing meaningless lines down the middle over and over again and connecting nothing. I had a pretty great moment though when I realized the jersey fabric I was using was stretchy enough that I didn't need a zipper. God, that was a good feeling. I hate zippers so much. Especially invisible ones.

So I got the dress assembled. I measured the length on myself and managed to get it cut at the right length. I ended up doubling up on the shoulder drape part, the amount of fabric the pattern uses initially was too small for how it looks in the picture of Ulla, so I just doubled up and made one piece slightly shorter so they'd stack.

The difficult part came when I needed to do the drapey twisty bit on the bust. I had a vague idea of a rectangle of gathered fabric twisted across the bust of the dress. Which is basically what I did, with much arranging and shifting. It's really hard to describe what I did, but I'll try.

So, my rectangle was like maybe a foot and a half wide and like two feet long, just to make sure I had plenty. I gathered it up until it was about four or five inches wide. I intended to attach it vertically, but it just wouldn't lay right. I eventually realized if I attached it horizontally along the top edge on the side of the bodice, and then twisted it in the middle and attached it to the other side it made the gathers lay much more nicely.

I ran into a problem when trying to figure this part out. I really needed it to be on a body to get the shape right, but because of the lack of zipper and my weight loss, I could not get this dress on my dress form. I'm really gonna have to remodel that thing. I tried hanging the dress or laying it out, but nothing helped me figure out the shape I needed. Finally, I found the correct solution. Meet Tempy, the temporary dress form:


Why yes, that is a bra hooked around a bed pillow and stuffed with scraps of fabric. It totally worked, too:


I think my next big project should be a new dress form. Or maybe a small project of at least carving this one down a bit so I can actually get things on the dress form.

Side note, this whole topic of my dress form being too big is just AMAZING for my self esteem.

It only took me a few evenings to finish the dress, it really we it together pretty smoothly. Which makes sense, this has been the most karmically perfect project. My issues have been very minor.


This is the only picture I have of me in the dress so far, and it's not a great one, but I will get more later. I'm really happy with it.

So, probably the biggest issue I had was about the garter belt. Joann's didn't have garter clips in the style I could see in the screen shot, but they did have some little metal clips with plastic teeth. They didn't look right but I figured I could paint them black and they'd work well enough. They're barely visible anyways. And I just happen to have black enamel paint that will hold up under use better, especially if I bake in on for hardness.

You might see where this is going.

So I paint the clips. I put them on a tray, preheat the oven, and stick them in at 350 degrees for half an hour. Once they'd been in there for about 15 minutes I remember THEY HAD PLASTIC TEETH AND I JUST PUT THEM IN THE OVEN. I immediately go pull them out, but it's much too late. The teeth are completely melted into each other and there's no saving them.

So I trashed them and went online where I was able to find black clips in the style of the screenshot on eBay and they only took a few days to arrive. No more messing around.

I went really simple with the garter belt. I cut a piece of black elastic to go around my waist and four pieces to go down the front and back of each leg. Stitched everything in place and we were good to go. The thing is barely visible in the costume, I wasn't gonna waste a lot of time it thought on it.
I also needed an apron, since I was doing the short dress and she wears an apron in that part of the scene. I used fabric I had on hand, hilariously enough it was the mock-up skirt I made for Princess Peach, still in skirt form, so I just cut it up. Big rectangle for the main piece, two small ones for pockets and ties. Easy peasy, like half an hour max. And I made sure the pockets were big enough to carry my phone so I shouldn't need to carry a purse, which is excellent.

At this point, all I have left is the barrettes she wears in her hair. I attempted to make some out of some alligator clips I had, but it looked weird, so I need to go get some actual barrettes, which won't be a big deal. So that means I'm basically done almost two weeks early! I like that. Nothing like the death stress of Princess Peach.

I have a few things to do still, I'm helping Cari out with some of the other stuff, I'm doing Danny's shorts, and I'd really like to get my parasol for Princess Peach done as well. I'm taking Peach to this con and entering her in the costume contest. I don't expect to get anything but I really feel like I need to try with how hard I work on these costumes. If I have time I'm gonna try to get my Toad purse done as well, but that's way down the priority list since I'll only be wearing Peach for the costume contest. Going to a real, big con is quite an investment thought, time and money wise. Well, I suppose it wouldn't have been so expensive if I hadn't purchased both a photo op and an autograph with David Tennant...

Oh, did I forget to mention that? I'm totally getting my picture taken with David Tennant. I might die. Like really. I decided to get the autograph too because Shannon is literally going to kill me when she finds out, so I thought maybe I'd be super nice and bring her back and autograph. Spoiled kid.

Well, I think that's all I've got for the moment. I'll be back later.