Thursday, November 14, 2019

Xena: Warrior Princess Costume DIY tutorial: Part Six: The Hair, The Eyes, The Makeup and Playing The Part

This is the sixth and final part of my multipart walkthrough for creating your own Xena: Warrior Princess costume. In this one we'll be covering all the finishing touches to make you a really convincing Xena.  The other parts are here:

Part One: The Corset
Part Two: The Skirt and The Boots
Part Three: The Main Armor Pieces: The Breastplate and the Backplate
Part Four: The Accessory Armor Pieces: The Shoulders, The Armbands, and the Kneeguards
Part Five: The Weapons
Part Six: The Hair, The Eyes, The Makeup and Playing The Part ***You are here***

This is likely to be a short post. Technically, none of this step is necessary, if you want to rock your own look in a badass warrior outfit, then fucking rock it. I believe Xena would agree. If you specifically want to look like Lucy Lawless then a few more tweaks can be made.

First of all, the hair.


Now, I was lucky enough to be born a brunette with a preference for keeping my hair long. And a few years back decided to get bangs and found out that I have just the best face shape for bangs and so have kept them. I also have developed a definite hatred for wigs based on past experiences. So when I realized I had the same basic hairstyle as Xena, I decided to just roll with it.

I had about half a bottle of Arctic Fox semi-permanent hair dye in Transylvania left over from my chain chomp cosplay back in March. So I dyed my hair black. Trust me on the brand, too. I tried a few others previously and none covered as nicely and as darkly as that one. And semi-permanent is nice if you're not looking to commit to color. I knew it would just wash out after a few weeks, and since my hair is already fairly dark, it would just be a gradual graceful fade.

Xena's hairstyle varies slightly, sometimes it's half up, sometimes it's got a few decorative braids. My favorite is the braided headband style. I'm sure if you're talented enough you can use your own hair to braid a headband across the top of your head. I am not that talented. Hair styling is definitely a weakness of mine. So, I bought a fake hair braided headband:

https://www.ebay.com/itm/Women-Girls-Braided-Faux-Wig-Elastic-Rope-Pretty-Plaited-Hair-Band-Headband/162266321538?ssPageName=STRK%3AMEBIDX%3AIT&_trksid=p2057872.m2749.l2649

Once my hair was dyed, all I had to do was make sure my hair was straight, which is as simple as blow drying it after showering, I didn't even find it necessary to use a straightener, and then put in the headband. Ridiculously easy. And then I didn't have to worry about fighting with a wig!

However, if you don't have the right hairstyle already, or just don't want to dye your hair, then I suppose you'll need a wig. I'd suggest not getting a cheap ebay wig, I've done that a few times and it's never a good idea. www.arda-wigs.com is a pretty well regarded site, although I can't say I've ever bought from there. You're welcome to get your wig wherever you like. It just needs to be somewhere just around your shoulder blades in length, and it needs to have bangs, which you'll have to trim to suit your own face. This is a pretty good basic tutorial for trimming wigs if you need more help:

https://www.youtube.com/watch?v=c-qLiicy3Yo

I'd still suggest getting the braided headband and wearing it over the wig, wigs aren't really suited to braiding.

That's it. The hair is really pretty simple.

Next, the eyes.


Now, I have naturally light greenish eyes, so I wasn't going to worry about the eyes originally. I figured I was close enough. But then I started watching the show. And I realized that the show just loves to give long lingering shots to her staring intensely with her absurdly vibrant blue eyes. So I decided I needed colored contacts. www.uniqso.com is my favorite site to buy colored prescription contacts, and the ones I got are here:

https://www.uniqso.com/products/sweety-k-crazy-lens-platonic-aqua?variant=13156465704983


So, here's the thing. I bought those in an effort to save a few dollars, they were cheaper than most of the others I looked at at the time. However, these were SUPER INTENSE. In fact, they were really a bit too much, and rather cartoonish.

Yeah, it's got a bit of a filter on it. It's a selfie, sue me. The eye color is accurate.

I ended up wishing I'd gone for something a bit more natural. The other not so fun part of those contacts is that the blue part was a solid opaque ring, and I could see it out all around the edges of my vision. After a few hours I'd gradually stop paying attention to it, but it was super annoying for a while. They will, however, completely cover your natural eye color, if you happen to have dark eyes. But there are also lots of other more natural options if you have lighter eyes and just want to make sure they're blue. Or maybe you already have blue eyes, you lucky bastard.

That website also allows you to easily select your prescription strength for each eye, if you need that. But I think they only go up to something like -12 or so. Works for me, but not everyone.

And then the makeup!


Yes, you should wear makeup. You're in costume. Why leave your face plain when the rest of you is dressed up? The good news is Xena's look is pretty subtle.

Now, I do wear makeup regularly, and my normal look is pretty neutral, but I did reference this post for extra tips:

http://gildedlilybeauty.blogspot.com/2013/11/xena-warrior-princess-make-up.html?m=1

My own process was very nearly the same as my daily makeup. Primer, foundation, concealer, powder. Contouring is definitely a good idea, Lucy's got some pretty bangin' cheekbones. I'm super bad at this, I added a little, but I was afraid to go too far. I'd suggest looking up some other makeup tutorials on that subject if you need it, it's an easy google search.

For my first Halloween party I didn't do much more than eyeliner and mascara but ended up feeling like my eyes were too plain. So the second time I kicked it up a bit. Liquid eyeliner along the top lid, and pencil liner from the center of the bottom lid to the outer corner. Neutral color all across the lid, and then a dark brown or black on an angled brush to blend upwards from the top eyeliner. Then just a little of the same dark eyeshadow blended into the crease. A few coats of mascara was all I needed to finish. The only thing that was different from my usual look was I didn't add the eyeliner wings I usually like to do. So that was easy enough for me.

I didn't even bother with lipstick. You could probably wear a nude lipstick if you wanted, but I was going to parties where there was going to be drinking, why worry about reapplying a lipstick when I just needed my natural lipcolor?

Xena's look is really a pretty simple one. Even if you don't wear makeup you can totally handle this.

All you need now is the attitude. You don't take any shit, and you laugh in battle. You find short irritating blondes irresistible. And of course, the warcry. You know the one. I just screamed "AIYIYIYIYIYIYI!" At the top of my lungs, as high and loud as I could. It's a real party stopper, let me tell you what. Unfortunately I never did learn how to do those crazy flips.

And that's it. It's kind of incredible after all this time and work, it kind of seemed like it was never going to end when I was working on it. But I did eventually finish. And now so have you! Enjoy your amazing new costume and all the admiration and compliments you're about to get. And for god's sake, put on the knee guards and boots before you put on the corset. Trust me on this.

Kick ass, warrior princess.


Wednesday, November 13, 2019

Xena: Warrior Princess Costume DIY tutorial: Part Five: The Weapons

This is the fifth part of my multipart walkthrough for creating your own Xena: Warrior Princess costume. In this one we'll be covering the weapons, just so important for any warrior.  The other parts are here:

Part One: The Corset
Part Two: The Skirt and The Boots
Part Three: The Main Armor Pieces: The Breastplate and the Backplate
Part Four: The Accessory Armor Pieces: The Shoulders, The Armbands, and the Kneeguards
Part Five: The Weapons ***You are here***
Part Six: The Hair, The Eyes, The Makeup and Playing The Part

PART FIVE

THE WEAPONS


Unfortunately, time did not allow me to make Xena's whip as well, but I did cover the sword and chakram. Let's start with the chakram, I think we all know that's the more iconic piece.

Materials:

about 1 medium sheet of Worbla
10mm EVA foam
5mm craft foam
wood glue, gesso, or desired primer
sandable spray primer/filler
18 coin shaped abalone shell beads in 10mm diameter
Spray Plastidip
wood burner tool
sandpaper in medium and super fine grits
gold and silver paint- your preferred painting method
black acrylic paint
clear spray varnish
dremel with a grinding bit

So, take note up above, Xena's chakram looks different on each side. So. Let's start with patterns!

https://www.instructables.com/id/Xena-Costume/

https://www.instructables.com/id/Xena-Costume/

Based on screenshots, I figured that my chakram should be about 10" across, so I resized and printed the patterns at that size.

I made multiple mistakes in the process of this chakram, please please please read through my process so you don't. You may notice my materials list doesn't mention some things I'm about to use, like expanding insulation foam, because some of my attempts got totally scrapped.

So, my first thought was expanding insulation foam. It's just such a nice way to make whatever shape you need. So I sprayed some foam onto some posterboard in a roughly circular shape.


Obviously I did the sword at the same time, but we're not talking about that yet.

So, I let the foam cure and got this:


Spoiler alert: It did not go well.

The sword pieces were horribly warped, but we'll get to that. The chakram pieces weren't as bad so I thought I could still use them.

I cut them out and glued them together and started carving. There were a lot of big bubbles, so I started gluing chunks of foam into the gaps. As I was working on this I realized this was not going well. And it was still a little too thick.


And then I looked at it. And realized the thickness I wanted was basically the 10mm EVA foam. And then I felt dumb.

So I threw away the expanding foam chakram and cut out a new one from the foam tiles. I took some scraps and cut some angled strips and glued these around the edge to add a little bit for the sharp edge, I worried dremeling a sharp point would take off too much and make it too small. ANOTHER SPOILER ALERT: I was wrong. Do not do this. You don't need to add anything for the sharp edge.

Once the glue was set I dremeled it down a bit to try and make it smooth, and then smeared Kwikseal sealant around the edges to fill in what still wasn't smooth.


Once that was done I covered it in Worbla. This piece is pretty straighforward, just cut out rings of Worbla, heat and press. If you've already done the armor you should be an old veteran at this by now, and this is a really easy shape. The hardest part is just making sure the blade edge cools straight and not wavy.

Once the Worbla is done, you'll need to prime it. We've already talked about Worbla's sandy texture, we can't have that for a metal weapon. Plus if you're like me and you used a floor tile for foam, one side has a very bumpy texture and you're going to need to make sure that doesn't show.

I used the same homemade gesso I used for the breastplate, 50/50 mix drywall joint compound and Elmer's white glue. Two or three coats, sanding between each coat. Then I gave it two coats of the spray primer/filler with more sanding. It was pretty smooth by this point.

So I cut out the designs from my patterns and laid them on the chakram to see how it looked.


I can't describe the way my stomach dropped when I saw this. That looks AWFUL. It's all uneven and lumpy and I just couldn't stand it. No matter how many people tell me I'm crazy. So I scrapped it again.

This time, I decided to go with 5mm foam. I had felt like the 10mm was a little thick, so I took the opportunity to try a thinner foam. I cut out a new foam circle, and due to lack of time only trimmed the square edges rather than dremeling (another mistake) and covered this new foam ring with Worbla. I added a thin snake of Worbla all around the edge to give it the blade edge (which was ALSO a mistake) but it did come out okay.

The next problem was that this chakram really didn't want to cool flat. When all the Worbla cooled it ended up a bit warped. So I heated it and spent it's cooling time pressing it into the table and flipping it and pressing it again over and over to try and get it flat. It cooled warped. So I heated it again, pressed it into the table and placed my cutting mat over it and let it cool. It cooled warped. So I heated it AGAIN and pressed it into the table, pressed the cutting mat over it, and placed a large frying pan full of water on top of it and left it there for FOUR HOURS AND IT COOLED WARPED. I gave up at that point. I was running out of time.


The is where we ended up. It is more even than the first one, but because I added the extra Worbla for the blade it still ended up a bit too wide. But I wasn't going to start over again.

I primed and sanded it again, but I was out of the spray primer so I couldn't get it quite as smooth, so I ended up using some spackle to smooth it out a bit more. I guess it worked, but the spackle wasn't the best choice, I came to realize later.

Once it was nice and smooth, I taped the pattern to the chakram. This is where the wood burner comes in. If you have skill with carving designs with a dremel, that might be a better choice, you can carve the designs in with an engraving bit of some kind. I have terrible control with my basic one speed dremel so I didn't dare. With the pattern taped to the chakram I just traced around the outlines with the wood burner, carving the edges and the circles where the abalone shell beads would go.

By the way, the beads I got are here:

https://www.ebay.com/itm/Natural-Abalone-Shell-Gemstone-Beads-15-5-Oval-Square-Coin-Oblong-Etc/372091050451?ssPageName=STRK%3AMEBIDX%3AIT&var=640978824390&_trksid=p2057872.m2749.l2649

One strand gets you more than twice as many as you need. And I learned from experiments you can totally sand them if you need to to get them smooth with the surface of your chakram, all you have to do is put a new glossy topcoat on them after sanding and they're as good as new.

Putting the abalone shell beads in was actually kind of fun. Once I'd marked out where they went I'd just stab the circle repeatedly with the woodburner until the Worbla and the foam underneath were soft and melty, and then I could just press the bead into place and hold it there while everything cooled. That way I was able to sink the beads in so they would be flush with the surface of the chakram, and the adhesive properties of the Worbla glued the beads in place.


The downside of the spackle wasn't obvious on this side, but on the other side where it's got the sharper pointed designs I had an issue with the spackle crumbling where I tried to carve the points. So the other side is a little messy. I would have loved to start over again and do it properly with gesso and spray primer and no extra added on for the blade edge but I was out of time before the party I planned to wear this to and couldn't afford to start over.

Also, I realize it might not make sense to put the beads in before painting, but I didn't want to do the woodburning over paint, I had some concerns about fumes and burning things. So I cut out small circles of painter's tape to cover the beads so I could paint freely. I sprayed it down with Plastidip, and then due to the fact that I had run out of gold Rub N Buff, used my airbrush to paint the gold parts. I then used silver Rub N Buff for the silver sections, it was pretty easy to be careful and not get it onto the gold parts. I rubbed it down with watered down black acrylic paint to weather it, but later wished I hadn't done that either, Xena's chakram is pretty shiny and flashy. A few coats of spray varnish later and the chakram was done.


In the end I'm not unhappy with what I made, but good lord I struggled with this, and I still feel like it's kind of a weak point in my costume. I still kind of want to scrap it and make a new one....

But it's time to move to the next weapon. 

The sword!


Materials:

about 1 medium sheet of Worbla
thermoplastic beads
10mm EVA foam
Kwikseal bathroom and kitchen sealant
wood glue, gesso, or desired primer
sandable spray primer/filler
7 coin shaped abalone shell beads in 16mm diameter
Spray Plastidip
wood burner tool
sandpaper in medium and super fine grits
gold and silver paint- your preferred painting method
black acrylic paint
clear spray varnish
dremel with a grinding bit
hot glue gun
hacksaw
toy sword

Based on other tutorials my idea was to carve it out of expanding foam and cover it with Worbla. If you remember from the earlier pictures, my expanding foam turned out like this:


I think what happened is the outside dried first and when the foam wanted to keep expanding, didn't have anywhere to go but down. And unfortunately I had sprayed it on paper, which did not resist the push of the expanding foam. Sure, theoretically if I was good at carving I still could have come up with the sword shape out of this, but I realized immediately that it was going to take an absurd amount of time and effort and I seriously doubted I had the skill. So I trashed it. And based on my previous experience with prop making, and my boyfriend's suggestion, I decided to go buy a toy sword and overhaul it, like I did for my Captain Hook hook.

A quick trip to Walmart through the Halloween section and I came back with this:


Look at that sweet wolf's head, isn't it cool? 

Yeah, this thing is going to look 100% different by the time I'm done. 

Now, if you want to make something from scratch, you will need PVC pipe and EVA foam, you can just trace and cut out the shape of the sword out of several layers and glue it around the PVC pipe and then dremel it into shape. I could have done this, it was within my abilities most likely, but I was nervous. And my Captain Hook hook went really well. With everything else I was doing I decided the base sword would simplify my life. And for the record, the expanding foam idea might have worked if I had sprayed it directly onto this toy sword and then carved it down into the shape I needed, with the toy sword as a core to base what I was doing on.

So, when printing out my patterns, I'd found a nice straight on image of the sword:


I'd done some math looking at screenshots and figured I needed the sword to be about 27" long, and had resized this image and printed it at that size. I cut it out and traced the shape onto 10mm foam. Then I laid the toy sword over top and traced that to show me how much foam I needed to add to make it the right size. Then I glued it to the edges of the sword. Interestingly enough, the thickness of the plastic blade perfectly matched the foam.


I also ended up deciding the 27" was too short and added a few inches, it ended up closer to 30".

I am aware that my blade is much larger than the pattern's. I had to work with the toy sword base, and I didn't want to try cutting it down. This is where making one from scratch with PVC pipe and EVA foam might have been better- it would have been easier to get a more accurate shape. 

I dremeled the edges to give it a nice sharp edge and smooth the seams. Then I ran a line of hot glue right down the middle of the blade on both sides, and then spent a great deal of time covering the blade with Kwikseal and smoothing it to taper from the middle of the blade to the edge.

I also took my hacksaw and cut off the wolf head and replaced it with a big wad of thermoplastic beads that I carefully shaped into an oblong oval shape, pressed the end of the hilt into it to make a divot that it would settle into, and once it had cooled, glued to the end of the sword. 

I bought my thermoplastic beads here:


They're super cool, you just dump a handful of them into boiling water, wait until they turn clear, pull them out with a spoon, and mold them into whatever you want. I've already found hundreds of uses for them, I recommend getting a big bag. They're just like the Worbla too, extra bits you cut off or don't use can be remelted and reused.


I had thought I wouldn't need to worry about the shape of the guard too much because it was fairly close, but after looking at it I decided it wasn't really close enough. So I ended up hacksawing off the ends of the guard, and using my paper pattern traced the shape of the ends of the guard onto 10mm foam, it took two layers for each end, and then glued them in place. 

Next came covering it in Worbla. I traced it twice on a sheet of Worbla, for the front and back, making sure to leave extra around the edges because the sword was a little thicker than anything I'd covered in Worbla so far, I needed to make sure there was enough Worbla to wrap around. Covering it in Worbla is the same as everything else, heat and press. 

Things to keep in mind: The pommel- the round thing at the end of the sword, if you don't know sword terminology, although I realize if you're a big enough nerd to cosplay you probably know sword terms- is made out of thermoplastic. When you heat the Worbla and lay the sword on your Worbla work board and then keep everything warm as you press the Worbla down, you will quite likely start to melt the pommel. Also, if you used my method and put a line of hot glue down the middle of the blade, that'll probably try to melt as well. That part is actually helpful, you can squish the hot glue at the tip down to sharpen the point a bit. Getting the pommel covered in Worbla did take adding some extra scraps and heating and squishing, which got the pommel pretty melty- I had thermoplastic oozing a bit between gaps in the Worbla. But once I got it covered I could just squish it back into shape and let it cool, so not a big deal. 

Next I needed to add the details. I added some long triangles to the base of the blade, one large one and one smaller one. You can use the paper pattern or just freehand it. I made some strips of Worbla  out of scraps and wrapped it in an X around the middle of the guard where the blade met. Then I made some disks of Worbla that I attached to the center of the guard over the center of the X on both sides. I made an oblong disk that I stuck to the bottom of the pommel as well. While all the disks were hot I pressed one of the 16mm abalone shell beads into the center of each disk to make an indent for where the beads would be glued in. I also heated the Worbla on the ends of the guard and made bead indents there as well. I also made sure to squish and straighten the edges to make a nice blade edge.


Next up was priming. I used my homemade gesso and sanding between each coats, and then a few coats of spray primer and more sanding. Just like with the armor I wasn't too worried about a perfect surface, Xena's sword has got some pretty noticeable wear marks, so it didn't need to have a mirror finish.


Once that was done I used my wood burning tool to soften up the indents I'd made for the beads and pressed the beads into them, just like I did with the chakram, and then covered them with circles of painter's tape for painting. I sprayed it with a coat of black Plastidip, airbrushed the hilt and the details on the blade gold, then covered the blade with silver Rub N Buff. I spread the handle grip in E6000 glue and then wrapped it in suede leather cord, that I lightly brushed with black Rub N Buff to darken it. I didn't want to go buy black cord, so I worked with what I had. To weather everything a bit I just used watered down black acrylic paint and a sock and rubbed it down. I gave it a few coats of semi-gloss polycrylic, removed the tape circles, and it was finished!


I'll be honest. I'm not super thrilled with the lumpiness of the blade. But I'm pretty proud of the hilt. I would also like to remake this using the PVC pipe and EVA foam method, I do think that's the better option. But for my first sword ever I'm not too unhappy. 

However! There was one important thing missing. Was I planning to just carry the sword around all the time? Definitely not! I needed a sheath. 

The sheath is pretty simple.


Materials:

5mm craft foam
contact cement
half a yard of pleather
Worbla scraps
leather cord
suede cord
3 16mm abalone shell beads
hooks or lobster claw clips
gold paint
black paint
brown fabric paint

I laid the sword on a sheet of 5mm foam and traced a generous outline of the sword blade up to the hilt. I cut it out twice and glued the edges together with contact cement. If you force the foam to bend around to glue the edges flat to each other the curving foam will naturally hold itself open for the sword. I then traced the foam core onto pleather with a wide ragged edge on one side and extra at the top to tuck over. I sewed it closed on the straight edge, then lightly glued it around the foam core. I didn't stress too much about the glue, it was just for safety. I then stitched down the open end as close to the foam core as I could. I used a zipper foot, but it still wasn't easy, that kind of shape just isn't meant to go through a sewing machine. 

I trimmed the flap on the ragged edge to match up with the opening of the sheath, and took the excess fabric around the top of the foam core and tucked it inside, gluing it down.

After that I took some suede cord and braided it. In order to get it thick enough I had to double up the strands. I cut it exactly as long as was needed to wrap around the sheath, and made 2 of them. Then I glued them on with E6000. I had to sort of manually hold them in place while the glue set, but I was just sitting around watching Xena anyways.

I made three disks of Worbla scraps and pressed 16mm bead imprints into them. Due to Worbla's wonderful tendency to fuse to my pleather, all I had to do was press them in place, no need to worry about gluing. I gave them a few coats of wood glue, painted them gold and glued the beads in the indents. A little watered down black paint for weathering and they were good to go. 

I used my leather punch on the smallest size and punched holes a little less than an inch apart all along the seam on the ragged edge of the sheath and wove leather cord through the holes. I just used a tiny drop of super glue at each end of the cord to fix it in place.  I took a pair of scissors to the edge of the ragged piece and just sort of roughly chopped it. I also took a bit of brown fabric paint and painted the inside of the ragged flaps so it would look more leather-like when it flapped around. 

To hook the sheath to myself I took some lobster claw clips I had scavenged from the same old purse I'd used the straps from previously. With scraps of Worbla I made some strips that I fed through the loops on the hooks and then pressed into the back of the sheath. It requires some help from a friend, but when I'm dressed up the top clip hooks to the O ring in the back of my corset, and the bottom clip hooked to the laces of the corset further down. It sat perfectly over my shoulder where I could easily draw it. And attempt to put it back... Aiming for the sheath over my shoulder was a little more complicated.

And that was it. Easy peasy. 


The nice part is that the sheath is nice and soft and flexible so if I take the sword out it doesn't prevent me from sitting back and leaning against it. It squishes and bounces right back. I also had a Deadpool at one of the Halloween parties I went to that found it quite entertaining to sneak up behind me and steal the sword, which was shockingly possible. I never thought I wouldn't notice the change in weight, but he got away with it repeatedly.

Well, you're a properly armed warrior now! There's just a few little details to wrap up. But we will cover that in the next, and final post.

Part Six: The Hair, The Eyes, The Makeup and Playing The Part

Tuesday, November 12, 2019

Xena: Warrior Princess Costume DIY tutorial: Part Four: The Accessory Armor Pieces: The Shoulders, The Armbands, and the Kneeguards

This is the fourth part of my multipart walkthrough for creating your own Xena: Warrior Princess costume. In this one we'll be covering the accessory armor pieces, the upper armband, the lower armguards, the shoulders and the kneeguards.  The other parts are here:

Part One: The Corset
Part Two: The Skirt and The Boots
Part Three: The Main Armor Pieces: The Breastplate and the Backplate
Part Four: The Accessory Armor Pieces: The Shoulders, The Armbands, and the Kneeguards ***You are here***
Part Five: The Weapons
Part Six: The Hair, The Eyes, The Makeup and Playing The Part

PART FIVE

THE ACCESSORY ARMOR PIECES: ARMBANDS, ARMGUARDS, SHOULDERS AND KNEEGUARDS


So, I would think this post won't be quite as long because we already covered working with Worbla pretty thoroughly in the last post. But there's a few different aspects to these pieces, and the knee guards were a whole other thing.

Materials:

about 2 medium sized sheets of Worbla
2mm craft foam
SHARP Xacto knife
heat gun
sculpting tools
About 200 4 pronged flat antique bronze studs
~2 yds of pleather
~2 yds black lining fabric
heat proof place to work with the Worbla- we covered making a work board in the previous post
cutting mat
wood glue, gesso or primer of choice for smoothing the Worbla
Antique Gold Rub N Buff
black acrylic paint
Optional- airbrush and black airbrush paint
~1 yd 1" wide elastic
wire cutters
20-30 size 0 antique gold grommets
grommet setting tool
rubber mallet
leather punch
cord for lacing

We'll start with the armbands. And lead directly into the shoulders, really, the technique was the same for all these pieces. First of all, some patterns!

https://www.instructables.com/id/Xena-Costume/

https://www.instructables.com/id/Xena-Costume/

https://www.instructables.com/id/Xena-Costume/

IMPORTANT NOTE: After I was done with these, I wish I had done them a different way, which I will cover after I've told you what I did so you can see why I wish I'd done it differently. This method still gives a good result, but I believe there's a better way now that I understand things a little better.

So, I resized all of these based on my measurements. I wanted the shoulder pieces to be about 8" from longest point to longest point, and to extend about 4" wide. My upper armbands needed to be about 12" around and about 3" wide. For the lower armbands they needed to be 10" around at the upper forearm and 6" around at the wrist.

The shoulder and upper armband were easy to resize, mostly I just focused on the length and the width ended up close enough to what I wanted. I sized the images just a little smaller than my measurements since these patterns would be cut out of Worbla and glued to pleather bases that I would want to be the actual measurements of my arms.

The lower armband was a problem. If you check out the source for these patterns, you might notice the lower armbands are extremely rectangular shaped. And based on the way the designs wrap around Xena's arms, and the length that they need to be to fit properly, I'm forced to assume that Lucy Lawless has some thick ass wrists. Or thin upper arms. But based on the sword play I tend think it's probably the former. Anyways, there is a much bigger difference in the circumference of my wrists and forearms than there appears to be for the original armband pattern. So I uploaded the image to pixlr.com, my favorite basic photoshop knockoff, used the distort tool and just brought those bottom corners in a bit until it would fit the way I wanted on my armbands with my measurements. If you have good thick sword fighting wrists, feel free to use the original pattern linked in the caption of that image.

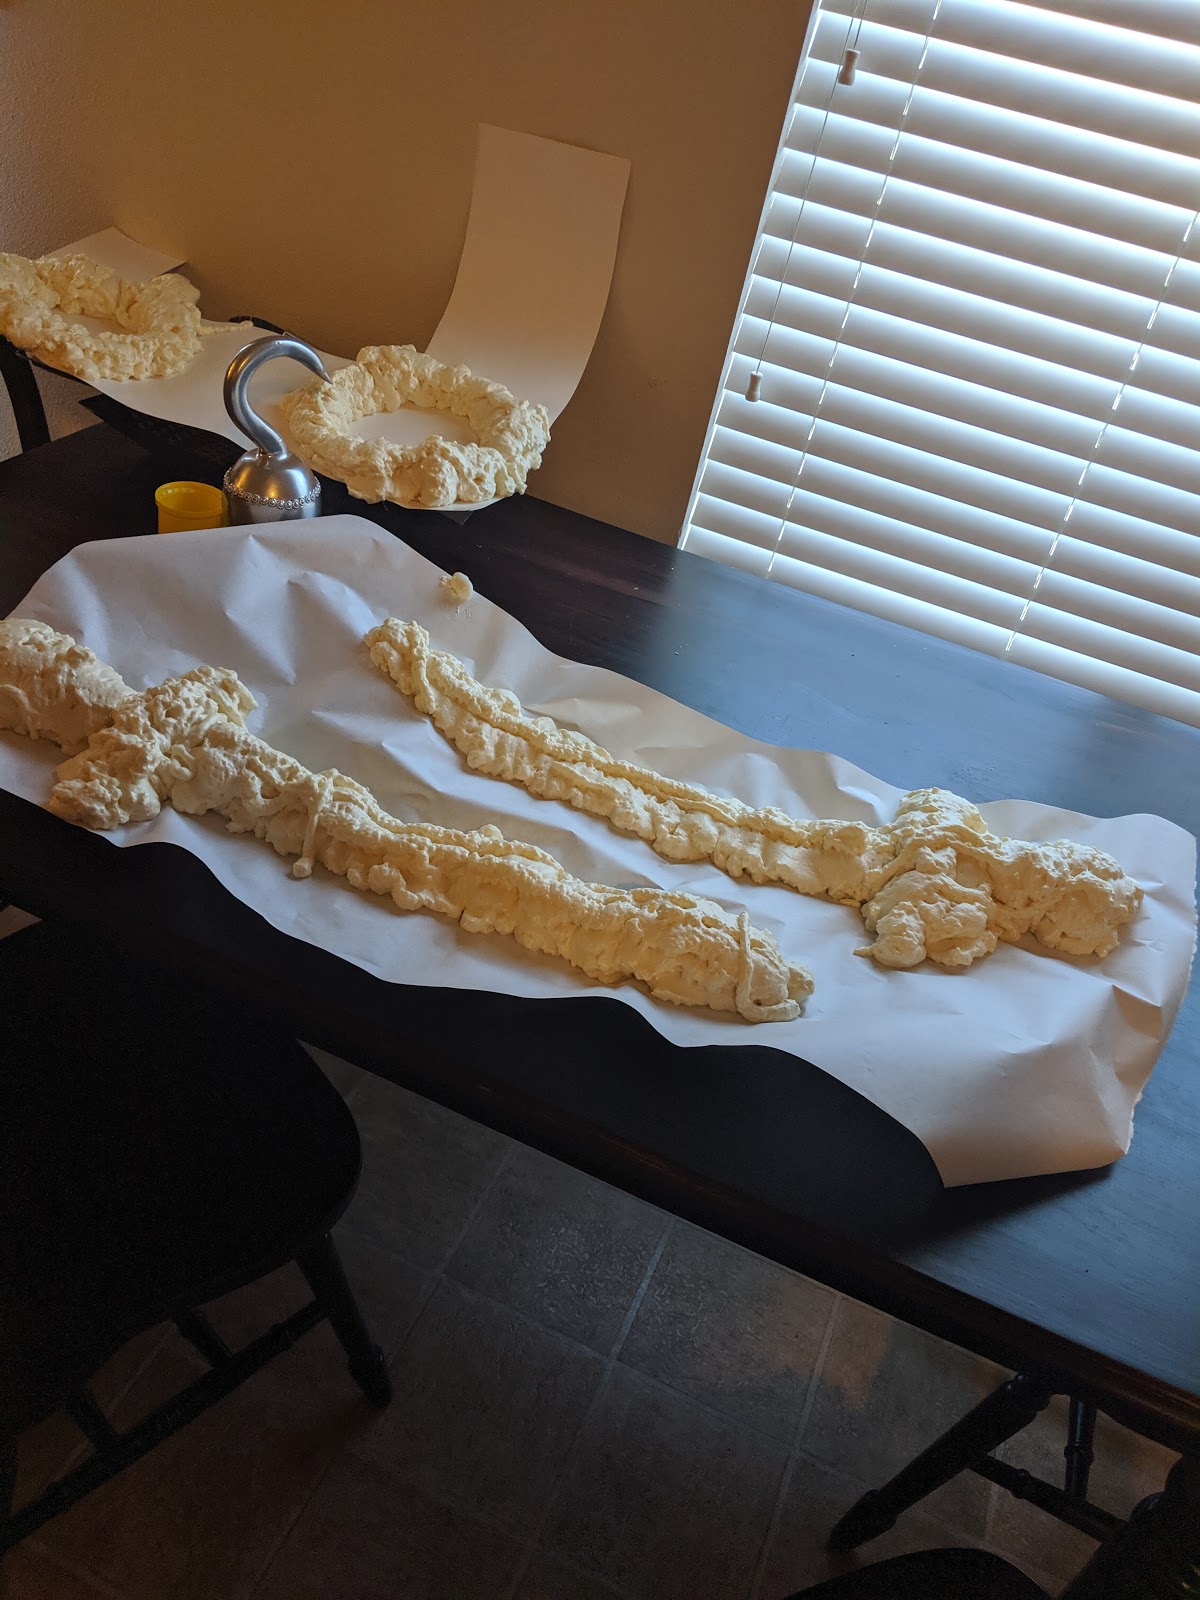
So, initally I traced these onto the 10mm EVA foam and cut out the main shape only to realize that the amount of time and effort I'd spend sanding and carving and cutting the foam to get it to look right was going to be maddening and probably be too thick in the end. So I scrapped that idea. And instead I cut them out of 2mm craft foam.


It took some time with all those details, but it wasn't too bad.

Next up, those foam pieces need to be covered in Worbla. So the method was the same as the breastplate and backplate. Cut out two of each piece you're making, heat up one piece, stick it to the back of the foam, heat up another piece and stick it to the front of the foam and then press in all the details to define them. You will really want your sculpting tools here, there's so many tiny details.

It's important to note that there is a definite top and bottom to these. The top is where you're going to spend all your time carefully pressing the Worbla around the details and it's going to look much neater and nicer, so make sure you remember to do the shoulders facing opposite directions so they'll both look good on top going the right way. Technically I suppose the upper armbands should have a left and a right as well, but the designs are so close to being reversible that no one will notice if they're not perfectly mirrored. I can tell you I've paid exactly zero attention to which armband I'm putting on which arm and which way it's facing. It really doesn't matter. And the lower armbands are exactly the same, no need to worry there.

Once you've got the Worbla pressed neatly into all the details comes the most fun part, cutting out all the extra Worbla. You remember the fun dance we did with the other armor pieces of heating the Worbla, moving it to the cutting mat, cutting a little, unsticking it from the cutting mat, cutting, unsticking, reheating and repeating? Yeah. Get ready to spend the rest of your life doing that.

The day I did this, I sat at the kitchen table to start at about 3 in the afternoon. I didn't finish until 3 in the morning. And I don't want you to think I was slacking, I only stopped for bathroom and brief food breaks. This is a hell of a chore and requires massive amounts of patience. It is, unfortunately, necessary. With this method, anyways. I have another idea on how I would do this if I started over.


You will notice here that I ignored the fact that all of the metal piece on Xena's armor have that ridged line down the middle of everything, almost like a lightly folded point. My method does not really allow for that. I suppose technically you can try to squish it into a point along all the middle of the designs, which would take a lot of time and might not work, or you could add snakes of extra Worbla and squish them into ridges like I did on the breastplate, but that would make them thicker, probably too thick, and would also take a lot of extra time and work.

So, my other idea is based on the little scrolly curlicues I did on the backplate. Basically I would lay out the pattern for the armbands, and roll out a bunch of little Worbla snakes that I would arrange in the various designs. No foam base needed. These would also be really easy to squish flatter and shape the little ridge down the middle of everything. I do have some concerns that these might be hard to squish flat enough, particularly in the borders around the designs of the armbands, so I thing it might also work to cut strips and stack them together, I think a double thickness of Worbla would be thick enough to be squished into a slight ridge down the middle to give that lightly folded look. I'd probably to do the strips for the borders and the snakes for all the curly designs. The shoulders would be all snakes. I think this would give a better three dimensional look, without being too thick, which is what adding Worbla to the flat foam cored pieces would do.

So, the main thing with this alternate method, is it will make your life a thousand times easier to arrange the patterns directly on the pleather base of the pieces. That way you don't have to worry about reheating and forming them to yourself, and worry about stretching and ruining your carefully crafted curlicues. So we're going to cover the pleather bases now.

(side note. Carefully crafted curlicues is my new favorite phrase.)

There's nothing super complicated here. Basically I used the design patterns to cut out pieces of pleather just a bit larger than the designs. Keep in mind you need to leave like an inch or so on the ends so you have space to add grommets to lace them closed. I did not pay enough attention to this, and barely had enough room on mine. Make sure you leave at least a small seam allowance as well.

You'll also want to cut the base out of black fabric for the back side that goes against your skin. Sew the tops and bottoms together, right sides together and turn it right side out. Next, you'll want a 2mm foam core just to give the armbands some body and thickness. I found it easier to use the sewn pleather pieces to trace the foam core, since it needs to fit inside the seams. Fit the foam inside the fabric.

So, if you're following my method with the flat designs, you will now want to form these pieces to your arms. (We'll cover the shoulders in a moment.)

COMMON SENSE DUMMY MOMENT: Form these to your dominant arm. I know it's easier to form them to your non-dominant arm because you want to use your dominant hand to do the work, but that's a terrible idea. Fun fact: Your dominant arm is probably slightly thicker than your non-dominant arm, since it's the one you probably use for everything. If you make the same mistake I did and form this to your non-dominant arm, it's gonna be snug and uncomfortable on your dominant arm.

Ask me how I know.

So, basically what I did was I wrapped the foam core pleather pieces around my arm and held them in place with a strip of painter's tape. No, I did not sew the edges closed at this point. I could have, but I know that when you curved this around your arm, the fabric and foam were going to shift, if I sewed it while it was flat it would probably warp weirdly when I wrapped it around my arm.

My plan was to form the Worbla pieces, remove them so I could paint them without have to worry about getting paint on the base, add the grommets to the pleather, and glue the Worbla to the pleather. So, one at a time, I taped on a pleather piece, heated the corresponding Worbla piece and carefully lined up and pressed it to the pleather, wrapping it around my arm. I made sure to let it cool in place so it would hold it's shape.


Please pay no attention to my makeup-less sleep deprived face. I'm not kidding when I say this costume was a process. And I get really intense and focused when I'm deep in a complicated project. Things like sleep and my appearance are really irrelevant.

It was at this point that I learned something important. The adhesive in Worbla absolutely, 100%, irrevocably, irretrievably fuses to the pleather I was working with. There was absolutely no way I was ever going to remove these from the pleather to finish the grommets or paint the Worbla pieces separately. The second I pressed the warm Worbla into the pleather, the game was over. That was where they lived now. Which saved me from worrying about using the right glue to make sure they stayed attached, but meant I was doomed to have to be careful about painting. And I was now unable to use any kind of spray primer or varnish on them.

It also meant adding grommets was going to be a royal pain in the ass, since those Worbla pieces were absolutely going to make it difficult to get the proper angle for hammering. And they absolutely did. I added the grommets next, which was quite a challenge, but I managed. I do feel like maybe I should have used smaller grommets, the size 0 seems a bit big. I'd probably have been better off with 00, but I was working with what I had on hand.

I used tiny narrow strips of Worbla wrapped around to seal the unsewn edges of the armbands, based on the fact that I hadn't really left enough fabric on the edges to finish the edge any other way. If you're smarter about it you can probably leave more fabric, tuck it to the inside and sew it down, which might be nicer. But I had to adapt based on my previous mistakes.

If you're following my alternate ideas for these armbands, the process of making the pleather foam core base is the same, but I would suggest tracing the pattern designs onto the pleather with a sharpie or something before shaping, while it's still flat. Then there's a pretty solid argument to be made for using a Worbla core instead of foam with this method as well. You can then form it around your arm and let it cool, and that way it will give you a rigid shape to sculpt the curlicues directly on to, which is why you will want to have traced the designs on the pleather before shaping it around your arm. That will be so much more difficult on a curve. Again, this is only a theory, but I believe it would end up looking better and more accurate.

Also- I would have bought the black Worbla if I knew what I was doing. I've read it's better for details like this. But I was too much of a Worbla noob to want to buy the more expensive Worbla before I knew what I was doing. That would have made it so I didn't have to work so hard to smooth the surface and also skipped the black base coat step for all my armor.

In the process of creating this costume, I've spent a lot of time studying screenshots while also binge-watching the show, so I have a much better grasp on how the pieces of her armor break down. For instance the round curly part on the front tip of the shoulder pieces is a separate shape from the rest of the designs. It's really hard to describe all the little bits that go into the shape of her armor pieces. I really recommend you spend a lot of time with screenshots, and if you can watch the show, you should. You get a lot more different angles and views of her costume.

So, the shoulders now. I attempted to follow the same method, but when I sewed the pleather to the lining and turned it inside out, I got this awful weird lumpy thing.


This is not the first time I have found something I did to be totally awful but for some reason pictures don't really capture it. Trust me, it was bad. The edges were ugly and lumpy and it was never going to work. So instead I cut out some Worbla pieces based on the pattern I had made for the pleather base piece, and then cut out new pleather pieces just a little bit larger than the pattern. Then all I had to do was heat the Worbla to stick them together, folding the edges of the pleather around to the underside of the piece.


See how much nicer and flatter those pieces look?

I then stuck the Worbla design pieces to the top of the pleather, heated the whole thing and shaped it over my shoulder. My shoulders are a bit lumpy, so I rounded them out around a nearby convenient spray paint can. I also added a Worbla tab with a D ring to the back tip of the shoulder and a Worbla tube shaped to the copper wire for the front squiggly wire pieces to the front tip. Once that was done I cut some black 2mm craft foam pieces a bit smaller than the pleather base pattern and glued it to the underside.


Just for neatness' sake, I also ran a line of black puffy paint around the edge of the foam just to cover any showing Worbla bits and to soften the transition from the foam to the edge. Totally not necessary, but I have this thing for making the insides and undersides of my projects neat and nice. It's just more professional.

Also, in this process while looking for reference photos you may note that Lucy Lawless ALWAYS HANGS HER HAIR IN FRONT OF HER SHOULDERS FOR PICTURES. It's infuriating. Getting screenshots of these shoulder pieces is absurdly difficult. This is where watching the show was invaluable. Even if it's not a still shot unless I pause it, it still gives me a much easier way to study the way it's supposed to look.

So at this point you should have unpainted plain Worbla designs firmly stuck to pleather bases for both sets of armbands and the shoulder pieces. The armbands should have grommets and the shoulders should have D rings and squiggly wire tubes. All that's left now is painting.

For priming I did three coats of wood glue. Just like with the other pieces I wasn't concerned about a perfectly smooth surface. After that I painted them black. I actually mixed black acrylic paint with textile medium because I figured turning it into fabric paint meant it would flex and be less likely to crack. Once that was dry I rubbed the surface with Antique Gold Rub N Buff. After that I took my airbrush to it and sprayed down the edges and seams with black paint to weather it.


After this I added a topcoat of Polycrylic semi-gloss to protect the paint. For some unexplainable reason it wasn't as glossy on the armbands as it was on the larger armor pieces? Maybe I'm crazy. But then I was able to call it done!

Until a few days later when I remembered there's supposed to be rivets all around the edges of these pieces.

Whoops.

So, of course this is where you'll use more of those flat studs, but of course you can't stab the prongs through the Worbla. So basically what I did was I took the studs, and using a pair of jewelry wire cutters I cut the prongs off the studs and just glued the heads in place. The cut prongs had sharp edges so I was able to kind of drive them into the Worbla a little to give it more grip, but mostly it was just the glue holding them on.

Once they were in place and the glue was set I took a bit of black Rub N Buff and a Q tip and smeared some faintly around the base of each rivet so it looked worn in with the rest of it, and then added another coat of Polycrylic to protect the new paint and kind of seal the rivets in place.


NOW I could call them done. I just needed to sew the straps from the backplate around the D rings in the back of the shoulder pieces, after measuring how long I needed it to hang (About 4 inches on me), and I needed some lacing for the armbands and they were good to go. Due to the Worbla being formed to my arm for the armbands the lacing was really just decorative, so I just used the cheap stuff I used for the boots. I even superglued the knot tying it shut on the upper armbands, those just slide into place, easy peasy. I need the gap where the lacing is to get the lower armbands on since I apparently have super skinny wrists, so I just have to have someone tie the lacing for me once they're on.

Wow. Turned out I had a lot more to say about those pieces than I thought.

But now, on to the kneeguards!

Man, maybe I shouldn't have lumped those in together, they're made in totally different ways. Oh well!

So, I know I already posted this image, but as a reminder, we're trying to create this:


There are many variations on how this piece goes together based on various screenshots and other cosplayers, but this is supposedly a costume actually worn by Lucy on the show. I think it's possible that it may have changed from time to time, but I chose this image to base my knee guards on. There was no pattern for this that I could find so I had to start from scratch.

So, to make a pattern I started with a rectangle of paper I covered in duct tape that was 11" high by 14" wide. Based on my reference image 11" is roughly what would cover from the top of my knee to about halfway down my shin, maybe slightly higher. And 14" would go comfortably around my BOOT not my leg with a gap in the back for adding elastic for ease of wearing. There was no way I wanted buckles or lacing going across the back of my knee, so elastic was the way to go. But we're nowhere near that part.

So. Rectangle.

(Artist's sketch)
Then, I marked the vertical and horizontal centers.

(We use the term artist loosely)
Then I marked off an inch wide strip across the center horizontal line.

(Artist's rendition of "an inch")

I then rounded off the top corners, gradually trimming off roughly an inch with a gradual curve. On the bottom half I found the center and then cut a straight line from the middle of the bottom half to the center vertical line on each side to bring it to a point.

(Look, man, I never claimed to have the steadiest hand. Especially when drawing with a mouse.)
On a separate piece of duct tape covered paper, I drew out a circle of approximately the right size- fun fact, the O rings that come with the Todd's Costumes hardware kit are EXACTLY the right size, so I just traced one of those- and roughly sketched some claw shapes to arrange around the circles. The claws for the top half will need rounded back ends to curve around the circle in the center, but the bottom will just have blunt back ends. I then cut them out and took my time arranging and tweaking the shapes until they looked right, and then traced them onto the pattern for later reference.

(Man, I regret using the word Artist to refer to myself and I apologize that you have to look at that.)
You get the idea. My clumsy sketches are nothing like a pattern, please don't take them as gospel, just use them as a vague idea on how to create this yourself. Also, if I were to redo this, I would cut some curves into the sides:


Roughly where the blue spots are, because when I actually wore these, the bending of my knees caused the fabric in those spots to fold outwards in an awkward way, and I'd have liked to remove it, and have some curves tapering to a point where I attach the elastic to go across the back of my knee.


As you can see, the real thing isn't much prettier than my awkward drawings.

So, at this point, I cut my pattern at the top and bottom of the inch wide strip across the middle, so I had three pieces, one rounded top piece, one pointed bottom piece and the inch wide strip for the middle. I then cut all these things out of pleather- MAKING SURE to add a small amount of seam allowance at the bottom of the top piece, the top of the bottom piece, and both sides of the strip. Then I stitched the pieces together for each knee guard so I just had one piece with seams that matched the lines I had drawn when I added the one inch strip to the pattern. Then topstich those seams down.

Next I traced the pleather piece onto some black fabric for a lining, the lining doesn't need the seams, so there was no reason to use the front pattern for the lining. Sew the top and bottom edges to the lining, right sides together, flip right side out, and topstitch the seams. Fold the ends under maybe a quarter of an inch and stitch it down to finish the ends. Now it's time to add the rivets.

I suppose if you're fancy you could do the rivets before the lining and have the prongs hidden by the lining, but that means making sure you leave enough fabric to sew them together after the rivets are placed, and sewing a careful narrow seam and all of that sounds terrible. So I didn't. But if you want to, feel free.

I placed 13 studs along the top edge, and 15 along the bottom. They're roughly an inch apart, but I didn't measure, I just tried to evenly space them by placing the one dead center and the ones on the ends, and then folding each section in half to find the center and just dividing in half repeatedly until I liked the spacing. Feel free to use more precise measurements if you're more meticulous than I am.

There are 21 studs across the middle strip and those are within an inch of each other, zig-zagging up and down. By which I mean I would lay down a ruler, and the first rivet would be placed inside the beginning line of the inch, and the second would be inside the ending line of the inch. Like this:

Image not to scale
Once you have all the studs placed, we can move on to the decorations. This is another one of those places where I wish I'd done it a little differently, and I will cover that.

So I took the circle and claw pattern pieces I had made and traced them onto 2mm craft foam and cut them out.


I made sure to label all the pieces. The top pieces are slightly different shaped so it's important to keep track of which is which. it's not so important for the bottom, they're all the same.

I attempted to heat seal the foam to make painting easier, but these tiny scraps of 2mm foam just blew around under my heat gun. That was where I first realized this wasn't going to be easy. Next I wanted to spray them with a coat of Plastidip, but this proved to be exactly as difficult. I did the best I could, laying them out in a box and chasing them around the box with the spray can, trying not to spray too close. Plastidip got underneath some pieces, sticking them to the box when it dried and the foam just ripped when I tried to pull it off, forcing me to remake some of them. To remake them I sprayed a large piece of foam with Plastidip and then cut them out.

Also, why did I use yellow foam? I really don't know. I had perfectly good black foam sitting around unused. I had to take some black Rub N Buff around the edges of the replacement pieces to cover the cut yellow edges. So silly.

Once I'd finished fighting- I mean painting- the foam pieces, I glued them all in place using E6000, since it's flexible. I then gave them a coat of Antique Gold Rub N Buff, and did some black airbrushing for weathering. I added three roughly 2-3" strips of 1" wide elastic to the edges and that was pretty much it.


I just slide these up to my thighs, put the boots on, and slide the knee guards down into place.

So, a note: I regret using foam for the designs. I've worn them twice and after the first time the foam pieces started peeling off. The Plastidip I sprayed them with made the edges curl, and to foam did not seem to want to stay glued. You can see in the pictures that the pieces are resisting the pleather it's glued to and trying to curl away. I wished I had used pieces of pleather, but maybe of a different, thicker kind? One layer of my pleather would not have been thick enough, and I'd have my doubts about double layering it, but a thicker leather or pleather would have worked better I think, more flexible and less resistant to being glued down. Or at least I should have skipped the Plastidip.

Well, once we've gotten here you should have yourself a very convincing Warrior Princess outfit, complete with armor. You're ready to take on some bad guys! As long as you only plan to use your fists, of course.

What's a warrior without her weapons? We'll be covering that next.


Part Five: The Weapons