Part One: The Corset
Part Two: The Skirt and The Boots
Part Three: The Main Armor Pieces: The Breastplate and the Backplate
Part Four: The Accessory Armor Pieces: The Shoulders, The Armbands, and the Kneeguards
Part Five: The Weapons ***You are here***
Part Six: The Hair, The Eyes, The Makeup and Playing The Part
PART FIVE
THE WEAPONS
THE WEAPONS


Materials:
about 1 medium sheet of Worbla
10mm EVA foam
5mm craft foam
wood glue, gesso, or desired primer
sandable spray primer/filler
18 coin shaped abalone shell beads in 10mm diameter
Spray Plastidip
wood burner tool
sandpaper in medium and super fine grits
gold and silver paint- your preferred painting method
black acrylic paint
clear spray varnish
dremel with a grinding bit
So, take note up above, Xena's chakram looks different on each side. So. Let's start with patterns!
 |
| https://www.instructables.com/id/Xena-Costume/ |
 |
| https://www.instructables.com/id/Xena-Costume/ |
Based on screenshots, I figured that my chakram should be about 10" across, so I resized and printed the patterns at that size.
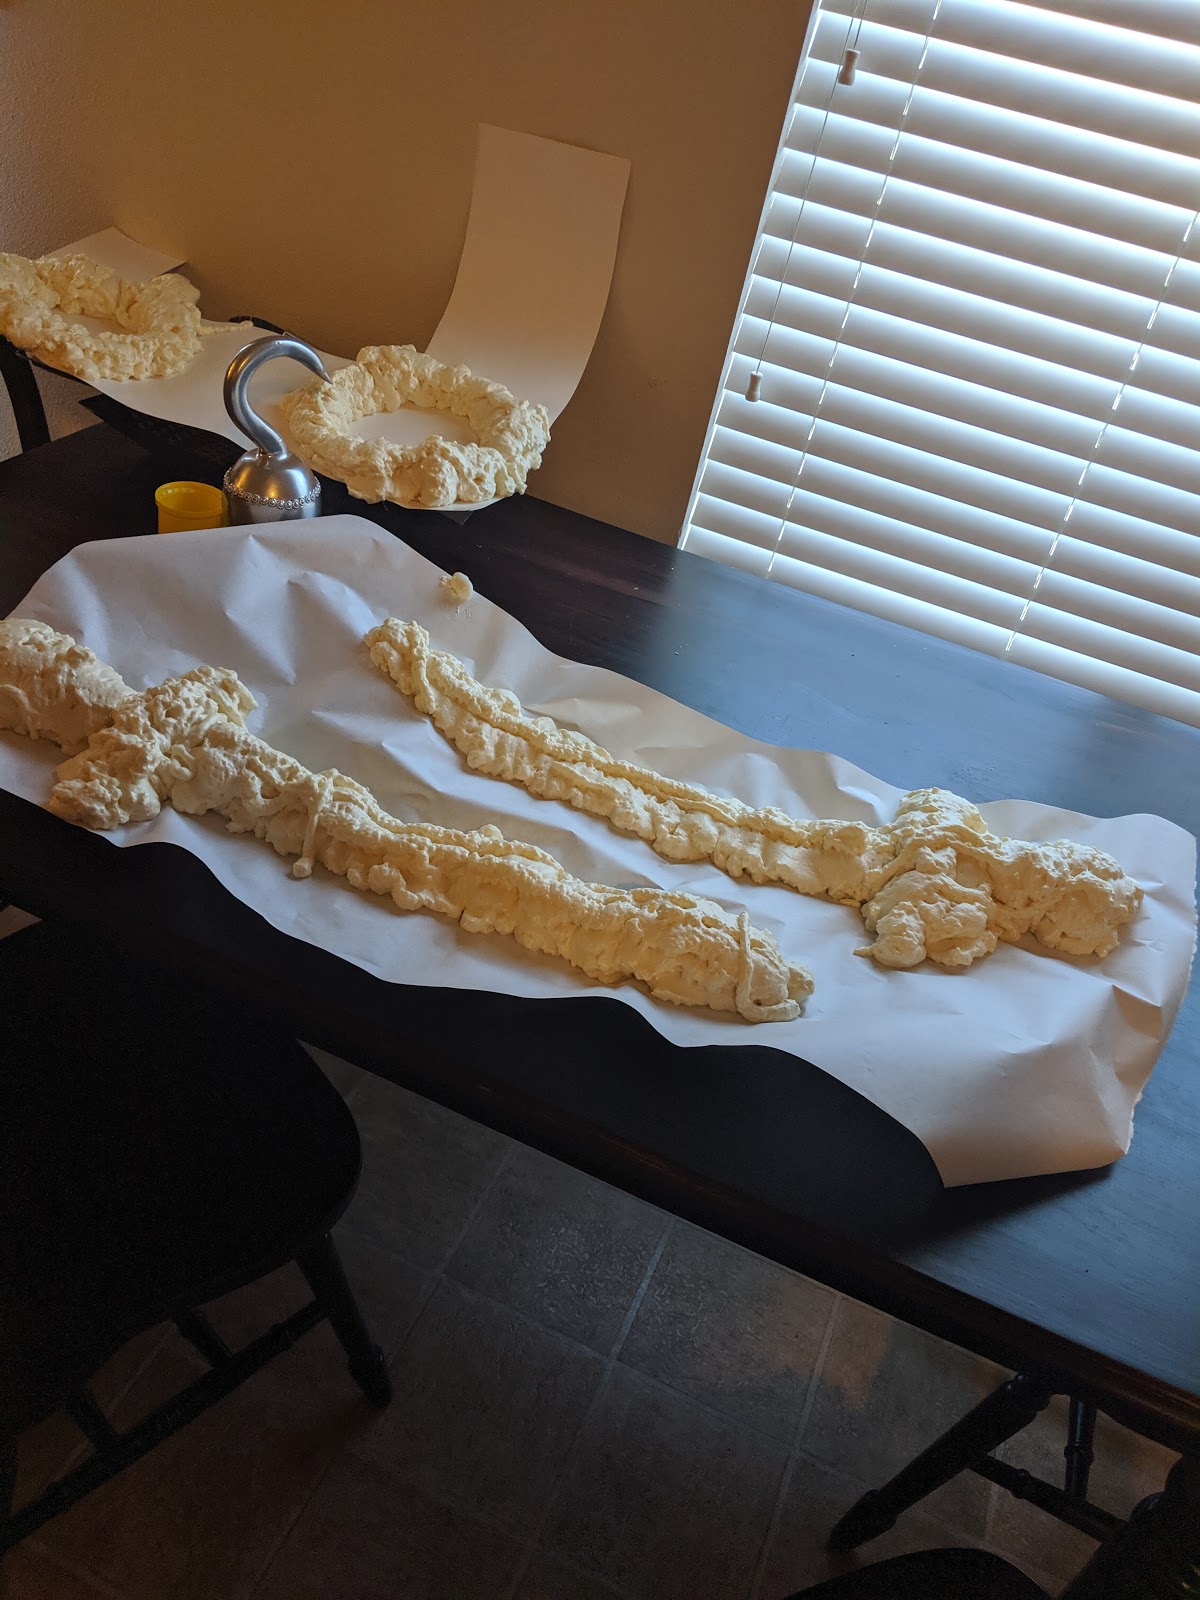
I made multiple mistakes in the process of this chakram, please please please read through my process so you don't. You may notice my materials list doesn't mention some things I'm about to use, like expanding insulation foam, because some of my attempts got totally scrapped.
So, my first thought was expanding insulation foam. It's just such a nice way to make whatever shape you need. So I sprayed some foam onto some posterboard in a roughly circular shape.


Obviously I did the sword at the same time, but we're not talking about that yet.
So, I let the foam cure and got this:

Spoiler alert: It did not go well.
The sword pieces were horribly warped, but we'll get to that. The chakram pieces weren't as bad so I thought I could still use them.
I cut them out and glued them together and started carving. There were a lot of big bubbles, so I started gluing chunks of foam into the gaps. As I was working on this I realized this was not going well. And it was still a little too thick.

And then I looked at it. And realized the thickness I wanted was basically the 10mm EVA foam. And then I felt dumb.
So I threw away the expanding foam chakram and cut out a new one from the foam tiles. I took some scraps and cut some angled strips and glued these around the edge to add a little bit for the sharp edge, I worried dremeling a sharp point would take off too much and make it too small. ANOTHER SPOILER ALERT: I was wrong. Do not do this. You don't need to add anything for the sharp edge.
Once the glue was set I dremeled it down a bit to try and make it smooth, and then smeared Kwikseal sealant around the edges to fill in what still wasn't smooth.

Once that was done I covered it in Worbla. This piece is pretty straighforward, just cut out rings of Worbla, heat and press. If you've already done the armor you should be an old veteran at this by now, and this is a really easy shape. The hardest part is just making sure the blade edge cools straight and not wavy.
Once the Worbla is done, you'll need to prime it. We've already talked about Worbla's sandy texture, we can't have that for a metal weapon. Plus if you're like me and you used a floor tile for foam, one side has a very bumpy texture and you're going to need to make sure that doesn't show.
I used the same homemade gesso I used for the breastplate, 50/50 mix drywall joint compound and Elmer's white glue. Two or three coats, sanding between each coat. Then I gave it two coats of the spray primer/filler with more sanding. It was pretty smooth by this point.
So I cut out the designs from my patterns and laid them on the chakram to see how it looked.

I can't describe the way my stomach dropped when I saw this. That looks AWFUL. It's all uneven and lumpy and I just couldn't stand it. No matter how many people tell me I'm crazy. So I scrapped it again.
This time, I decided to go with 5mm foam. I had felt like the 10mm was a little thick, so I took the opportunity to try a thinner foam. I cut out a new foam circle, and due to lack of time only trimmed the square edges rather than dremeling (another mistake) and covered this new foam ring with Worbla. I added a thin snake of Worbla all around the edge to give it the blade edge (which was ALSO a mistake) but it did come out okay.
The next problem was that this chakram really didn't want to cool flat. When all the Worbla cooled it ended up a bit warped. So I heated it and spent it's cooling time pressing it into the table and flipping it and pressing it again over and over to try and get it flat. It cooled warped. So I heated it again, pressed it into the table and placed my cutting mat over it and let it cool. It cooled warped. So I heated it AGAIN and pressed it into the table, pressed the cutting mat over it, and placed a large frying pan full of water on top of it and left it there for FOUR HOURS AND IT COOLED WARPED. I gave up at that point. I was running out of time.

The is where we ended up. It is more even than the first one, but because I added the extra Worbla for the blade it still ended up a bit too wide. But I wasn't going to start over again.
I primed and sanded it again, but I was out of the spray primer so I couldn't get it quite as smooth, so I ended up using some spackle to smooth it out a bit more. I guess it worked, but the spackle wasn't the best choice, I came to realize later.
Once it was nice and smooth, I taped the pattern to the chakram. This is where the wood burner comes in. If you have skill with carving designs with a dremel, that might be a better choice, you can carve the designs in with an engraving bit of some kind. I have terrible control with my basic one speed dremel so I didn't dare. With the pattern taped to the chakram I just traced around the outlines with the wood burner, carving the edges and the circles where the abalone shell beads would go.
By the way, the beads I got are here:
https://www.ebay.com/itm/Natural-Abalone-Shell-Gemstone-Beads-15-5-Oval-Square-Coin-Oblong-Etc/372091050451?ssPageName=STRK%3AMEBIDX%3AIT&var=640978824390&_trksid=p2057872.m2749.l2649
One strand gets you more than twice as many as you need. And I learned from experiments you can totally sand them if you need to to get them smooth with the surface of your chakram, all you have to do is put a new glossy topcoat on them after sanding and they're as good as new.
Putting the abalone shell beads in was actually kind of fun. Once I'd marked out where they went I'd just stab the circle repeatedly with the woodburner until the Worbla and the foam underneath were soft and melty, and then I could just press the bead into place and hold it there while everything cooled. That way I was able to sink the beads in so they would be flush with the surface of the chakram, and the adhesive properties of the Worbla glued the beads in place.


The downside of the spackle wasn't obvious on this side, but on the other side where it's got the sharper pointed designs I had an issue with the spackle crumbling where I tried to carve the points. So the other side is a little messy. I would have loved to start over again and do it properly with gesso and spray primer and no extra added on for the blade edge but I was out of time before the party I planned to wear this to and couldn't afford to start over.
Also, I realize it might not make sense to put the beads in before painting, but I didn't want to do the woodburning over paint, I had some concerns about fumes and burning things. So I cut out small circles of painter's tape to cover the beads so I could paint freely. I sprayed it down with Plastidip, and then due to the fact that I had run out of gold Rub N Buff, used my airbrush to paint the gold parts. I then used silver Rub N Buff for the silver sections, it was pretty easy to be careful and not get it onto the gold parts. I rubbed it down with watered down black acrylic paint to weather it, but later wished I hadn't done that either, Xena's chakram is pretty shiny and flashy. A few coats of spray varnish later and the chakram was done.


In the end I'm not unhappy with what I made, but good lord I struggled with this, and I still feel like it's kind of a weak point in my costume. I still kind of want to scrap it and make a new one....
But it's time to move to the next weapon.
The sword!

Materials:
thermoplastic beads
10mm EVA foam
Kwikseal bathroom and kitchen sealant
wood glue, gesso, or desired primer
sandable spray primer/filler
7 coin shaped abalone shell beads in 16mm diameter
Spray Plastidip
wood burner tool
sandpaper in medium and super fine grits
gold and silver paint- your preferred painting method
black acrylic paint
clear spray varnish
dremel with a grinding bit
hot glue gun
hacksaw
toy sword
Based on other tutorials my idea was to carve it out of expanding foam and cover it with Worbla. If you remember from the earlier pictures, my expanding foam turned out like this:
I think what happened is the outside dried first and when the foam wanted to keep expanding, didn't have anywhere to go but down. And unfortunately I had sprayed it on paper, which did not resist the push of the expanding foam. Sure, theoretically if I was good at carving I still could have come up with the sword shape out of this, but I realized immediately that it was going to take an absurd amount of time and effort and I seriously doubted I had the skill. So I trashed it. And based on my previous experience with prop making, and my boyfriend's suggestion, I decided to go buy a toy sword and overhaul it, like I did for my Captain Hook hook.
A quick trip to Walmart through the Halloween section and I came back with this:


Look at that sweet wolf's head, isn't it cool?
Yeah, this thing is going to look 100% different by the time I'm done.
Now, if you want to make something from scratch, you will need PVC pipe and EVA foam, you can just trace and cut out the shape of the sword out of several layers and glue it around the PVC pipe and then dremel it into shape. I could have done this, it was within my abilities most likely, but I was nervous. And my Captain Hook hook went really well. With everything else I was doing I decided the base sword would simplify my life. And for the record, the expanding foam idea might have worked if I had sprayed it directly onto this toy sword and then carved it down into the shape I needed, with the toy sword as a core to base what I was doing on.
So, when printing out my patterns, I'd found a nice straight on image of the sword:

I'd done some math looking at screenshots and figured I needed the sword to be about 27" long, and had resized this image and printed it at that size. I cut it out and traced the shape onto 10mm foam. Then I laid the toy sword over top and traced that to show me how much foam I needed to add to make it the right size. Then I glued it to the edges of the sword. Interestingly enough, the thickness of the plastic blade perfectly matched the foam.

I also ended up deciding the 27" was too short and added a few inches, it ended up closer to 30".
I am aware that my blade is much larger than the pattern's. I had to work with the toy sword base, and I didn't want to try cutting it down. This is where making one from scratch with PVC pipe and EVA foam might have been better- it would have been easier to get a more accurate shape.
I dremeled the edges to give it a nice sharp edge and smooth the seams. Then I ran a line of hot glue right down the middle of the blade on both sides, and then spent a great deal of time covering the blade with Kwikseal and smoothing it to taper from the middle of the blade to the edge.
I also took my hacksaw and cut off the wolf head and replaced it with a big wad of thermoplastic beads that I carefully shaped into an oblong oval shape, pressed the end of the hilt into it to make a divot that it would settle into, and once it had cooled, glued to the end of the sword.
I bought my thermoplastic beads here:
They're super cool, you just dump a handful of them into boiling water, wait until they turn clear, pull them out with a spoon, and mold them into whatever you want. I've already found hundreds of uses for them, I recommend getting a big bag. They're just like the Worbla too, extra bits you cut off or don't use can be remelted and reused.

I had thought I wouldn't need to worry about the shape of the guard too much because it was fairly close, but after looking at it I decided it wasn't really close enough. So I ended up hacksawing off the ends of the guard, and using my paper pattern traced the shape of the ends of the guard onto 10mm foam, it took two layers for each end, and then glued them in place.
Next came covering it in Worbla. I traced it twice on a sheet of Worbla, for the front and back, making sure to leave extra around the edges because the sword was a little thicker than anything I'd covered in Worbla so far, I needed to make sure there was enough Worbla to wrap around. Covering it in Worbla is the same as everything else, heat and press.
Things to keep in mind: The pommel- the round thing at the end of the sword, if you don't know sword terminology, although I realize if you're a big enough nerd to cosplay you probably know sword terms- is made out of thermoplastic. When you heat the Worbla and lay the sword on your Worbla work board and then keep everything warm as you press the Worbla down, you will quite likely start to melt the pommel. Also, if you used my method and put a line of hot glue down the middle of the blade, that'll probably try to melt as well. That part is actually helpful, you can squish the hot glue at the tip down to sharpen the point a bit. Getting the pommel covered in Worbla did take adding some extra scraps and heating and squishing, which got the pommel pretty melty- I had thermoplastic oozing a bit between gaps in the Worbla. But once I got it covered I could just squish it back into shape and let it cool, so not a big deal.
Next I needed to add the details. I added some long triangles to the base of the blade, one large one and one smaller one. You can use the paper pattern or just freehand it. I made some strips of Worbla out of scraps and wrapped it in an X around the middle of the guard where the blade met. Then I made some disks of Worbla that I attached to the center of the guard over the center of the X on both sides. I made an oblong disk that I stuck to the bottom of the pommel as well. While all the disks were hot I pressed one of the 16mm abalone shell beads into the center of each disk to make an indent for where the beads would be glued in. I also heated the Worbla on the ends of the guard and made bead indents there as well. I also made sure to squish and straighten the edges to make a nice blade edge.

Next up was priming. I used my homemade gesso and sanding between each coats, and then a few coats of spray primer and more sanding. Just like with the armor I wasn't too worried about a perfect surface, Xena's sword has got some pretty noticeable wear marks, so it didn't need to have a mirror finish.

Once that was done I used my wood burning tool to soften up the indents I'd made for the beads and pressed the beads into them, just like I did with the chakram, and then covered them with circles of painter's tape for painting. I sprayed it with a coat of black Plastidip, airbrushed the hilt and the details on the blade gold, then covered the blade with silver Rub N Buff. I spread the handle grip in E6000 glue and then wrapped it in suede leather cord, that I lightly brushed with black Rub N Buff to darken it. I didn't want to go buy black cord, so I worked with what I had. To weather everything a bit I just used watered down black acrylic paint and a sock and rubbed it down. I gave it a few coats of semi-gloss polycrylic, removed the tape circles, and it was finished!


I'll be honest. I'm not super thrilled with the lumpiness of the blade. But I'm pretty proud of the hilt. I would also like to remake this using the PVC pipe and EVA foam method, I do think that's the better option. But for my first sword ever I'm not too unhappy.
However! There was one important thing missing. Was I planning to just carry the sword around all the time? Definitely not! I needed a sheath.
The sheath is pretty simple.

Materials:
5mm craft foam
contact cement
half a yard of pleather
Worbla scraps
leather cord
suede cord
3 16mm abalone shell beads
hooks or lobster claw clips
gold paint
black paint
brown fabric paint
I laid the sword on a sheet of 5mm foam and traced a generous outline of the sword blade up to the hilt. I cut it out twice and glued the edges together with contact cement. If you force the foam to bend around to glue the edges flat to each other the curving foam will naturally hold itself open for the sword. I then traced the foam core onto pleather with a wide ragged edge on one side and extra at the top to tuck over. I sewed it closed on the straight edge, then lightly glued it around the foam core. I didn't stress too much about the glue, it was just for safety. I then stitched down the open end as close to the foam core as I could. I used a zipper foot, but it still wasn't easy, that kind of shape just isn't meant to go through a sewing machine.
I trimmed the flap on the ragged edge to match up with the opening of the sheath, and took the excess fabric around the top of the foam core and tucked it inside, gluing it down.
After that I took some suede cord and braided it. In order to get it thick enough I had to double up the strands. I cut it exactly as long as was needed to wrap around the sheath, and made 2 of them. Then I glued them on with E6000. I had to sort of manually hold them in place while the glue set, but I was just sitting around watching Xena anyways.
I made three disks of Worbla scraps and pressed 16mm bead imprints into them. Due to Worbla's wonderful tendency to fuse to my pleather, all I had to do was press them in place, no need to worry about gluing. I gave them a few coats of wood glue, painted them gold and glued the beads in the indents. A little watered down black paint for weathering and they were good to go.
I used my leather punch on the smallest size and punched holes a little less than an inch apart all along the seam on the ragged edge of the sheath and wove leather cord through the holes. I just used a tiny drop of super glue at each end of the cord to fix it in place. I took a pair of scissors to the edge of the ragged piece and just sort of roughly chopped it. I also took a bit of brown fabric paint and painted the inside of the ragged flaps so it would look more leather-like when it flapped around.
To hook the sheath to myself I took some lobster claw clips I had scavenged from the same old purse I'd used the straps from previously. With scraps of Worbla I made some strips that I fed through the loops on the hooks and then pressed into the back of the sheath. It requires some help from a friend, but when I'm dressed up the top clip hooks to the O ring in the back of my corset, and the bottom clip hooked to the laces of the corset further down. It sat perfectly over my shoulder where I could easily draw it. And attempt to put it back... Aiming for the sheath over my shoulder was a little more complicated.
And that was it. Easy peasy.


Well, you're a properly armed warrior now! There's just a few little details to wrap up. But we will cover that in the next, and final post.
Part Six: The Hair, The Eyes, The Makeup and Playing The Part
Part Six: The Hair, The Eyes, The Makeup and Playing The Part
No comments:
Post a Comment