So, I felt I needed some fishnet fingerless gloves to go with my whole steampunk look, and after an exhausting internet search could not find a pattern for exactly what I wanted. Not for free, anyways. So I made one up. And I'm going to share them here for anyone else that wants them.
Crochet Fishnet Fingerless Gloves
3.5 mm hook
sock weight yarn
2 buttons
Abbreviations:
St- stitch
sc- single crochet
htr- half triple crochet
ch- chain
sl st- slip stitch
I made these to fit me, and I have fairly average sized hands. If you need a different size glove, change the length of the base chain, just make sure you increase or decrease by 2. The placement for the fingers is made by trying it on and marking the correct spot, so keep that in mind if you change the size.
This pattern is for the left hand, but it does not create a visible right side/wrong side. So for the right hand you can either reverse what you did for the left, or do what I did, and just make two lefts and turn one inside out. It works either way, and I found it easier to be able to put the glove on my left hand both times to check fit.
The instructions for the fingers might get a little confusing, if something doesn't make sense, please feel free to contact me.
Base chain: Ch 29 sts

- sc in second chain from hook, sc in each st to the end. turn. (28 sts)
- ch 2 (this does not count as a st) htr in each st to the end. turn. (28 sts)
- ch 3, sk st, htr in next st. *ch 1, sk st, htr in next st.* repeat from * to * to the end. turn. (28 sts, 14 open spaces)
- ch 2 (Does not count as a st) htr in first st, htr in space. repeat to end. turn. (28 sts)
- ch 5, skip one st, sl st into the second st from the beginning. repeat to the end. turn. (14 loops)
- ch 5, sl st in next ch 5 loop, repeat across. (14 loops)
- repeat previous row 6 times.

you should now have a rectangle of fishnet with a border on the bottom. The fishnet should reach comfortably from your wrist to over to web of your thumb to connect to the other side. You can increase the number of repeats if you need it a little longer to reach. End off piece.
Thumb- Join yarn to the 4th loop from the beginning
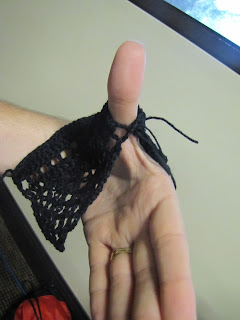
- Fold piece over to line up fourth loop with the sseventh loop. sc through both loops at the same time to connect. This will create a hole for your thumb to go through. if you need to change the specific number of loops you're working through for fit, feel free. You will now be working around the hole you made for the thumb.
- ch 5, sl st in the next loop around the small opening you made. It was three loops at this size. Do not turn, we're working in the round for this. (3 loops)
- ch 5 sl st in next loop around one more time (3 loops)
- Ch 2, 2 sc in next loop around, 3x, join with a sl st to beginning of first ch 2. end off.
Palm- join yarn to the original beginning of row
- Ch 5, sl st in next loop to the end, skipping past the thumb. do not turn. (about 11-12 loops- getting past the hole in the thumb can make this number vary. make whatever loops you need to to get past without leaving a huge gap.)
- join end to the beginning with a sl st to create at circle- this should fit around the palm of your hand. place a stitch marker here if you need to to keep track of rounds.
- ch 5, sl st in next loop around
- repeat previous round 3 more times.
This part should be long enough that the fishnet can
reach up to connect between your fingers. I used safety pins to connect the loops to check for fit. You can repeat the last round as many times as you need to to fit.
Fingers
At this point, put on the glove. (this is where it really make more sense to make two left hand gloves. if you're right handed, this would be impossible for the right hand glove. and vise versa if you're left handed.) Like I said, safety pins were the easiest way for me to do this part. Mark the stitches on the front and the back of your hand where you want the fishnet to connect
between your fingers.

I found with safety pins I could hook the stitch on the front, and carefully reach the pin between my fingers to pick up the stitch that most naturally fell on the other side. I did this with each finger before removing the pin to get the fit for each and make sure it was fairly evenly distributed. I then just added pins to mark each stitch as I disconnected the sides. It worked out to about 3 loops for the first three fingers, and two for the pinky. It does not matter what order you do this, or whether you start on the front or the back. I started on the front with the index finger. Please note, this can be fiddly and imprecise because you're not going to always have clearly defined loops to start with. Figure out how many loops around you want each finger to be to fit comfortably, and then make sure you have that many loops on your first round around the finger opening.
Join yarn to first marked st.
- ch 1, sc to its partner on the other side of the glove.
- ch 5, sl st into next loop around the small opening you made with the join. (3 loops)
- ch 5, sl st into next loop around again.
- Ch 2, 2 sc in next loop around, 3x, join with a sl st to beginning of first ch 2. end off.
Repeat this for each finger, omitting the first step where it's unnecessary. The pinky finger was the most difficult, doing this with only two loops was not easy. In order to keep track of where I was working I had to have my finger in the opening and try really awkwardly to work around it. And I only went around the pinky finger once, since the finger is shorter.

Add a sc border around the opening on the back of the glove to neaten it up. tuck in all your ends, add buttons and loops at the two solid htr rows on the cuffs to connect the back and you are done.
As you can see, I haven't added the button yet... I'm getting to it! If this wasn't for a steampunk outfit I might go with safety pins, actually, they give it a cool normal-punk look.


