Showing posts with label crochet. Show all posts

Thursday, January 28, 2021

A Few Things

 So, due to the lack of conventions, I don't really get an opportunity to do a lot of big projects and it's making. Me. Crazy. But I'm always full of other smaller projects to keep me occupied. I just have to remember to post them in batches so I don't get buried under too many things I want to post. So here we are.

So I made myself another yoga bolster. I already had one that I made before, but it was getting used as a knee pillow at night to try and keep my hips aligned while I slept and try to avoid my ever present back issues, so I never got to use it for yoga. So I made a new one this time stuffed with a rolled up comforter from the thrift store to be a little lighter and fluffier than the other but still dense enough to not go flat like a regular pillow. I'm not going to go over what I did and I don't have any pictures, the bolster isn't the point of this, but if you want some information, I used this as a basic plan:

https://bestfabricstore.com/blog/rectangular-yoga-bolster/?epik=dj0yJnU9Mnc4UkJXRDhJdlYxZVZoT3BZZVkzZDI1STNKSnA4MXomcD0wJm49bFJVaFpOOHg3NVNPTUI1ckFyRmxDZyZ0PUFBQUFBR0FUZi00

It's pretty straight forward.

Anyways. Doing this got me thinking about how I would really like a nice boho blanket that I keep downstairs in my little yoga/book/crafting room. And I thought it would be neat and true to the spirit of yoga and earth friendliness if I could thrift it as much as possible.

So, a while back I bought a bunch of recycled sari silk curtains because their thrifty boho look is everything I want in life:


https://www.mexicaliblues.com/collections/textiles/products/recycled-silk-panel-curtain

I love them so much I bought 10 of them, knowing I didn't need that many curtains, but I would find other uses for the fabric. And this was perfect, a nice brightly colored blanket of recycled sari silk was just what I wanted.

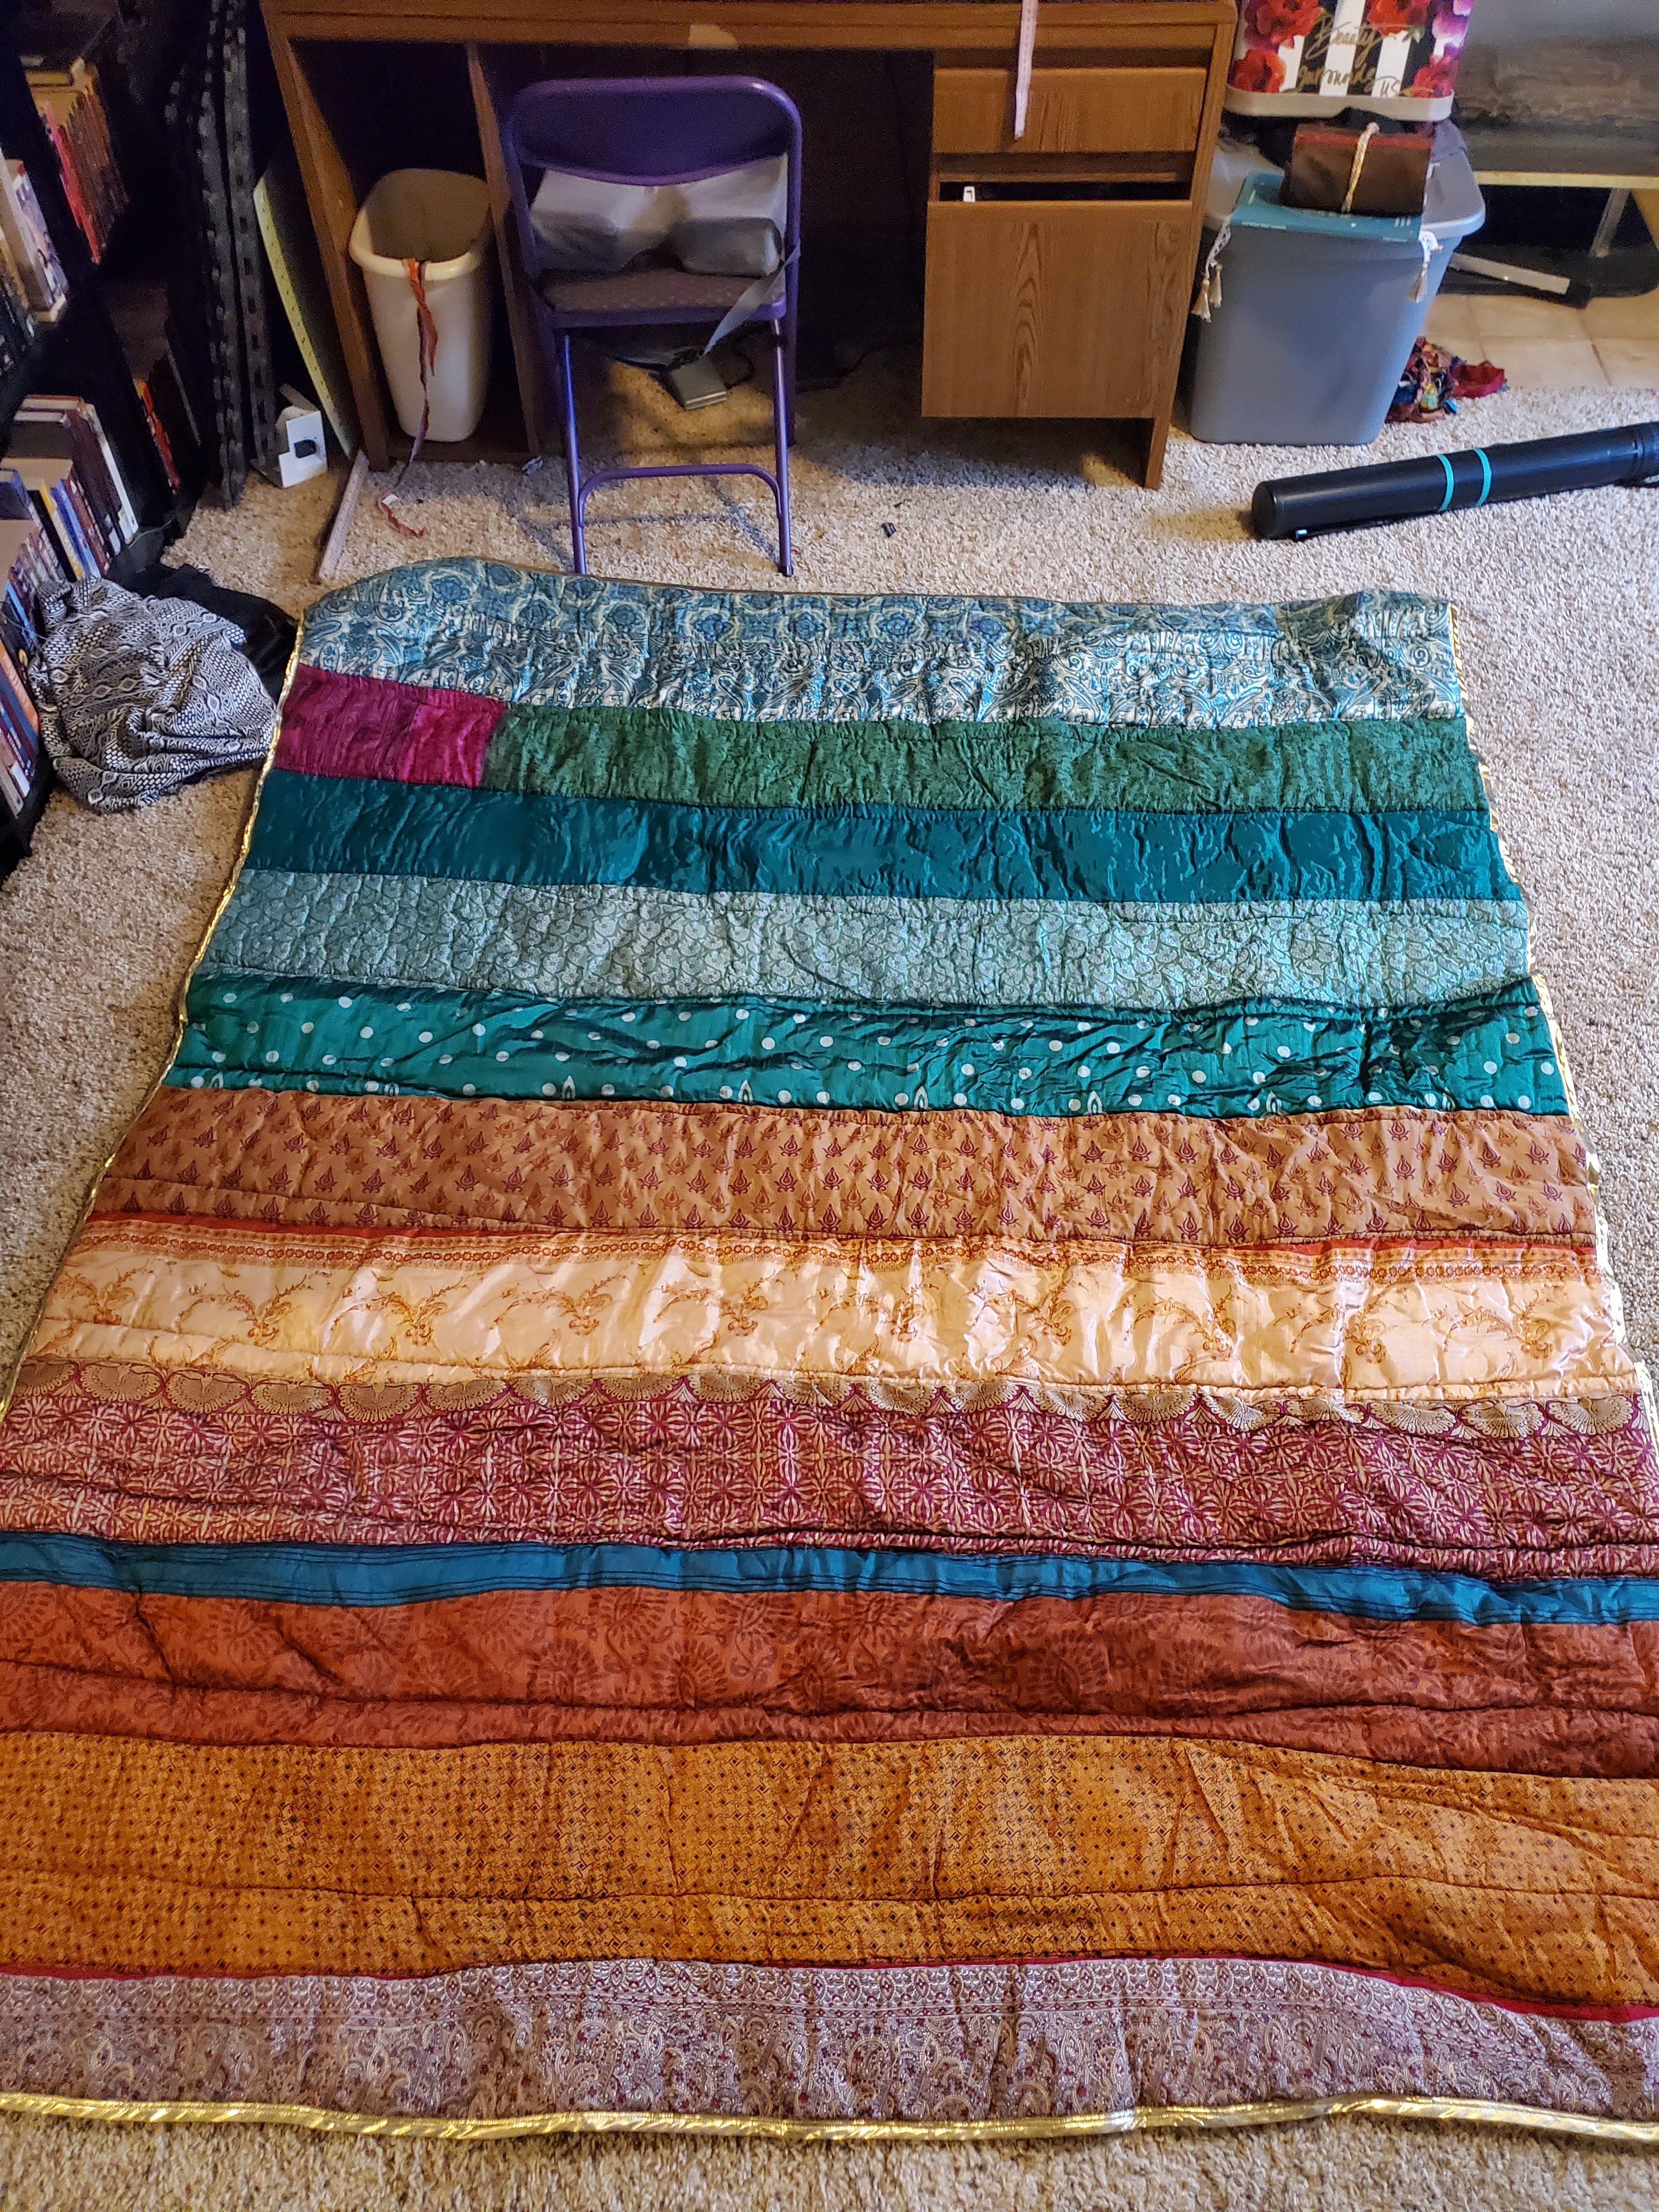
I also got really lucky on a thrift store run and found some large chunks of quilt batting. Hilariously enough it proved to be exactly the correct amount of batting for the size of two of these curtains sewn together, although I did have to Frankenstein stitch the chunks of batting together to get the size and shape of batting I wanted.


I basically just pressed the edges of the batting pieces right up against each other and then ran a wide zigzag stitch along the seams to hold it together. 

The quilt top and bottom were easy enough, I trimmed off the loops intended for hanging them as curtains and then just stitched two together for each side. I used basting spray to stick the fabric to the batting on the top and bottom and then for "quilting" I just stitched along the lines of each strip of color on the curtains. Due to the nature of them they did not line up with each other, so I quilted the seams on the top and bottom. It's.... eclectic, let's say. Also, if you're a for realsies quilter.... maybe.... don't look. 

I don't like quilting. I'm not good at it. I don't try very hard. I get my job done well enough and I get out.

To finish I bound the edges with a gold lame binding, I had a decent amount left over from I believe my Captain Hook costume, so I got a little more to have enough and sewed it on. It was the perfect flashy trim for all the bright colors.


It's crazy and colorful and flashy and I love it. It's not large, probably roughly twin comforter sized, maybe a little smaller, but it's a perfect one person blanket.

While I was at it, I wanted some boho pillows for my couch downstairs as well. I bought some thrift store couch pillows, cut off the bottom half of one of the curtains and made new covers for the pillows.


The couch looks very cozy and boho now.


It might not seem like much but it makes me happy. 

I was even able to take the top half of the curtain I cut for the pillows and hang it in my laundry room over a previously uncovered window, it turned out to be exactly the perfect length.


Haha, what a dingy looking picture. Apologies for the bad photo, folks. It's not that bad, I promise.

I also recently finished a crochet shawl for myself, I wanted something very light and hippie looking I could wear with maxi dresses in the spring and summer. I found a gorgeous pattern called Edlothia:

https://www.ravelry.com/patterns/library/edlothia

That was exactly what I wanted. Technically I finished it before Christmas but I hadn't gotten around to blocking it until now.

Here's mine:


The yarn I used was intended for some self patterned socks, and now that it's done I think using patterned yarn like that wasn't the best choice, I think some of the pattern detail was lost in the random seeming color changes. But I don't hate it, it has a nice fall earthy feel to it, that's not a bad thing.

I also added tassels to all the points:


And I LOVE how that turned out. I have a sleeveless black maxi dress that this is going to look great with once it's warm enough to wear it. 

I'm working on a rectangular shawl now, and I have another woodworking project that is a bit more involved, but it's not done yet, so you'll have to wait to hear about that one. That's mostly why I made this post, so I can make a whole separate post for that. I'll be back when that's done!

Wednesday, January 29, 2020

I wanna be a witch. Or a hippie. Or some combination of the two.

Just a short one, today, really.

So, I've always kinda loved the whole boho-hippie look, its so fun and colorful and comfy. And it's very flattering on my non-curvy athletic frame. So I'm kinda leaning into that fashion a bit more. I made some velvet bell bottoms that I just adore, and I'm probably going to make more, and I'm adding more kimonos and maxi skirts and crochet things to my wardrobe. I already have quite a bit to be honest. And the whole vibe of the style matches my pagan tarot reader thing.

But just recently I decided I needed a new purse. It's a little sad because I did just buy a cool new Firefly themed one at the last con I went to, but it's small, and I was getting annoyed trying to cram everything in there. So I decided a super cool boho crochet purse would be perfect, since I didn't want to spend a lot of money on another new purse so soon. Plus I stumbled across some perfect cotton yarn on sale at Michael's in just the greatest earthy shades. Cost me less than $10 for more than enough yarn.

There are all sorts of patterns and tutorials out there for this sort of thing, feel free to search around and find what you like if you're interested in making one. I decided on this one:

https://makeanddocrew.com/fringed-crochet-bag-free-pattern/

It was a very clear and easy to understand pattern and I love the look of it. I'm not really going to talk too much about the crocheting, it's all there in the pattern.

I selected a nice earthy brown color for the main color, I just can't do white purses, I know how quickly it will get dirty and it will drive me crazy. I also like bright colors so I picked out an orangey-red, a teal, and a navy blue to add some stripes of color. All I did was change color for the 3rd round, and the 7th and 8th round.  I did something similar on the triangular flap in front to sort of echo what I did for the circles.


If you're wondering how big this turns out, it is laying on a yoga mat, if that gives you any idea of scale.  I also added two rows to the strip that connects the two circles to make mine a little wider, but be warned, I should have added a bit to the triangular flap over the top and didn't realize it, it doesn't fit quite as neatly as it could. Not the end of the world, but still.

Each chunk of fringe is 5 strands, so I have one of each color and two of brown. 

The strap is scavenged off an old suitcase I bought and tore apart years ago to make my leather-ish corset, complete with hardware for attaching.


To close the front flap I actually had a magnet clasp I had torn out of an old purse I'd taken apart years ago as well that fit perfectly in the center hole of the circle parts. They had fabric around the edges from when I'd cut them out, so I just hand sewed one on the underside of the flap and one in the circle. I then sewed a cool looking button I happened to have on hand to the front of the flap as a sort of fake button thing.


The most important change I made however, was to add a lining to this bag. The crochet look is lovely, but with all those little holes I can never carry anything small in it. 

Basically, I traced the circles and the strip onto some brown fake leather looking fabric and some burgundy cotton. I also cut out some pieces the size of the bottom 2/3rds or so of the circles from the burgundy so I could add pockets. I'm afraid I don't have any pictures of this process, but it was very similar to what I did when I made my Luna-P purse, in this post:


Main differences were I did three pockets instead of two, since this bag is bigger, and I sewed elastic strips to the sides of the bag liner rather than across the front of the pockets for pen holders. I also edged the top of the pocket fabric with bias tape, but that was really because my burgundy fabric was a bit stretchy and I didn't want the pockets to stretch out. It's not strictly speaking necessary, if you'd rather just hem the top edge.

The purpose of the brown pieces was to make an outer layer on the liner to blend smoothly with the yarn through the holes of the crochet, I didn't want a contrasting fabric to clash with the yarn colors, and I was working with the limited options in my scrap collection, no reason to buy fabric for this. Once I had the pockets and elastic attached and all the pieces sewn together, I settled the burgundy liner inside the brown one, wrong sides to the inside so all the seams would be hidden, and I attached them at the top with more bias tape. I then carefully positioned and hand stitched the liner around the top of the purse and ran parallel rows of hand stitching along the seams on the bottom to attach the liner firmly to the bag. The nice thing about hand stitching things to crochet pieces is that the yarn hides the thread beautifully. 

Once that was done, I was good to go! This is much larger than my old purse, which I'm a big fan of, and I just love how it came out. And I was so thrifty, everything but the yarn was scavenged from what I already had. Recycling is very boho, right?


Tuesday, December 19, 2017

Final Christmas projects!

So, I finished up my last few Christmas projects in great time. There was no stressing over time limits, and it was so good after the clusterfuck that was Halloween. 

So, let's start with the Pikachus. I made two, one for my niece Alara and one for Shannon.


The pattern I used is here: https://www.ravelry.com/patterns/library/bigger-pikachu-pokemon

So, basically what I did was I made the body and arms and legs in the blueish grey yarn. Then I kind of fudged a pattern for the ears and tail (not pictured) based on what I remembered from when I made a regular Totoro for my brother's old girlfriend, and later again for my daughter. I then made a white circle for the tummy, and a yellow one for the face, and after the face was sewn on, I picked up a ring of stitches around the face and crocheted a few times around to create a hoodie-type look. I think they're pretty damn adorable. I did make the face and tummy a little bigger for the second Pikachu because I felt like it looked better, but they're both pretty adorable. Getting the faces right was hard, though, and I still feel like I could have done better. But Shannon and Alara will love them, that's all that matters.

The other thing I had to do was paint my mom's tiles for her gift. I did five tiles, figuring if I messed one up I'd have an extra. I based the color scheme on the fact that she has one wall in her living room painted sage green, and worked on complimenting that. I took freshly poured and after dried pictures of each tile so you could see the way they changed as they dried. Dirty cup pours are so fascinating!


You can see the way the cells changed shape and new ones formed as it dried. Also, I have no idea where the purple came from. There was no purple in this mix, it was all greens and blues and one brown for contrast. That happened after I put the clear coat on top, and I'm completely mystified.


I like the way the dark blue lines twisted and bent on this one. Sorry about the glare on the edge of the dried tile, these things were so hard to photograph laid out on the table the way they were.


I loved the big brown spot that opened up near the center of this one. Also, this was another one that had some mysteriously appearing purple.


I was super, super into that random dark blue slash in the corner, it was just so dramatic with all the lighter colors around it. I was a little sad that it kind of got smaller as it dried, but it still looks amazing.


This one basically just developed a lot more cells and circles, but it was probably the least changed when it was done.

So I decided to keep the third one for myself, since it had the least amount of green showing, and then I attached wall hanging hooks and felt pads to the back of each one, so these have the option of either being used as coasters or trivets or whatever, or being hung on the wall and used as art. They were super fun to do, and really quick and easy. The cool thing was I used the same colors on each one, poured in the same order in each cup, but each one is spectacularly unique. I want to make so many more of these, they're just so cool! And doing it on tiles that cost 46 cents at the hardware store, it's a pretty cheap hobby too. As long as you get cheap paint, since you're gonna burn right through it, haha.

The last Christmas project I had was Shannon and I wanted to make pajama pants, because new pajamas is a Christmas tradition. I usually just bought them from Old Navy, because Old Navy sold pajama pants that came in tall sizes, but apparently they discontinued that, so fuck those guys.  So Shannon and I went to Joann's and bought some cute polar fleece and made warm cuddly pants for ourselves, using pants we already owned as a pattern. There's dozens of tutorials for how to do that on the internet if you're interested, I didn't use any specific one. I just kinda figured it out. I also allowed Shannon to do her own sewing and cutting, so she made hers basically on her own, I was very proud of her. And proud of myself for resisting the urge to take it from her and do it myself because my perfectionist brain was dying a little watching her do it. But I let her do it, that's how she learns.  Unfortunately, I have neglected to take any pictures of the pants, so I'll have to get back to you on that.

When I bought the fleece, the stuff I picked out just happened to be near the end of the roll, so I got an extra yard of fabric for a steep discount, and now I have so much left over that I think I'm going to use it to make myself a new hoodie. I'll get back to you when that's done.

I have one more project that I'm working on right now, but it's not for Christmas, it's for New Year's. My friends Matt and Cari are having a New Year's eve party, and it's "Thrift store fancy dress". Which is a very loose guideline, basically dress fancy if you want, but keep it thrifty, thrift store purchases get extra points. And I decided that what I wanted to wear was my old junior year of high school prom dress, because with all the weight I've lost I was pretty sure I could fit into it. And I was right, with a little room to spare. So I'm overhauling the dress to make it more fun, and I have a whole outfit planned around it. But that is a project for another post, when I have pictures. 

It's gonna be amazing though. You'll see.

Wednesday, December 6, 2017

Crafty Things and Christmas Projects

So, I've been crafty again. I mean, it's nearly Christmas, so that makes sense, I'm exactly the type of person that loves to DIY Christmas presents, and not just because I'm broke! It's just what I do.

First of all, this isn't strictly a Christmas project, but it led to one. I learned recently about acrylic pours, or dirty cup pours, or whatever you want to call them. Basically it's where you mix paint with water and a little silicone, and then combine several colors into a cup and dump it onto a canvas or whatever and let it spread and mix and see how it comes out. (Also, for some reason I totally just typed 'color' with a 'u' in it, which is the weirdest typo I think I've ever made. Apparently I get a little British when I'm sleep deprived. Might need another cup of coffee today.) I thought these dirty pour painting looked amazing, and I also thought it would be a great thing to do with Shannon. So I picked  up a bunch of cheap acrylic paint and some silicone power tool lubricant and we tried it.  Here's the result:


The one on the left is mine, and the one on the right is Shannon's. Initially mine came out really muddy, I think I overmixed or something, so I actually added in more orange and turquoise and used a swiping technique to spread it and mix it, and in the end I was fairly happy with it. Shannon's was just beautiful from the beginning, she was very proud of herself. However, after drying for some reason the orange in mine faded to almost invisibility, making the whole thing look rather dull, and I was not happy with it. Shannon's stayed lovely, and was left alone. But I decided to do a new pour overtop of mine and try not mixing quite so much.

The second time I chose a different color palette. 


This one came out super, super cool and I was amazingly happy with it. Look at all those cells! And it dried just fine too, which I was also happy about. However I had too much paint mixed up for pouring, so to avoid wasting it I needed something else to pour on. I ended up using a smaller canvas and an old clock I had from years ago, which I intend to buy new clockwork for, because it looks so cool now.

Here is the small canvas:


This one came out super amazing, I love the way the cells form in the middle of the paint. What's really fascinating about these pours is that more cells and shapes will form as it sits, making it look cooler and cooler as it dries. I'll show you here with the clock I painted, the one on the left is right after I poured the paint, and the one on the right is after it had been sitting for a few hours.


You can see how there are a lot more cells and swirls in the second picture, it's so cool! 

One of the youtubers whose videos I watched to learn how to do this does all her pours on six inch ceramic tiles, which gave me the idea to do a set of them as coasters for my mom for Christmas. I haven't done them yet, but that's coming, you'll get pictures when I do.

The other thing I decided I wanted to do as gifts for people was etched glasses, wine glasses or beer mugs, depending on the person. I got the idea because I wanted to get one for Rachel with the homunculus tattoo from Fullmetal Alchemist, but even when I could find a reasonably priced glass, the shipping would cost twice as much. I knew that Danny, Stu's roommate, happened to have a bottle of glass etching cream he had used for something some time ago, and had told me previously that I was welcome to use it, since I've been curious about glass etching before. So I decided to make my own glass for Rachel. And then the decision I made to go with Stu to his parent's house in Arizona for Christmas led to me needing gifts for them, which led to more custom glass ideas, and then that led to a set for my dad and step mom, and then my brother, and then birthday presents for some friends with an idea I'd been wanting to do for ages, and then one for Danny for letting me use his etching cream since I know that stuff isn't cheap... and well, I etched a lot of things.  

I bought a lot of beer mugs and wine glasses from the dollar store, which was pretty great, because I knew it would be cheap and easy to redo if I messed something up. I also bought some stick on shelf liner from the dollar store because it would make perfect sticky but removable stencils. I printed off all my different designs at work, and then I would tape each design to a piece of shelf liner, cut it out with an xacto knife, and stick it to the cup. It worked really well, with only a few small instances of etching cream seeping a bit under the edges.

  I started with the glasses for Stu's parents. 


Simple monogrammed glasses.These were just stickers and tape, no shelf liner here. I got a little fancy with borders, but I kept it pretty straightforward since this was my first time doing it. But they came out really well, and I'm happy with them. Nice, simple gifts for my boyfriend's parents, since I'm spending Christmas with them.

Next I did Rachel's glass, but the placement was bad so I decided to redo it, and it came out much better the second time.


Photographing etched glasses is so hard, the flash brings out the etching but creates so much glare on the glass. Plus, with this one, the design was a bit big to easily capture. But it looks really cool.

After that I did my dad and stepmom's.  Wendy loves dragonflies, so that was an easy choice. For my dad, I chose to do his crest from his persona in the medieval recreation society he's part of, basically it's the symbol that he paints on his shield and things like that to represent himself.


See what I mean? Glare. Uhg. But they both came out really well. My dad's was a challenge with all those little details, the dots are actually supposed to be stars, but I tried to cut out two stars and realized this was never going to work. Luckily one of my dad's shields does have circles instead of stars, so this is totally legit.

Next was my brother Josh's gift. My family always just does a name draw for Christmas presents, since I have four brothers and that's a lot of gifts to buy. This way we each only have to buy one, and I got Josh.


This is another one where it was difficult to capture the full image. Josh is a Denver Broncos fan, so it's just a Broncos logo and his name. Pretty simple, although cutting out and placing some of those thin lines was a challenge. I nearly put his name as 'Doshie' instead of Josh since that's what I used to call him when I was little. It might have been funny, but I decided against it.

The last actual Christmas glass I did was for Danny, to thank him for letting me use his etching cream. I wanted to do the sign of the Prancing Pony from Lord of the Rings, because Danny is super into LOTR. But goddamn, did that have some fine lines and tiny details. Just getting it cut out was a challenge. I was not sure it would work. After it was cut out I actually placed a second layer of shelf liner over it to hold everything in place while I took the backing off and then stuck it to the glass, and then very carefully removed the top layer. It actually worked pretty well.


There's a little bit of blurring of lines around the horse's front legs, but it wasn't a complete disaster, and I'm pretty happy with how that came out. Not that I want to try something that detailed again, haha. That was a challenge.

After that, I did two wine glasses and a beer mug with a phrase I'd seen on etsy and wanted, but didn't want to pay nearly $30 a glass.


It says "Because Kids" if you can't read it. I did two wine glasses because one is for me and one is for my friend Cari, and the mug is for her husband Matt. I already have a Christmas present for Cari, so these glasses are going to hang around until their birthdays, I think.

So that's all the glass etching I did. It was quite a bit, but a lot of fun to see the designs come out. It did make me wish I owned a Cricut or a Silhouette cutting machine so I didn't have to cut all this stuff out myself though. I still own two other plain wine glasses that I think I may try to come up with something for before I return the etching cream though, because cups with designs are just so much more fun. 

Speaking about fun glasses, some time ago I found a wine glass on Etsy that I just had to own.


I mean, it's the goddamn Crescent Moon Wand from Sailor Moon in the form of a wine glass. I just... I just didn't understand a universe in which I didn't own this glass. Sadly for me, this one was already sold. So I immediately messaged the Etsy shop owner offering just all the money for one of these. This was in April of this year. And I got... crickets.  Nothing. No response. I investigated the seller's shop, all the reviews were good except for the most recent one from December of 2016, where the shop owner basically stopped communicating with the customer, never sent the ordered item, and ended up just cancelling the order with no warning or reason. There had been nothing since then, despite the fact that the seller's shop appeared to still be up and running. I realized for some reason this seller had dropped off the face of the planet.

I continued to wait for a bit, hopeful. But I eventually realized I wasn't going to hear anything. And then I had this idea. I mean, I'm a crafty person. The decorations on this glass were made of polymer clay, and I may not be a sculptor, but these were really pretty simple shapes. I bet I could do that. So I bought an extra wine glass when I was buying stuff for etching, and got some pink and yellow Fimo from the craft store. 

I used this image for reference, along with the picture of the original wine glass:


To start with, I made a long, fairly wide yellow oval and pointed the tips. I cut a slit a little further than halfway to allow me to wrap it around the wine glass stem, and then shaped that to the curve of the glass.

It actually ended up being slightly too far to one side, so I just rolled a small snake of clay and pressed that into the too narrow side and smoothed them together, using an xacto knife to neaten and straighten the edges. 

After that I covered the stem in a thin, but not too thin, layer of pink clay, and covered the base in a layer of yellow. I rolled a thicker snake of yellow that went around the seam between the pink and yellow at the base. Then I made a ball out of the pink clay, just sort of eyeballing the size, cut it in half, and then, lining it up with the direction the crescent was going, smoothed that into the top of the stem.

In the end, I got this:


For the decorations on that round part, I made two small yellow disks, slightly smaller around than the pink part, made two smaller red circles out of the clay I still had left from my Sailor Pluto earrings, put those on the yellow circles near the top, made small crescent moons and the little wing/ribbon things that come out of the top of the circle, and a dozen tiny yellow balls. Put them all together based on my reference, and got something that looked pretty damn accurate.  After that was done I added two small pink stars just under the round part. Obviously since I was making two of everything I was mirroring each side so they'd both look good no matter which side you looked at the cup from.

For the record, my version is more accurate than the Etsy glass, she just did a sparkly ball with some weird wing things that don't look anything like the real thing. I modeled mine after the details on the actual Crescent Moon Wand.

I was terrified of the baking stage, I was so scared that the wine glass would shatter. I baked it for two hours at 230 degrees. When it was done, I turned the oven off, but didn't open it, let it sit for a half hour, then cracked the oven open and let it sit for another half hour, and only then would I remove it from the oven. I let that thing cool nice and slow to avoid temperature shocking the glass.  This is what I had when it came out:


Picture made larger so you can see the details at the top of the stem.

Upon retrospect, perhaps I should have expected the pink clay to darken like that, I didn't pick the lightest shade of pink, really. But other than the too dark pink, that looks pretty damn sweet. I was so excited at this part. I knew the pink was wrong, but I also knew I owned some pearly pink paint that I had bought for yet another Sailor Moon project (Makoto's pink rose earrings, freaking forever ago) that would be exactly the right color, and I know polymer clay has no objection to being painted.

So I painted. And painted. And painted some more. It took like freaking five or six coats to cover that dark pink.

This is like three coats in I think? And look how blotchy it still is. Geez. But I did eventually get it smooth. I also ended up doing like three coats of yellow over the yellow parts, there were some bits of lint and things in the yellow clay that I didn't like the look of, but since I wasn't actually changing the base color it didn't take as many coats as the pink. 

Partway through this process, Rachel had just the most amazing idea. You know how partway through Sailor Moon using this wand it gets the silver crystal planted in the crescent? Well, obviously with this wine glass the glass itself is kinda being the crystal, but what if one were to buy an actual round crystal and glue it to the bottom inside the glass? How amazing would that be? I promptly became obsessed with this idea and started looking into it. Obviously I couldn't just use any old glue and crystal in something I intended to pour liquid into and then drink, that's just asking to get poisoned. So after exhaustive research I located a food safe waterproof silicone adhesive that was meant for things like aquarium repair, which sounded perfect, and a nice safe non-lead poisoning glass crystal. Goddamn, did I search hard for that crystal. I didn't want to order it online because I didn't want to wait, but after hitting every damn craft store I could find and getting nowhere, I broke down and ordered one. 

Once it arrived, I glued it in, added the red, yellow and green gems to the red circle, (which I already had from some other project, I don't even remember what) added a coat of clear Minwax Polycrylic, (god, I love that stuff, I use it on everything) just on the clay parts to protect the paint finish, and then my Sailor Moon Crescent Wand wine glass was complete!


Oh my god it's so pretty, I love it so much. So, if I had ordered it from the Etsy seller, she had been selling them for $40-$50, I believe, and I don't know what shipping would have been but for something like this it's gotta be minimum $10, and I'd count myself lucky if it was that cheap.  I spent $1 on the glass, $4 on the clay, $4 on the glue and $4 on the crystal. And I don't really count the glue, because I used such a small amount, and now I have the tube to use for whatever else I might need it for. It'll be handy for things like dish repair, if it's ever needed. And obviously the paint and gems don't count, since I had them from a previous project. So, even if you count the extras that I already had, this still cost me less than $20. And really, only cost me like $13. I'd say that's a pretty damn good deal, and I can't wait to drink out of this glass. 

Okay, okay, I swear I'm almost done here. There's just one more project to mention, it's not done yet, but I'm working on it. I decided I wanted to just crochet something for my niece Alara, she's only one, so crocheted toys are perfect, and I was gonna make her a Totoro. But then I found this image on Pinterest:


Oh my god, isn't that so cute you could die? Shannon saw it and immediately demanded one, but there was no pattern for it, just an image.  But after thinking about it, I realized it was really just a pikachu pattern done in grey with a yellow face and a border around the face to make it look like a hoodie. I could totally do that. So that's what I'm working on. Once I get it assembled I'll get some pictures. And yes, I am making two, I couldn't really just make one for Alara when I knew Shannon wanted one too that badly. I should have plenty of yarn, I hope. 

Okay. You tired of this post yet? I totally am. And I'm out.


Thursday, September 8, 2016

Too much downtime? Time to blog again I suppose.

I'm a sporadic blogger. You know this. Don't judge me.

Anyways.

I do have a few new projects to blog about. This first one is nearly a year old... haha, oops.

So I needed a Christmas gift for my boyfriend. I'd known him for a little while now, but this was the first gift giving opportunity I'd had for him. Well, technically the second, but I let his birthday slip by, and then of course he got me a fantastic gift for my birthday, a little stuffed beefalo from Don't Starve, that I just love to pieces.


See? There he is, hanging out with Chester on my desk at work. I named him Bill. Beefalo Bill. And of course then I felt bad for not getting him a birthday present, so I wanted to make the Christmas gift awesome.

So, Stu loves older classic video games, he likes to watch a lot of speedruns and things like that, and one of his favorites is Mega Man. I had previously seen other things where people would crochet afghans of 8 bit characters using granny squares for the pixels, and I'd always wanted to try it. So I found a good image of classic Mega Man, and using Excel I drew it out, and filled the blocks with the corresponding colors so I would know how many blocks of each color I needed to make. The pattern, if you want it, looks like this:


I was shooting for a roughly full/queen sized blanket. I found a simple pattern online for a solid block granny square, and left off the last round so each square ended up about 2" across. I thought about making the squares bigger, but the blanket would have ended up massive and taken way longer and way way way more yarn. As it was I severely underestimated how long it would take to make it. I knew Stu was going to visit his parents for Christmas and wouldn't be home until a little bit after that, so I had a grace period, but as the time came, it turns out I only had the squares for Mega Man himself done, hadn't even started the background yet. He looked great, all sewn together, but I knew I'd be at this for months if I made squares for the background too. So I ended up just doing endless row upon row of solid double crochets for the backdrop. Still took a while, but much less time. And it made him stand out a bit more. I completed him right around New Year's.


Stu loved it, and still uses it every night as his comforter at home. :D

So, I am also starting a new project. Well, I say starting, it's one that's been half in the works for years, but I've never been able to finish it.


This bitch.

That's right, I've finally decided that this year is when I will finally finish my Sailor Pluto costume and achieve my dream of having a sailor senshi costume.

I intended to do it last year, but when October hit I was too busy doing things like getting divorced and moving out to my own place to be able to do something like create a detailed costume for myself. I had already bought a brooch and some gloves and a wig, so at least that stuff is already done this year. Although that isn't much, there's still a lot to do. I have some plans, and I'm going to put it all here just to organize my thoughts in my head.

Boots- I have a pair of black thigh high boots that I bought several years ago and have worn exactly zero times. Turns out without a specific costume in mind there's really no reason for me to own thigh high boots. So I'm going to cut them down and add the white stripe and they'll be perfect.

Gloves- bought last year, as I said. Hilariously enough it took three tries to get the right gloves. I wanted them matte, not shiny satin and apparently lots of sellers think matte means "SUPER SHINY NASTY CHEAP LOOKING SATIN."I had some disagreements with some merchants. But I did finally find a good pair, I just need to add the black cuffs to them, which will maybe take me a half hour, if I do it in slow motion. :P

Leotard- this is a two phase thing. part one is actually a white body shaper leotard that I have purchased. At the time I bought it because of my self consciousness with my weight, I thought I could use it to slim down a bit and look better. I have since lost a bunch of weight (more on that later) and am less worried about it, but I'm still going to use it just for smoothing everything. The second part is a white leotard I'm going to make. I can't just wear the body shaper because it's too sheer. I have started on this, I'll provide more details on what I'm doing once I'm done with this list.

Skirt- I'm going to sew this. I have this really nice matte part cotton part satin fabric that's thick and lovely and I am very excited to see how it turns out.

Collar- Same.

Bows- Same. I have some burgundy of the exact same fabric that's just perfect.

Choker- I mean, it's really just a ribbon. Not a big issue. Although it occurs to me that I don't actually have any black ribbon... Haha. Might have to go get that. For the gem on the choker I intended to find something at the craft store but I found an Etsy seller who makes really nice looking gems intended for Sailor Pluto, so I decided to just go with that.

Earrings- Pluto's are fairly distinctive. I found a youtube video with a very detailed walkthrough to make them out of oven bake clay, which I have done and was fairly pleased with them. I think I made them too small though, I might redo it. We'll see.

Tiara- I was going to make one out of foam, but I found an Etsy seller- the same one I bought the choker gem from- that makes really lovely ones out of brass. I do not have the capability to work with metal, and these ones are so pretty. Which how much this costume means to me and how perfect I want it to be, I decided to splurge and go ahead and buy it. It's in the mail now, I can't wait to see it.

Brooch- purchased off of Etsy last year. Pretty sure I know where it is...

Hair- Like I said, I bought a wig. And then just a few weeks ago I found the same wig for much cheaper. So I bought it again. I have a tutorial for how to take a wig apart and sew it into another wig to make it thicker and nicer, and in every picture, Pluto's hair is impossibly thick. I know I won't get it anywhere near hers because I have to live in reality where we have physics, but that doesn't mean I can't try and make my hair a little thicker at least. Plus with adding more hair I can style it better.

Eyes- I have bought some burgundy tinted contact lenses just to make sure I get every detail right.

The Time Key Staff- Ooooohhhh this is the big one. But if I'm going to do this I'm gonna do it right. I'm pretty sure this is doable. Wooden dowel for the main part, cut in segments with steel rods and screws added so that it can be twisted apart for easy storage and transportation. Details will be created out of foam covered in paper mache for sturdiness, I think, and the top part will be carved foam and probably some kind of Christmas ornament for the orb. My plan is still very vague for this part, and I think a lot of it will depend on what I can find.

So, I said I had started on the leotard. Now, I've done EXTENSIVE research on techniques and tutorials and patterns and whatnot for this pattern. There is one particular pattern that is recommended time and time again for sailor scout outfits, but of course it's an old discontinued pattern and not super easy to find. I'm sure I could find something, but turns out I'm too cheap if I think I can do it myself. So I'm starting with trying to make my own pattern.

I started with an old swimsuit:


Still fits and everything, it just got all faded in the sun so I quit wearing it. So I cut it to pieces.


Removed the bit of ruched fabric in front, the elastic from the butt, and cut across the middle to lengthen the whole thing, due to my white fabric not having enough stretch vertically. I have concerns about my fabric not being quite right, but we'll see what happens. I cut that out and sewed the pieces together to come up with something that fit almost perfectly. Still too short for my torso, but everything else was good.

I took the white fabric pieces apart, and in the interest of symmetry cut them in half and traced one half onto paper (adding two inches of length in the middle) twice, flipped one side over and taped them together for a reasonably functional looking pattern.


Uhg. Not gonna lie, I hate how wide that pattern looks. But it does have to stretch all the way around me. And it really did fit nicely in the mockup. I've cut out the actual pieces now and will sew them together soon to see how it looks.

The problem I've run into now is that I don't have enough fabric to make the breastplate thing.

You know, that thing. The top part of the leotard. Most cosplayers interpret that as a whole second piece that they make and attach over top. I do not have enough fabric left to do that and I don't really want to go get more. So I'm hoping that the extra two inches of length I added to the patterns will be just slightly too long so I can just cut a seam there and sew it back together to make that line. If not I suppose I'll just have to go get more fabric.

So! Another thing. I mentioned I lost a bunch of weight. Well, I have had a few previous posts on this blog where I've complained about my weight. (Oh, 162 lb Jessica, how silly and naive you were.) Well, I continued to gain weight. All my attempts to fix it were half assed and quickly petered out. But then my marriage started falling apart. I realized I wanted to leave but it took me about another year to do so. And in that year the stress of it went and doubled my weight gain. Not my weight, my weight gain. I weighed in at one point at 194 pounds. Then I finally moved out and all that stress lifted and I realized that this whole thing was bullshit and it was time to get real. I hated my body, but I was starting to annoy myself by complaining about it. My opinion was if you're not doing anything to fix it, then quit bitching about it. 

I started collecting workout videos on Pinterest and I bought a kettlebell. Just a little 15 pounder. And somehow, I'm really not sure how, I came up with the willpower to get up early before work and workout. I've always been so, so bad at it. It was patchy there for a bit. Anytime I was hungover, or just really tired I'd skip the workout. But then I started getting stronger.

I think the real tipping point was near the beginning of March I did a 2 week clean eating challenge, one that had all the meals planned out and a grocery shopping list and everything. I followed it pretty closely, not perfectly but any subs I made were within the basic guidelines of the plan. And I focused really hard on my workouts. As a result I learned of a lot of healthy foods I liked, quinoa, kale, sweet potatoes, chickpeas. And I started to get some momentum on my workouts, I got on a streak. And I didn't want to break that streak. I don't remember if I missed any workouts in March, but I don't think so. And I lost 8 pounds that month. 

Since then my workout streak has remained unbroken. I workout every day I go to work. Holidays are an exception, I get an extra rest day then, and I don't workout on weekends. Eating healthy has gotten easier, and I still allow indulgences on weekends. I couldn't keep up that weight loss pace and still keep my sanity, but I've settled at a pretty solid 3 or so pounds a month. I've lost more than 20 pounds and gained muscles I forgot I had. I had to buy heavier kettlebells, twice! And I can do push ups again! Like, 4 or 5 maybe, but still! I was only able to do that in high school when I was in color guard. 

I have a few before and after pictures, but no really good current ones, I'll post something once I get those taken. But there is a very visible difference, I fit into my clothes again and I feel amazing. Basically, everything is awesome right now. :)