Showing posts with label steampunk. Show all posts

Friday, November 15, 2013

Shut up, I'm hilarious.


AHAHAHAHAHaHaaaaaa.... I'm so clever.

I should be ashamed of myself.


Anyways, the point of my ultra lame reference making is: I rescued the 5th corset!  I'm so glad!  I really didn't want that one to fail since the image of a brown leather underbust with swing hooks is what started me on my steampunk and corset making path.

Here it is:
yeah, I know the plaid pajama pants kinda ruin the effect.  oh well.  It's after midnight and I didn't care enough to change.
Here's an upclose of the fabric so you can see the pattern:


I'm very fond of it.  and now I have a brown corset with cliche swing hook closures.  I don't care if every steampunk corset uses swing hooks, I think they look awesome.

I managed to rescue the front panels from the original corset, although I did have to add a small strip to the edge to have enough fabric for boning channels.  And I saved about half of the back panels with the grommets in them.  I just barely managed to scrape together enough fabric for the rest of it.  I had to redo panels 2, 3, and 4 to correct the fit issue.  I had to resize most of the bones, but that wasn't a big deal.  I found it was nice to have the front and back closures already done as I was assembling it so I could actually try it on and know it was going to fit before it was finished.  I had to use commercial bias tape, since there was barely any scraps of the fabric left, and on the tops of the front panels it's actually only glued down because the bones in front go up too high for me to sew it down.

However, the liner looks great, the inside is very pretty.  My best work yet, considering it's a salvaged failure.

Yay!

Monday, October 14, 2013

My Corsets

So, I took some pictures of me wearing just my corsets, and I'm going to put them up here cuz I want to talk about them.

We'll start with this one.  (I'm aware the lighting sucks.)  The first one I made.  Made from the scraps of a duffle bag and a suit case, alternating brown and black panels.  I used a generic pattern I found online.  Not a lot of waist reduction, but the fabric looks badass. It was a huge pain to sew though.  So thick, and didn't slide easily through my sewing machine. Inside is a mess, because I'm terrible at sewing bias tape on and the liner doesn't quite fit in places. There's even a spot or two where a boning channel didn't actually get closed when I was sewing, so they've been glued shut.  Quick and dirty fix.  So it's quite messy on the inside.  But it does have the best laces, the ones I got from corsetmaking.com.  I've done several other things for laces, and these are by far the best.  This one's also the easiest for casual wear, I have a sheer black blouse that's hot as hell with this over top.


The second one.  An overbust made from the same pattern as the first.  Burgundy fabric from what looked like a table cloth from Goodwill.  Exterior boning channels done with tape from corsetmaking.com. Same unremarkable waist shape.  This pattern has two gores in the bust, which is really just awful.  I do not have the bust to create the cleavage that would make that shape work.  For me, bust cups have to curve back inward, cuz I just don't have the cleavage.  I should have at least removed one of the gores.  If I ever get motivated I'll overhaul this, because it's almost unwearable as is.  I realize you can't see from the pic, but anyone who cared to see could look straight down my front.  Also, this one has a denim liner which peeks out at the join in the front and makes me insane.  It also had fit problems, and has been snipped and trimmed and glued in place.  And again, store bought bias tape, still badly sewn on.  This is laced with paracord, which does not slide, and makes it very difficult to loosen the laces.  Not a fan. I'll probably change it.


Third: My Jessica Albert corset.  Technically Jessica Albert's thing isn't really a corset, but I wanted to make it that way just cuz.  Drafted my own pattern for this from a tutorial on foundationsrevealed.com.  Much, much nicer waist shape.  Hips are a teensy bit wide.  Not so much that you'd notice, just enough that I know it's not quite right. Put in my first modesty panel since this was lacing up the front.  It's just a closed back, which means I needed enough lacing to be able to pull this over my head.  The problem with this is that means when it's pulled tight, the laces reach the floor.  So I have to tie it in a bow, then tie the bows into a bow to get them short enough.  The fabric is just a faux leather stuff from Walmart.  I tried an experiment with this, adding in a rectangular panel in the back so this would lace closed (to avoid needing the modesty panel) but that destroyed the fit abominably.  And at the point I was at, it would have been too much work to take it apart and take the panel out, so I just folded it in and sewed a seam down the back.  this of course made a big ugly ridge down the back, which I covered with a square of lining fabric.  This liner fit almost perfectly, and since I'd taken my first shot at binding the edges with the same fabric it was made of, I came really close to having a pretty inside.  The bias tape isn't perfect.  This fabric does not hold a crease, but since it doesn't fray either, I didn't bother to fold in the edge on the inside.  The grommets on the front were inserted through predrilled lacing bones, which I will never do again.  It was so difficult to get those grommets through all the layers.  This one is laced with craft cord from the Hobby Lobby.  This is my second best choice for lacing.  Loosens easily enough.  It's just not a nice and smooth as the corsetmaking.com laces.


Fourth!  My newest one that you didn't know about yet!  Also made from my drafted pattern. Again with the pretty waist.  I had not realized the looseness in the hips yet, so that has not been corrected, but again, it's not that big of a deal.  The fabric is scavenged from unused pillow shams from our garage.  I don't believe in pillow shams.  We've had this bed set for most of our marriage, and never once used the shams.  The bust shape has been tailored to fit me, curves inward on top to avoid any unfortunate peeks.  More pronounced point in the front than my others.

This one I straight up made bias tape for.  I even figured out which way the bias went on the fabric and cut it correctly.  Spent a half hour ironing in the creases to the tape.  And my sewing bias tape skills have advanced to where this was almost perfect.  there were a few places where my stitches wobbled, and there's a few folds in the liner where it was just a bit too big, but this one is comparatively gorgeous on the inside.  It makes me so happy.


This one was originally laced with paracord, which is when I decided I hate that, so I changed this to satin ribbon.  Slides more easily than paracord, not as easily as craft cord, but is easily prettier than every other choice.  No modesty panel and no tank underneath, so you can see that strip of skin on my back, and my bra band.  I am thinking I'm going to sew some bra cups into the front so I don't have to wear a bra with this.


So there you have it.  My corset collection so far.  I have plans and supplies for at least three more, four if my boning holds out.  I'm so excited.  I love corsets!

Thursday, October 10, 2013

Steampunk and Cosplay Pictures Part 1!

So, I finally bothered to learn how to use the self timer on my camera.  took all of 15 seconds just to find the right button.  So I have some costume pics for you! They're not amazing, but at least I'm not holding a camera in them.  There's a lot of pics, so I'm going to break it in to two posts, one for steampunk and one for cosplay.  Let's start with steampunk.


The jacket is from the Simplicity 2172 pattern, a very popular steampunk pattern.  tank top and pants I made underneath.  This is made out of some suede/faux leather almost type fabric which I think looks amazing, but it is HOT AS HELL.  So I made the sleeves detatchable.  You can't tell in this picture really, but around the sleeves I put grommets and the sleeves lace on so they can also be removed.

Like so:


That way I can wear it even if it's not the dead of winter in Alaska.

I think I'm going to put a lot of these clothes on Tipsy and get some better detail shots of them.  You can't even see the cool buttons I used on the front of this... sad.


And here's a better look at the pants.  It was just a basic slacks pattern that I tailored to fit better.


Now for undergarments.  Here's my petticoat.  I bought a wedding dress from Goodwill for a few dollars and just destroyed it.  I cut out the interior skirt for a petticoat, cuz I really didn't want to make one.


My spats are made from the fabric of the wedding dress, which makes them really feel high quality and sturdy.  Also, fifteen million buttons.  Only about 7 of them are real though.  the rest are fake, with a zipper hidden underneath.  I got the tutorial for making the pattern for these from here: http://steamfashion.livejournal.com/525310.html


Yup.  that's a bustle pad made by cutting a pillow in half and sewing it closed.  Just a regular bed pillow.  We had some old ones sitting in a closet.  and I sewed ribbon across the top so I can tie it around my waist.


My burgundy bustle skirt, ruffly collared shirt and burgundy corset with black exterior boning channels.  The light's kinda crap, it's hard to see the colors.

I really need to get a real photographer.


Back view.  I can lace the corset tighter than that, but I was just dressing for pictures quickly.

I should have taken a side view so you can see how far my bustle goes out.


With my burgundy bolero.  sleeves made from lace from my old bridesmaid dress.  connected with a chain across the front that you can't see.


With the brown and black striped underbust corset.  Dunno why I'm making a weird face.


And here's a detail shot of the hat I wore to Beerfest with Amanda.  I quite like it, but I'm going to attach it to a headband to make it easier to wear.


All in all I'm pretty happy with my steampunk stuff.  I'm probably not done making stuff, I know for sure I'm making several more corsets.  But I've got several outfits here, and I'm happy with them.

Saturday, August 24, 2013

A Steampunk Excursion!

So, I agreed to escort Amanda to Beerfest today.  Since I don't like beer, I make an excellent designated driver for this kind of thing.  And, kind of out of nowhere, Amanda and I decided to dress steampunk for it.

So, I’ve been creative lately. I’ve been playing around with steampunk and have made some things. Me (the tall one) and my sister in law (the shorter one) all dressed up. I altered the black shirt and skirt Amanda’s wearing, made the jewelry and the gloves we’re both wearing. She made her own hair clip. I decorated my hat, and Amanda helped. I also made the skirt I’m wearing, the little belt with the pouches, and, my by far proudest achievement, the corset I’m wearing. Corsets are hard to make but very satisfying. 

I'm very proud of the steampunk things I've made so far. The corset turned out really good, and fits perfectly.  My sewing machine hates me, though.  It did not like that thick fabric.  In reference to my first steampunk post, here's what you see here: 


The hat and sunglasses are from the Amazon set I bought.  I decorated the hat, and Amanda added the chains on the side.  You can't really see them. I'm gonna get a better pic of the hat soon.  The necklace came from my general jewelry supplies.  The corset is the one that used to be a suitcase and a duffle bag.  You've seen the belt and watch already.  And the gloves. Both sets of gloves were made from my pattern.  The skirt is from the curtains I bought from Goodwill, trimmed with the lace I painstakingly picked from the yellow dress.

Thursday, August 1, 2013

Crochet Fishnet Fingerless Gloves (Now with pictures!)

So, I felt I needed some fishnet fingerless gloves to go with my whole steampunk look, and after an exhausting internet search could not find a pattern for exactly what I wanted.  Not for free, anyways.  So I made one up.  And I'm going to share them here for anyone else that wants them.

Crochet Fishnet Fingerless Gloves

3.5 mm hook
sock weight yarn
2 buttons

Abbreviations:
St- stitch
sc- single crochet
htr- half triple crochet
ch- chain
sl st- slip stitch

I made these to fit me, and I have fairly average sized hands.  If you need a different size glove, change the length of the base chain, just make sure you increase or decrease by 2. The placement for the fingers is made by trying it on and marking the correct spot, so keep that in mind if you change the size.

This pattern is for the left hand, but it does not create a visible right side/wrong side. So for the right hand you can either reverse what you did for the left, or do what I did, and just make two lefts and turn one inside out.  It works either way, and I found it easier to be able to put the glove on my left hand both times to check fit.

The instructions for the fingers might get a little confusing, if something doesn't make sense, please feel free to contact me.

Base chain: Ch 29 sts

  • sc in second chain from hook, sc in each st to the end. turn. (28 sts)
  • ch 2 (this does not count as a st) htr in each st to the end. turn. (28 sts)
  • ch 3, sk st, htr in next st. *ch 1, sk st, htr in next st.* repeat from * to * to the end. turn. (28 sts, 14 open spaces)
  • ch 2 (Does not count as a st) htr in first st, htr in space. repeat to end. turn. (28 sts)
  • ch 5, skip one st, sl st into the second st from the beginning.  repeat to the end. turn. (14 loops)
  • ch 5, sl st in next ch 5 loop, repeat across. (14 loops)
  • repeat previous row 6 times.  
you should now have a rectangle of fishnet with a border on the bottom.  The fishnet should reach comfortably from your wrist to over to web of your thumb to connect to the other side.  You can increase the number of repeats if you need it a little longer to reach.  End off piece.

Thumb- Join yarn to the 4th loop from the beginning

  • Fold piece over to line up fourth loop with the sseventh loop.  sc through both loops at the same time to connect.  This will create a hole for your thumb to go through.  if you need to change the specific number of loops you're working through for fit, feel free.  You will now be working around the hole you made for the thumb.
  • ch 5, sl st in the next loop around the small opening you made.  It was three loops at this size. Do not turn, we're working in the round for this. (3 loops)
  • ch 5 sl st in next loop around one more time (3 loops)
  • Ch 2, 2 sc in next loop around,  3x, join with a sl st to beginning of first ch 2. end off.
Palm- join yarn to the original beginning of row

  • Ch 5, sl st in next loop to the end, skipping past the thumb. do not turn. (about 11-12 loops- getting past the hole in the thumb can make this number vary.  make whatever loops you need to to get past without leaving a huge gap.)
  • join end to the beginning with a sl st to create at circle- this should fit around the palm of your hand. place a stitch marker here if you need to to keep track of rounds.
  • ch 5, sl st in next loop around
  • repeat previous round 3 more times.


This part should be long enough that the fishnet can
reach up to connect between your fingers.  I used safety pins to connect the loops to check for fit.  You can repeat the last round as many times as you need to to fit.

Fingers

At this point, put on the glove. (this is where it really make more sense to make two left hand gloves.  if you're right handed, this would be impossible for the right hand glove. and vise versa if you're left handed.)  Like I said, safety pins were the easiest way for me to do this part.  Mark the stitches on the front and the back of your hand where you want the fishnet to connect
between your fingers.

I found with safety pins I could hook the stitch on the front, and carefully reach the pin between my fingers to pick up the stitch that most naturally fell on the other side.  I did this with each finger before removing the pin to get the fit for each and make sure it was fairly evenly distributed.  I then just added pins to mark each stitch as I disconnected the sides.  It worked out to about 3 loops for the first three fingers, and two for the pinky. It does not matter what order you do this, or whether you start on the front or the back.  I started on the front with the index finger.  Please note, this can be fiddly and imprecise because you're not going to always have clearly defined loops to start with.  Figure out how many loops around you want each finger to be to fit comfortably, and then make sure you have that many loops on your first round around the finger opening.

Join yarn to first marked st.

  •  ch 1, sc to its partner on the other side of the glove. 
  • ch 5, sl st into next loop around the small opening you made with the join. (3 loops)
  • ch 5, sl st into next loop around again.
  • Ch 2, 2 sc in next loop around,  3x, join with a sl st to beginning of first ch 2. end off.
Repeat this for each finger, omitting the first step where it's unnecessary.   The pinky finger was the most difficult, doing this with only two loops was not easy.  In order to keep track of where I was working I had to have my finger in the opening and try really awkwardly to work around it. And I only went around the pinky finger once, since the finger is shorter.

Add a sc border around the opening on the back of the glove to neaten it up.  tuck in all your ends, add buttons and loops at the two solid htr rows on the cuffs to connect the back and you are done.

As you can see, I haven't added the button yet... I'm getting to it! If this wasn't for a steampunk outfit I might go with safety pins, actually, they give it a cool normal-punk look.

Sunday, July 28, 2013

My newest obsession- Steampunk!

So, I've got a new obsession, obviously.  I've been aware of steampunk for some time, but for some reason it just finally caught my fancy and I can't think about anything else. Basically, if you're not familiar, steampunk is kinda a science fiction Victorian age alternate history where steam power became the dominant technology.  And the clothes are fantastic.  As a result of the newly found fabulousness of this, I am making my own steampunk outfit.  Some of the pieces I'll be able to wear in my normal wardrobe, some I won't and I don't know what I'll  do with them, but I don't care.


First in my collection is these two shirts.  just really awesome Goodwill finds.


And these two corset belts, brown and black, from amazon.com for about $5 each.  I love these, they're rad.  I want to wear them over my long tunic sweaters that I wear all winter.

These two dresses are being sacrificed to my project. The black one was my bridesmaid dress to my sister in law's wedding that I will never wear again, and I want the black lace.  The yellow one is a Goodwill find that, again, I just want the lace.

This is the fabric for my big bustled skirt and the bolero jacket I'm going to make.  They are velvety curtains I found at Goodwill for $2 each. I was pleased with myself.
This is the fabric and liner for one of the two corsets I'm planning. Slightly shiny for some contrast against the skirt and jacket.
This is for the second corset.  This one will be an underbust corset and is made up of leather like pieces cut from a suitcase and a duffle bag, also purchased from Goodwill for about $3 each.  I like the idea of different colored panels.
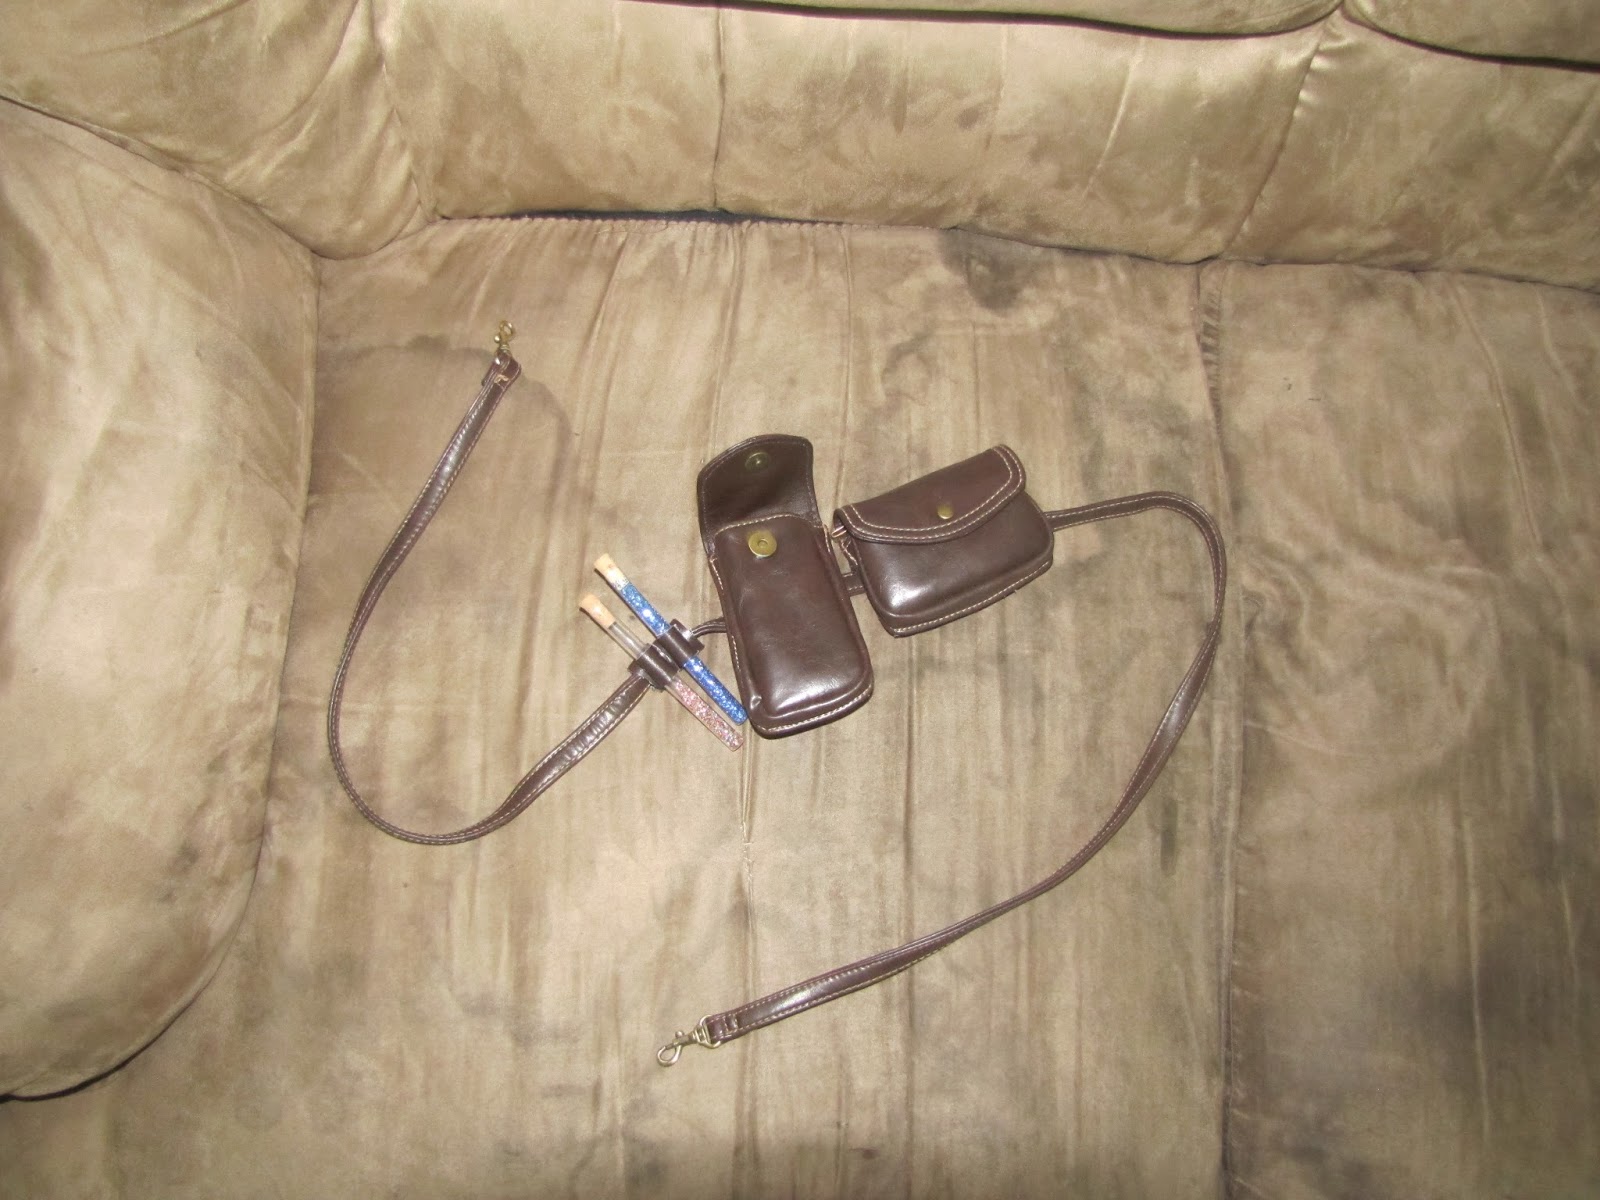
This is a, I guess you could call it a utility belt? It was a purse I bought at Goodwill for $2.50.  I cut out the patches, sewed strips on the back, made holders for the tubes out of scraps, and strung them on the shoulder strap, which I can hook around my waist.  The longer pocket is exactly the size of my phone and the other is perfect for ID, or debit card or whatever.  perfect so I don't need to carry a purse.

Nothing more Victorian than a pocket watch, right? Just something I picked up at Walmart.  The left is a crappy phone pic of how it looked originally, and then I painted it with special metal paints to give it more the color and look I was going for.


This box is full of all my little embellishments. Beads, chains, gears, rivets and whatnot.  I will make jewelry and decorate my outfit with these.
                                    
The glasses were kinda a failed project. I ordered the ones on the left, and they were too big and dumb looking, so after lots of drama I was able to grind them smaller, and dipped them in epoxy to cover scratches, which warped any ability to see through them- right.  Plus they're rough, uneven and they don't look nice. I am not happy.


So I ordered this set here. It's the hat, glasses and choker.  Glasses should be perfect.  I was gonna make a hat, but this might be better. I wanted a black hat, but we'll see how this looks. I figure I can paint it if I need to. And I'll play with the choker.  I figure I can use the ruined lenses to make goggles or something.  Goggles don't really go with my steampunk persona I've created, but I think they'd be fun t make.


This is a picture of some swing clasps I've order so I can have some fancy closures on at least one of my corsets.


Currently I'm working on the first corset.  For the burgundy one I have a pattern I got online- it's an overbust corset.  I've made a mock  up to perfect the fit. Turns out the waist is too high and of course the whole damn thing is too short.  makes sense with how tall I am, I suppose.  I've altered the pattern, lengthening, and changing the shape of the neckline, so I need to do another mockup now to check my changes.


This is the pattern that I'm working off of for the underbust corset and the jacket.  Not so much the skirt, I have an online tutorial that I'm planning to follow for that.  And I plan to make a bustle pad to go under the skirt.


So, the main purpose of this image heavy post was because I wanted to take pictures of all the pieces before they're complete, just for a before/after kind of thing.  I've got no idea how long this will take.


Ooh! one extra thing that this project gave me an excuse to do:
 I made me a duct tape dress form.  it has it's quirks, but it does the job.  It's nice for taking pictures of clothes, as I'm sure you noticed above.  It was a pain to make, my daughter helped me.  But I got it done.  It's handy.  and a little creepy just sitting there in the corner of my office when I'm not using it.  I call her Tipsy.  My husband likes to move it and put it in front of doorways when I'm not expecting it and scare me.