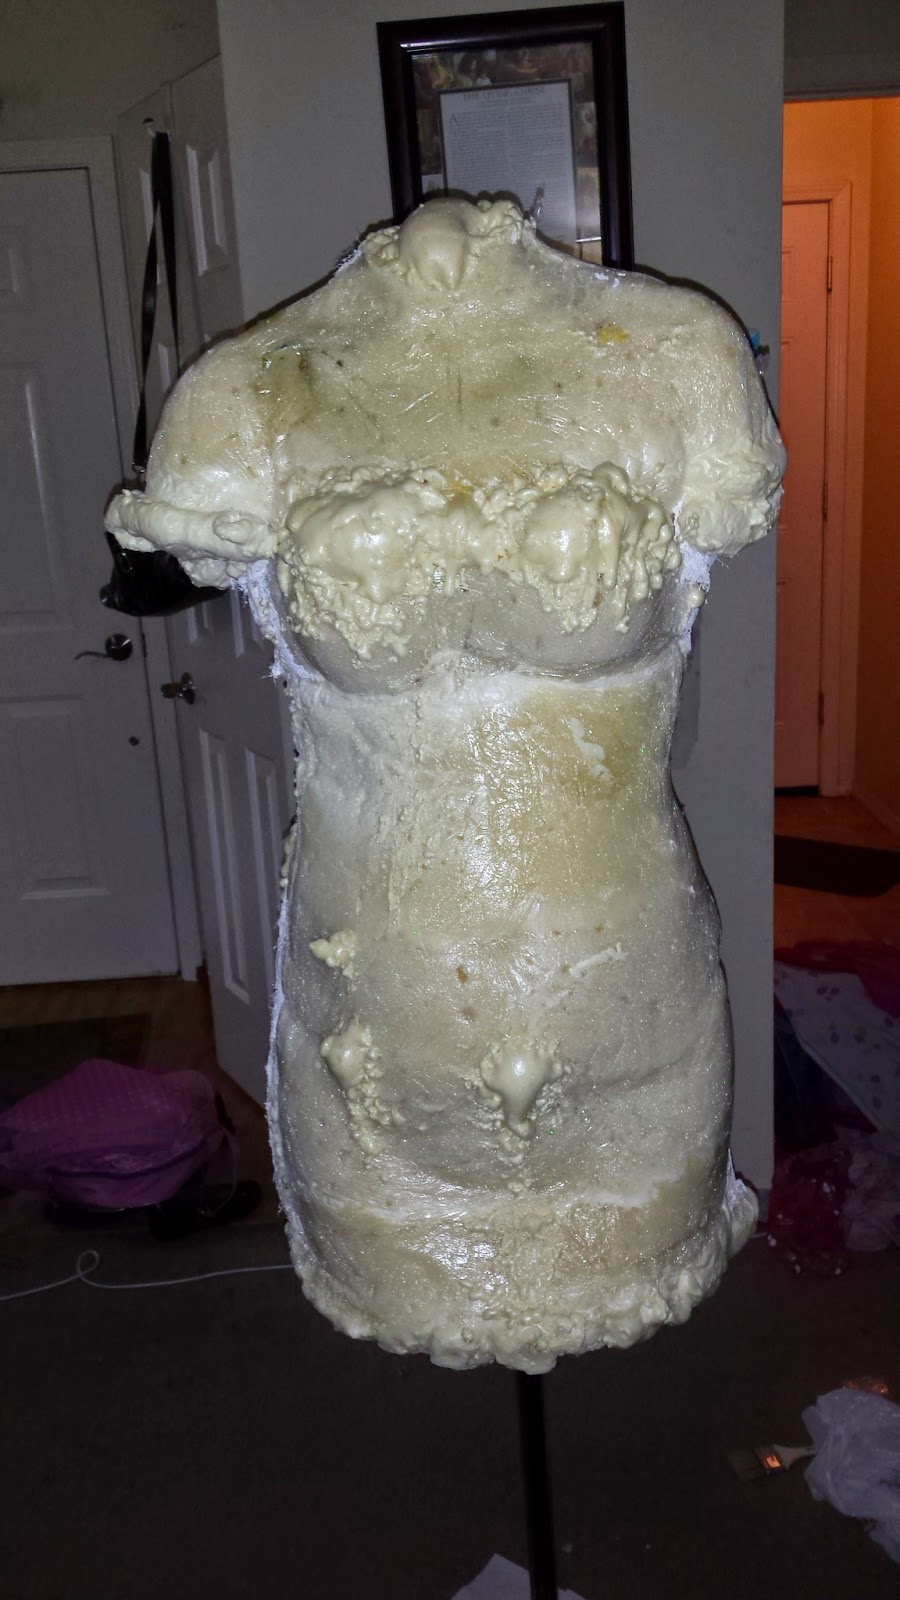
So, I mentioned a little bit ago that I needed a new dressform, poor old Tipsy had lost her shape and simply wasn't cutting it for me anymore. And after a good bit of research I decided I wanted to try the plaster cast and expanding foam method. I'd been wanting to do this for ages, but it's not as cheap as the duct tape form. It cost under $100, but just barely.
I am going to write up my experiences here in case anyone out there could benefit from my horrendous trial and error. There are at least half a dozen good tutorials for this online that I referenced, and I'll link them at the end, but if you're anything like me, you'll want as many opinions and trials as possible to try to discover everything that can go wrong and try to avoid it.
First of all, budget $100 for this. you probably won't spend quite that much, but it'll be close. And have a partner, for the first stage at least. And read all the instructions before starting, you don't want any surprises with this project.
ALSO. For god's sake, do this in the summer, or spring at least. Not the dead of winter. It made so many things more difficult, which I will explain as we go along.
Stage One
The Plaster Cast
This is an important stage, this is where your form gets it's shape. You need:
Plaster bandages
something to cut the plaster with
that partner I mentioned earlier- someone who you are comfortable getting very familiar with. Mine was my sister in law, Amanda.
bottles or something to prop up the sides of the form for drying
waxed thread
upholstery needle
plastic wrap
basting spray
Minwax Polycrylic, or some other form of sealant
I bought my bandages here:
http://orthotape.com/3_inch_face_mask_plaster_bandages.asp
Based on my research, DO NOT buy the plaster strips from craft stores. For some reason they take way longer to dry, and you do not want to extend this stage any longer than you have to.
For cutting the plaster we just had kitchen shears, which made our lives very difficult and crumbled the edges of our forms for a bit. We ended up using a very sharp pair and dragging the blade down the plaster to cut it, but we did risk cutting ourselves doing that. I would work my hand under the plaster so that my hand was between the blade and her skin, which meant that my fingers got sliced a bit. Get bandage cutting scissors. Or something. There has to be a better way than what we did.
Anyways, you do want to cut the plaster into shorter strips, we did just a giant pile of roughly 6 inch long strips. Some people do a bunch of different sizes, we didn't and we did just fine. You will make a terrible mess doing the plaster, so lay down a tarp or do it outside. We worked in the garage, with plastic bags laid down. Which is one of my DON'T DO THIS IN WINTER things. It was COLD. And we were DAMP from the plaster. NOT GOOD.
Wear your crappiest underwear, underwear that you don't care if it survives, because it probably won't. But your bra does need to hold the girls where they normally are so that everything sits the way it should. Some people covered themselves in lotion or vaseline or a plastic bag so the plaster wasn't on the skin. We did not. The plaster basically just feels like pulling off a bandaid when you pull it off, no big deal.
So, you just take turns covering each other in plaster. We worked from just below the butt to over the shoulders and we did two layers, which was plenty strong enough later. The one being plastered cannot help, they need to stand as still as possible. And DO NOT try to suck in your belly. Let it all hang out. You need that space in order to be able to breathe. It the belly ends up larger than you would fit clothing too you can trim it down a bit. Just make sure you're honest about it so the dressform still matches you. This stage will be very bad for your self esteem if you're self conscious of your body, because you can hide nothing.


Well, here we are, all plastered up. Neither of us is fat, but god we felt it after this. We both agreed we hated this stage a lot. And it was cold. WINTER IS A BAD TIME FOR THIS. Luckily Amanda had this gigantic floodlight that put off an impressive amount of heat, so we just stood in front of that for warmth when we were covered in plaster.
It doesn't take too long to set, like 30-45 minutes. which was good, we both weren't fans of the restricted feeling. But it wasn't awful, we could breathe just fine and didn't have a problem with panicking from claustrophobia or anything. You just can't move.
So we cut ourselves out along the sides and tops of the shoulders, and then we laid them out on the garage floor to dry. We propped the sides with the cans of foam we'd bought to keep them from spreading out. They were probably fully dried after about a day, but we didn't have a chance to do anything else with them for several days. After the first day Amanda coated the insides with this:

She did three coats on each side. I had read that it was a very good idea to seal your plaster to make it easier to remove from the foam, which makes sense. At this point, we were having trouble finding time to work together, so I ended up gathering my supplies and taking my stuff home, and we worked independently from here on.
Based on some more reading, I knew I would need more help to keep the plaster from permanently bonding to the foam, so I used some basting spray on the inside of the plaster, and lined the whole thing in plastic wrap. I STRONGLY RECOMMEND THIS. Amanda took a different method and simply sprayed the inside of hers with WD-40. Which only works if you thoroughly soak your plaster form with it. She ended up only getting hers really well in one spot, and she never did get the plaster completely off the rest of it. Mine, with the plastic wrap, peeled off really neatly.
Next, using waxed thread and a big, sharp, curved upholstery needle I stitched the two sides of the form together, to make it whole again. Big, messy stitches, but whatever, it doesn't matter too much.
I had a picture of Amanda's all stitched up, but I don't know where it went. Here it is, plastic wrap hanging over the edges, hanging on the stand that will later be her feet. I did end up using some extra plaster over the stitches to seal the seam better, but I don't think that was really necessary. If it had leaked out the sides, which I don't think it would have, it would have been easy to smooth out.
And now she's ready for foam!
Stage Two
Filling it with Foam
Critical reason number 2 to do this in summer: Expanding foam does not like the cold and will make your life hell! You'll see what I mean.
You will need:
expanding foam (duh) 4-6 cans. I used 6. well, seven, but that's for other reasons I'll explain later.
your plaster cast (also duh)
rubber gloves that will be thrown away
the stand you are using for your form
Again, a messy stage. do this outdoors or put a tarp down. I ended up working in my garage.
This is the foam I worked with:
It came from Home Depot, at about $5.50 a can. I bought 6 for each of us, but I ended up somehow only taking 5 with me. So I picked up some more since I didn't feel like going all the way to Amanda's house. But I accidentally got something different:
Which says it's meant to fill gaps of less than one inch, but let me tell you what, I don't know why, but this stuff seemed to expand way more than the other stuff.
We used an IV stand that I got off of Amazon here:
http://www.amazon.com/gp/product/B000G31FZK/ref=oh_aui_detailpage_o05_s00?ie=UTF8&psc=1 It made a perfect stand for the form. I had hoped that the adjustable height would be handy, but the form covers the knob, so make sure you set it at a good height before setting it in the foam. And simply don't attach the feet until you're done foaming, you don't want to deal with that bulk and weight, there's no reason to at this stage.
With my husband's help, we propped the form upside down. I covered the neck opening with plastic wrap so it didn't get foam on the floor, and then we rested it on a big pile of grocery bags to not crush the plaster. I didn't cover the arm openings because I wanted to be able to add more foam from there if I needed to.
WARNING: If you get foam on your skin and it dries, it will take ALL your hair with it when you peel it off. Keep this stuff off your skin, it does not come off easily or pleasantly.
My husband simply held the stand in position while I sprayed the foam. This was a bad decision. Find some way to prop your form and stand where you want them so that you don't have a human holding it who gets tired and impatient to have the foam done. I knew from my reading that you needed to wait in between cans of foam to give it time to expand before adding the next. My cans of foam did not seem to expand much, no matter how much I shook them, which was probably a result of the cold. I was giving it roughly 20-30 minutes in between each full can.
We did eventually work out a stand with a stack of boxes on either side of the form and a big wooden clamp holding the IV pole in place. I should have waited hours, maybe a day in between each can of foam, to let each layer completely set before adding the next. You will see why. Anyways, she took six cans to fill, and she was left propped upside down in the garage to set for about three days, and then I put the feet on the stand, and flipped her right side up.
I knew right away there was a problem, because when I peeled the plastic wrap off her neck opening, it looked like this:
This is a bad thing. That is a mess of sticky goo, which is what happens when not set foam is put under too much pressure so it can't expand. This is what happens when you fill your form too fast. And it might have something to do with the cold. It's not all bad news though. Out in the sunlight, and with the pressure take off, the goo reexpands into foam.


This is what happened when I let her stand in the sun. So, not good that it happened, but not a disaster. But then she started to drip out the bottom.
.jpg)

This is not good. I eventually flipped her over again and got the foam to harden over the leak to get it to stop dripping. I left it for another week before I took the plaster off, trying to let the foam set again.
Because of the plastic wrap, it was not too difficult to get the plaster off, although it did require a box knife and lots of cutting. Do not maintain the illusion you will preserve your plaster form. You will not. It will have to be destroyed. This is what she looked like freed from the plaster:
You can see places where there was gaps in the plastic wrap and the plaster would not come loose. However:


Do you see that brown spot? That's a baaaaaaaaaad thing. And in the process of taking the plaster off it was discovered the back was too thin, and my husband put his hand inside here and got foam goo on his fingers, which he proceeded to whine about for days, because it wouldn't come off. She was still very, very gooey inside. And now that the goo was out of the plaster it wanted to be foam again.
After a day or so, it started to burst out.
All I could do was lay paper towels under her and let her drain. I did deliberately stab a hole to allow it to drain better. And I just let it drip. It was never going to set while it was contained. So I entertained myself by dealing with several cosmetic things I wanted to fix. She had several air bubbles I wanted to fill, and I hadn't filled the top part of her boobs well so they were lumpy and odd looking. So I took a plastic spoon, scooped up the goo she was draining and spread it over all the areas I wanted to fix.
At this point she got nicknamed "Space Princess" as in the Lumpy Space Princess in Adventure Time. Cuz she was super lumpy. But I knew I'd be able to carve all that out. In the mean time, her butt continued to drain. And as it drained the remaining goo insider her turned back to foam and then expanded,
And then this happened:
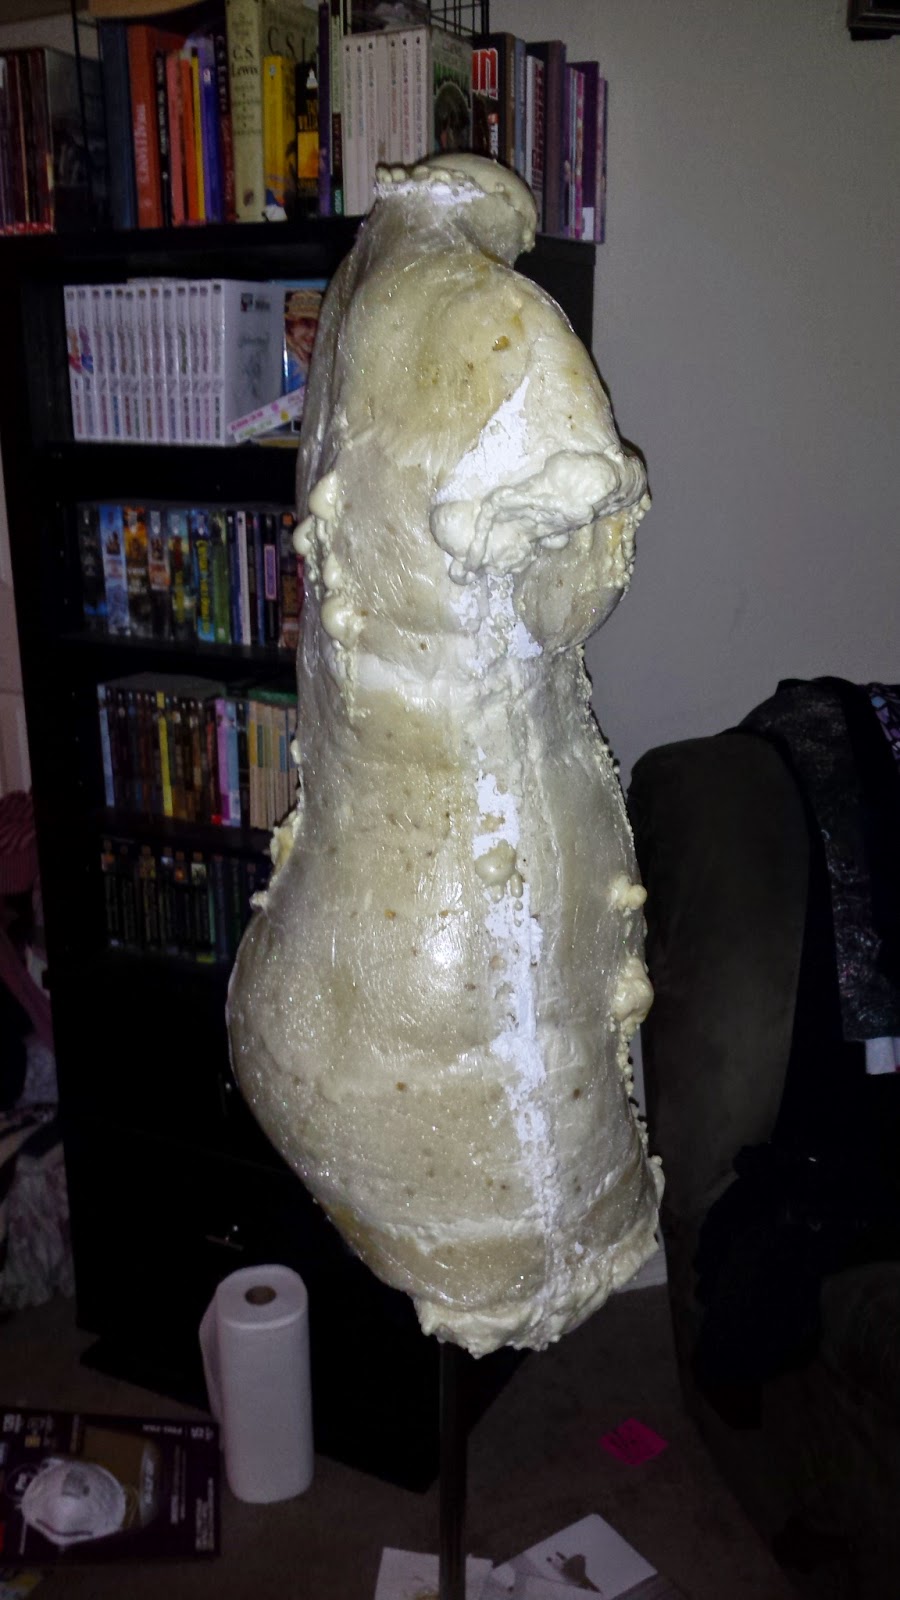 |
| My anaconda don't want none unless you got buns, hun. |
You may not be as familiar with the shape of my ass as I am, but let me tell you what, that ain't it. She had a good six inches on me at this point.
On top of that, her upper chest was now completely hollow. The outer foam had dried, but all the draining had taken away what used to be filling her. I had one more can of the smaller gap filling foam so I intended to refill her, but not until her butt stopped draining. I thought that it had stopped at one point and started cutting into it and found more goo.
Finally it stopped draining. I used a carving knife to cut away the extra foam and make things a little more reasonable.
See? All trimmed up nice. But I needed to fill the hollow chest. Basically I just poked a hole in her chest with the straw of the can of foam and filled her up. I also filled a few more gaps, and the top of her neck to even her out a bit. It was really hilarious the way the foam expanded out of that little hole in her chest. I don't know if it was the different types of foam, or the fact that she was indoors where it was warm, but the black cans didn't do this:
It took several days for that to stop coming out of the hole too. Eventually I kept breaking off the growths to make sure it could keep expanding and not turn to goo again. Finally, I had her all set and shaped:
Doesn't she look better? All her measurements match mine, she even ended up almost exactly my height. At first she was slightly taller, but then because she was full of goo, not foam, she scooted down slightly as she stood. I sanded the plaster a bit to remove more of it, and I used a big carving knife and a metal file to do all the shaping and cutting.
My only concern at this point is that the foam on her butt where it was all expanded is very airbubbly, and too easily crushable for my comfort. I worry that all the expanding stretched it out too thin and it's not going to last. But we'll see.
Stage Three
Covering the Form
Of course it needs to be covered, that foam is not pretty. You will need:
quilt batting (Optional)
super stretchy fabric- roughly 2 yards
needle and thread
hot glue gun
I opted to cover my form in quilt batting before putting the cover on it. It does not noticeably add to her measurements, and if you're worried you can always shave it down a little extra. And it makes her so soft and smooth and pretty.
Basically, I cut out chunks of batting, pinned them to the form, and stretched and trimmed it to fit, then stitched them together in a very Frankenstein kind of way.


I just stitched together on her, basically making a perfectly fitting bodysuit of batting. I did use different batting on the boobs and hips, because that seemed to hug the curves better, but it ended up being visible under the cover, and it looked weird, so I ripped it out and replaced it with the same stuff the rest was made of. I almost cut the thing off her just to try it on myself out of curiosity. It would have told me if there was anything weird about her shape I hadn't realized. But I didn't. I was pretty sure she's good.
For the fabric I took a little less than two yards of cheap white jersey, draped it over top, and then hand sewed seams to make it fit.

I do not recommend cheap jersey. It shredded and ran a bit around the edges and I wished I'd used slightly nicer stuff. This was $1 a yard garbage I got from Walmart, and I got what I paid for. I basically just pulled and tucked the fabric until it laid smooth and fitted. My lines are not straight or even, and I'm aware of that. And since this was less than two yards, the seams and curves ended up pulling it up so much that I had to add a band to the bottom to make sure it was completely covered.
Once I had all the seams sewn I took it off and ran all the seams through my sewing machine to secure them. and I serged the edges around the armholes and the neck. I basically just tucked the raw edge of the fabric under the bottom and hot glued it down. For the love of god, flip your dressform over when you do this, hot glue drips. And burns. Ouch. But the blisters have healed now, it's all good. This is what we ended up with:


Sure she's still a little awkward looking, but she does the job just perfectly, and I can pin into her and everything. During the hot glue stage I glued some scraps of foam to the top of her neck to even it out and covered it in a circle of quilt batting. I intended to add some stuffing and a fabric cap to her neck, to make a kind of pin cushion up there, but honestly, it functions as a pin cushion just fine the way it is, and I'm lazy. The weird rectangle you see on her butt was a little extra protective padding I added to the weird foam right there. I have serious concerns about her butt kind of collapsing on me, and I may end up having to redo all this in the next few years depending on how she holds up. But we'll see. at least this time I know I can do it better, I won't have nearly the same issues that I did before.
I didn't put up any pictures of Amanda's process, but I will, she had some different issues. I just feel this post is plenty long enough as it is.
For your reference, here are the blogs I referenced for my instruction:
http://jezebel.com/5803791/how-to-make-a-custom-dress-form-part-one
http://lulushion.blogspot.com/2011/05/cast-yourself-or-making-of-dress-form.html (just for the fabric cover, I had no desire to draft a pattern for this.)
http://katastrophicdesign.blogspot.com/2013/04/the-ultimate-diy-dress-form-tutorial.html
http://joost.decock.org/fromscratch/dressform
***EDIT***
As of yesterday, I checked and her butt is already developing severe dents and holes. It is collapsing on me, like I was worried about. Just her butt, the rest seems to be holding up fine. I have one remaining can of foam, I am considering cutting out the bad foam, just spraying more foam in the area that I cut out, and sculpting it to match my butt. I think I could more or less follow the guides of her shape to make it look good, and I can make her match my measurements easily enough. I don't want to remake her if I can avoid it, because it will cost another $50 for new plaster and new foam. At least I can reuse the stand. But I also don't know how deep this weak foam goes. It may end up being an overall structural failure and she'll collapse completely. I cannot emphasize enough, DO NOT do this in the cold and make sure you give it plenty of time for each can of foam to set.