
Thursday, August 30, 2012
nothing to see here...

Monday, August 27, 2012
Progress... slowly...

this is sooooo slow....
Wednesday, August 22, 2012
The Back Panel
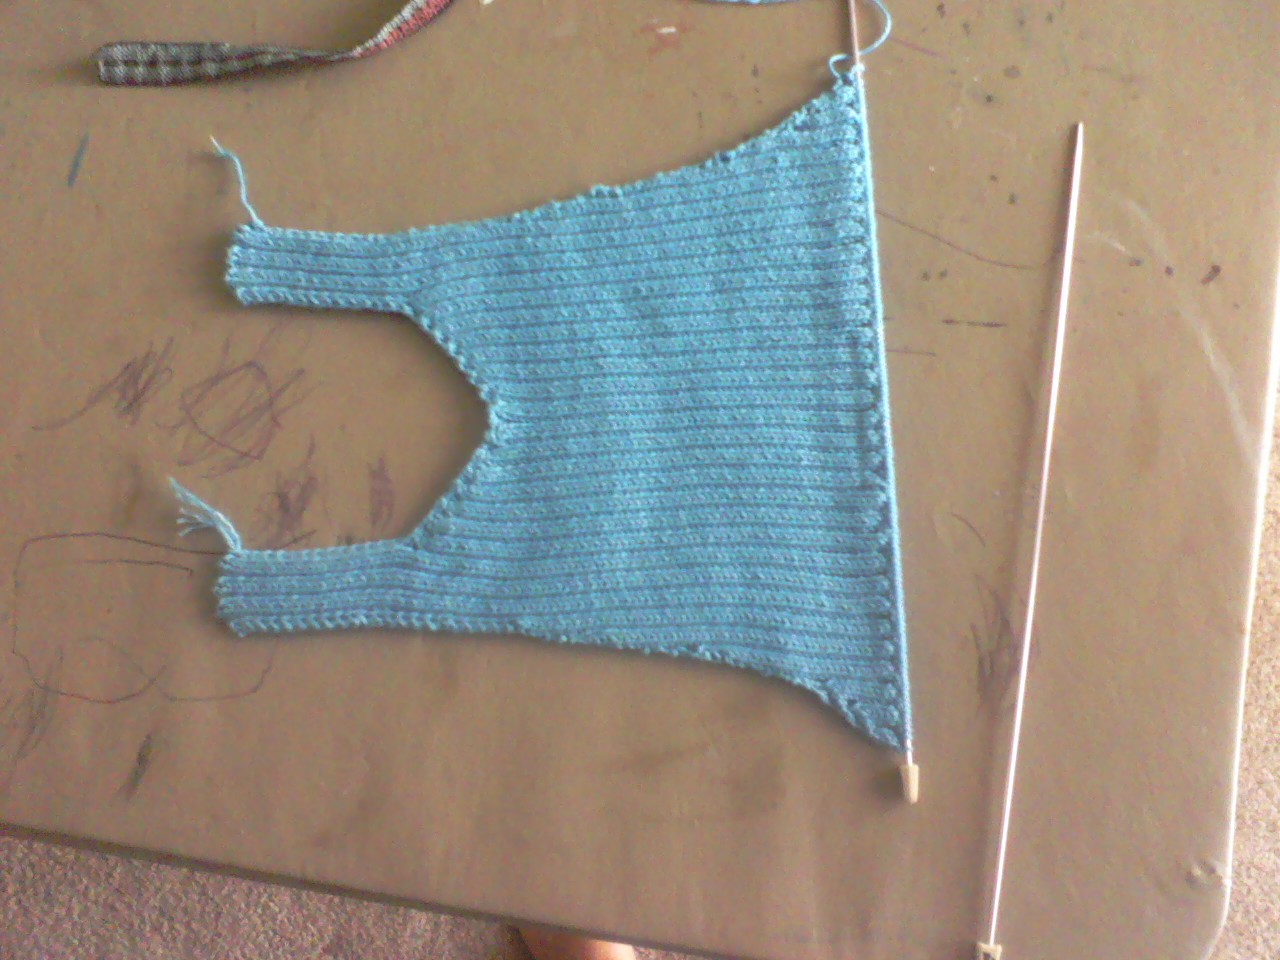
process was the same as the test run for the straps, with the two balls of yarn. while working on it, realized I'd made a mistake. While math-ing this, I was using my number of 10 rows per inch. measured the finished front panel and got 9 rows per inch. I figured if I just started my increases on the sides as soon as I had the straps joined that would make up for it. once I had the straps joined I measured again and got 10 rows per inch, and realised I LEFT THE FRONT PANEL TO HANG. you know, to test the stretch? so the 9 rows was after stretching. which meant I needed to work in a few more rows to make sure this hit 10" long by the time it was 18" wide. gah. as a result, my increases seem a bit random I also realised that 118 +20 is 138, not 128. apparently I'm a moron. which means I needed WAY less increases than I thought. so much stress... add this to the fact that I'm consistently getting 6 sts to the inch, rather than 7, which is the number I based my math on, I was going insane. I got it figured out though, and this is what I did.
one row after the join to solidify it. piece was 4 1/2" long, about 11" across. I think. hard to measure ribbing.
inc one st on each side
plain row
plain row
increase
plain
plain
increase
plain
plain
increase <---- It was here I realized the length problem. piece was 5 1/2" long.
plain <---- one inch
plain
plain
increase
plain
plain
plain
increase
plain
plain
plain
plain <--- two inches (eleventh row is extra to make up the length) 6 7/8" long
increase
plain
plain
plain
increase
plain
plain
plain
increase
plain
plain <--- three inches just shy of 8" long
plain
plain
increase
plain
plain
plain
increase
plain
plain
plain <--- four inches. no need for an extra row. 9 1/8" long
increase 1 st on each side (to make sure we have a complete bar of ribbing)
plain
increase 2 sts on each side
plain
increase 2
plain
increase 2
plain
increase 2 <--- 10" long and 128 sts across. my math said it should be 126 for gauge. after carefully stretching across two needles, I believe I have it correct.
so you can see the increases were not evenly spaced because of my mistakes. if I make this up into a pattern I'll refigure it just for neatness' sake. the piece looks fine. I'm just OCD. now I'm to the point where I just knit straight down for forever. and with this being 128 sts across, I do mean FOREVER.
A Different Project- River Tam's Vest
So, I watch Firefly. I adore Firefly. I cry into my pillow every night that there isn't MORE Firefly. if you haven't seen Firefly, quit reading this and go watch RIGHT NOW. It's on Netflix streaming.
 |
| This is River Tam. |
http://dragoncrafter.livejournal.com/20094.html
this, my friends, is a step by step crochet pattern for that gorgeous vest River is wearing. now, when I found this, I didn't know how to crochet. but I'd always thought I should learn, since I love knitting, and love learning new things. At first glance at the pattern, I despaired of ever understanding it, and considered asking my mother in law to make it for me. but I perservered. My job is utter bullshit, and I literally do NOTHING. (Not exaggerating. I love my job.) So I got a hook and some yarn and hit up Youtube. successfully taught myself to crochet. It wasa bit difficult without someone there to show me and for me to ask questions, but I got it. I got more comfortable by getting in to making amigurumis, which are super cute and super fun, I may make some posts about the adorable things I've made. Basically that helped me understand how to read a pattern, and really make sure I knew what I was doing. I'm gonna go ahead and put my process in here now.
IMPORTANT: this pattern was not written for a size small or medium. KEEP THAT IN MIND. YOU MAY NEED TO ADJUST FOR SIZE.
for the record, not to offend anyone who's done it this way, (do what works for you, this is just my opinion) but I do not recommend changing the triple crochets to doubles and the quadruple crochets to triples. it seems to take away from the open look of the vest and you end up with something thicker and heavier. you just don't get the same look. just change hook sizes to get what you need to fit you. the 2.0 mm hook was perfect to me, and I'm generally between a small and a medium. also, for accuracy, the fingering weight yarn is important. www.knitpicks.com is a great site for yarn with fantastic prices. the smaller hook and the fingering weight yarn alllow you to include all the edging rows so your vest is as screen accurate as possible.
11/11/11 yarn purchased. I’m so excited!

11/23/11 So, halfway through the first square and I’ve come up with some upsetting math. on a C hook with fingering yarn, this square will likely turn out around 15 1/2” across. way too much for my little rib cage. So, after some experimenting and swatching, I’m going to undo everything I’ve done sob and restart on a 2.0 mm hook. Math says that should be 14.2” across, but this is not accounting for the smaller first three rounds, so probably more like 13”. which is only slightly bigger than my goal, which is 12”. probably an acceptable margin. we’ll see. sigh…
math says my current square should be 17”, but it’s an inch and a half smaller. so this should be right.

3/22/12 took another break to finish my husband’s socks- I don’t like making socks, so I made myself focus on only that project and nothing else, or I knew I’d never get done. back on track again. I finished the first square, it came in at about 12 and 1/4” across. which is absolutely perfect. I am pleased. the 2.0 hook was a good switch. also it’s nice that I got it right on my first try with a different hook. I thought it was going to come out an inch bigger, but I guess my gauge was smaller than I thought. I’m okay with this. On to the next square!

7/24/12 yay motivation is back! those tedious socks kinda killed me for a bit. but I’m back in the game now, started again yesterday and now on round 10 of the second square. just used up my first skein. hoorah!
I messaged another member who made this vest to get some help on finishing, who was fantastic about it. http://www.roguebibliophile.com/2011/12/04/river-tam-vest-finishing-notes/ very much better. the notes on the original pattern were way too vague for a brand new crocheter.

this is for my own reference: someone who created this outfit and did a great job on the dress: http://jj9437.livejournal.com/80028.html
7/30/12 a few notes- out of sizing paranoia I left off one row on the back, between the squares. should not have done that. It still fits, I just think it would fit a bit better if I still had that row. It’ll still be okay though. also, I went back and added a few rows to the shoulder straps- I did 15 instead of 12, as biteyfish’s instructions said. I will also probably add some rows to the bottom panel of finshnet as well. Keep in mind, though, I’m 6’ tall with a freakishly long torso, so I need the length. I stuck with my 2.0 mm hook for the rest of the vest, but part of my is wondering what would have happened if I’d gone up a size to try to get a looser look. Too late now, but worth pondering if I ever redo it.
8/2/12 all done! I’m so happy with it! the fit is fine, despite my worries. I added a picot stitch in between the two tr in the last row of the edging along the bottom and down the front to make it more accurate, and the tie is just a double stranded chain laced in the spaces in the front. I used very nearly three skeins- like literally, I had a few feet left- of my yarn. the ivory color I got is perfect, I think. I love it, and I’m very happy. Gigantic thank yous to Ariel Barton for coming up with the pattern in the first place and biteyfish for helping me with the finishing.
and yes, I did go on an epic quest to all the nearby thrift stores to find a dress somewhat similar to River’s to go with the vest.


There you are. The whole thing. I completed the project I learned to crochet for.
Saturday, August 18, 2012
Running out of ways to say "Here's more about the duster!"


Friday, August 17, 2012
more increasing thoughts
inc
p
p
p
inc
p
p
p
inc
p
one
p
p
inc
p
p
p
inc
p
p
p
two
inc
p
p
p
inc
p
p
p
inc
p
p
three
p
inc
p
p
p
inc
p
p
p
inc
four
p
p
p
inc
p
p
p
inc
p
p
five
p
inc
p
p
p
five and a half
go to
inc2
p
inc2
p
inc2
p
inc2
p
inc2
p
this means starting the increases at 31/2 inches, so just after finishing the straps. no, this is a bad plan. stick to the other, only two plain rows inbetween inc.
p
p
p
inc
p
p
p
inc
p
one
p
p
inc
p
p
p
inc
p
p
p
two
inc
p
p
p
inc
p
p
p
inc
p
p
three
p
inc
p
p
p
inc
p
p
p
inc
four
p
p
p
inc
p
p
p
inc
p
p
five
p
inc
p
p
p
five and a half
go to
inc2
p
inc2
p
inc2
p
inc2
p
inc2
p
this means starting the increases at 31/2 inches, so just after finishing the straps. no, this is a bad plan. stick to the other, only two plain rows inbetween inc.
Thursday, August 16, 2012
More.
 So, did a quick test run for making the back panel of my Rinoa jacket. Here's what I did:
CO 16 sts each from two different balls of yarn. to start with it's gonna be two seperate pieces, doing it like this makes sure they're the same length.
k2, p2 across for about three inches. so you'll have two completely independent pieces just hanging off the same needle.
 kfb/pfb depending on what's needed on the last two sts of the first piece on the needle and the first two sts of the second piece. so towards the inside, increasing the pieces towards eachother. keep doing this every row until the pieces together measure about 11"-12" across. that's about the comfortable length to go across my shoulders.
with the thicker yarn I was using to practice, I increased from 16 to 42 sts. If you think about it, that makes sense, since my front panel increased from 16 to 44.

now, I'm not gonna lie, the yarn I was using SUCKED. made my hands itch and was stiff and unfriendly, didn't like to slide over the needles or anything. so I stopped at this point when I really ought to have gone on to make sure of the rate of increases to get it to full size. I did not. I could not knit with that yarn anymore. I threw it all out when I was done. uhg. that crap is garbage. it was just some random stuff my mom had. Anyways, here's what I know.
Measuring myself across my back from sideseam to side seam is about 18". and I know from my current front panel that I need to be done increasing by 10" long for them to match up. I made nearly 5" of length with the back straps and neckline. I believe at this point I want to start a real gradual increase. now, normally I increase two stitches at a time, maybe I ought to think about just one at a time? I don't know what that would do to the ribbing. it'd probably be fine. I don't want it to increase as rapidly as I did on the front, the back is shaped a little different.
I believe, based on gauge math, I'm going to need to get from about 80 sts to about 126 in 5 inches. it's 10 rows to an inch, so that gives me 50 rows to increase 46 sts. and I'll be doing them two to a row, since I have to increase both sides. SO, if I just increase one sts, and alternate each row with a row without increases, and maybe throw in three or four rows without increasing to begin with, that ought to get me there perfectly.
the problem with this is this is all very specific math. so it's all subject to recalculation as I go along. but now that I've math-ed this a bit, it should be easy enough to plug in new numbers when I get there. but it ought to be right, since I'm basing these numbers off my gauge of my actual yarn. the only thing I'm taking from the practice yarn is the length before I start. and that'll be the same regardless. probably.
incidentally, I've decided this back panel is going to be the hardest part, since it's more than twice as wide as the front panels. (almost three times... but the front panels are allowing for a gap in the front) it's gonna go a lot more slowly. so I think I will start on that as soon as I'm done with this front panel, because that'll leave another front panel for last, to give me something a little quicker to work on at the end when I'm surely going to be getting tired. oh, and the armwarmers, of course, but after these big tedious pieces, the armwarmers are gonna feel like nothing.
just thinking...
might need to save some increases for there at the end of the increasing section, you know, the part that goes under my arm. it can't really be a straight line, it needs to curve. gah.
LATER THAT NIGHT...
I'm thinking about this, and it helps if I type as I think, then I can organize my thoughts and go back. so. we need the increases to pick it up sharply at the bottom without getting too wide. so, lets say we still start increasing at 5", but do two plain rows instead of one between increasing. for like... four inches.
so math.
inc
plain
plain
inc
plain
plain
inc
plain
plain
inc
one inch
plain
plain
inc
plain
plain
inc
plain
plain
inc
plain
two inch
plain
inc
plain
plain
inc
plain
plain
inc
plain
plain
three inch
inc
plain
plain
inc
plain
plain
inc
plain
plain
inc
four inches
14 increase rows: 28 sts increased. still neet to inc 18 sts. which means 9 rows of increases. only have 10 left. too abrupt. but what if I do two sts for the last inch? which means 4 sts on each inc row. and just alternate one row. so,
plain
inc
plain
inc
plain
inc
plain
inc
plain
inc
that increases 20 sts. but that might be okay. it's only two more.
break for food!
Subscribe to:
Posts (Atom)