Friday, September 20, 2013

Project Updates

Yes, I'm still working on my steampunk stuff.  I have a second corset done, and the bustle skirt, the bolero jacket and one set of spats done.  I even have a bustle pad and a petticoat.  I'll give you more details on that when I get some pictures of them.  Tonight I have a different project I'm working on.  A new cosplay.  I've had this one in the back of my mind for some time, because it's from one of my all time favorite games that's not Final Fantasy or Zelda, and it's a fairly simple outfit.

I give you Jessica Albert, from Dragon Quest VIII:
She's the sexy badass sorceress of the party.  NOT the healer, incidentally.  That job's left for the pretty boy.  She's the "I'm gonna roast these motherfuckers alive." She's also brutal with a whip.  Aaaand I suppose she's also the super obvious sex object of the game... She has a set of abilities called "Sex Appeal and her outfit can change periodically...


Yeahhhhh....

Anyways,  I love her.  I am doing her basic outfit, mainly because I don't want to walk around half naked.  I may do the bunny suit but that's for personal reasons and you don't get to hear about that. :D

I have the top and the skirt done.  The top is a thrifted turtleneck that's been dramatically altered, the skirt is a curtain with a petticoat made from a bedskirt.  I'll go into those more once I have pics.  Today I want to talk about her whip.  I made one!

I recently learned how to do kumihimo, a form of Japanese braiding made on a disk. Looks like this: 


It's fun and it's simple.  Shannon really enjoys it.  So anyways, I was looking around for a whip, cuz I really didn't feel Jessica's outfit would be complete without one.  And I don't want to put a lot of money in to it since it's just a prop.  A cool prop, but still a prop. I saw cheap costume ones that look like cheap costume ones, or tutorials for making them out of duct tape, which is also cheap looking.  Then I saw some tutorials for making real bullwhips out of paracord.  Now, I do not know how to do the types of braiding required for these projects (although I might learn, it would be cool to have a real bullwhip) but I did realize I know one fancy method of braiding. (See above.) I decided a kumihimo whip would be rad.  When I went for supplies, I intended to do paracord, but I found craft cord to be a much cheaper option.  I bought two skeins of 50 yds each for 2.99 each.  And used far far less than I thought I would.  And it turned out awesome.


I don't know if you can tell, but I shaped it to match the Leather whip, Jessica's starting whip.
Wrist strap, wrapped handle, little knobby bit at the end.  Although technically it is too dark brown.  Ah well.  I sacrificed color for price. 

I wanted a roughly 6' whip, not counting the handle, and based on other things I've made and other instructions I've read, I knew that a safe assumption for how much string to cut is roughly 3x the finished length. That's 18 ft for each strand, with an extra 3 feet or so for the handle.  I shot really high because I've come up short using this guess before, and I really didn't want that to happen.  So I cut each strand 25 feet long.  That was a pain in the ASS to keep from tangling, let me tell you what.  I had some kumihimo bobbins, but because of the thickness of the cord, they were held to far open for friction to keep the bobbins from unwinding, which  meant I had to pin them in place, and even that didn't always hold cuz the cord was slippery on metal pins.  It was awful.
I started with an 8 strand braid, with a core of two strands of paracord in the middle.  For the handle I added in a pen for stiffness. (I intended to use a large nail or bolt or something, but I was at work and didn't want to wait to get something else.  I worked with what I had.) I basically just stuck this in the middle, between the two paracord strands, and braided around it, wrapping it in cord.  At the end of the pen I tied a knot on top of it with the strands of paracord to keep it in place.  After the handle I continued the 8 strand braid around the strands of paracord for 2 feet. At two feet I took two of the strands, wrapped and tied them around the paracord, removing them from the braid.  I also cut off one of the strands of paracord.  I continued from there with a 6 strand braid around a single strand of paracord.  I kinda had to figure out the 6 strand braid on my own, I couldn't find anything online about it.  If you're curious, it works like this:


You work the sets of two strands just like normal, and the single strands basically just change places, moving over one space every time to keep up with the rotation of the two strand sides.  If anyone out there would like a more detailed description of this, just leave me a comment or something.  I can be clearer if you want.
I did this for another two feet.  At that point I took the two single strands and wrapped and tied them around the paracord, reducing the braid to 4 strands.  I chose the two single strands because the single strand sides use up string faster, and I didn't want any of my strands to be shorter than the otheres when I was working on my 4 strand braid.I thought I might have to cut the paracord off here, but I didn't and I'm glad. It added more solidity to the last segment.

I had trouble figuring out how a 4 strand kumihimo worked, I ended up having to watch several videos of people doing it to understand, but I got it.  I did this for another two feet.  Then I started on the knobby bit on the end.  First of all, The knobby bit is made out of a flip cell phone shaped eraser I had in my desk at work that I had no use for.  It was a cute eraser though.  Flipped open and closed and everything.  I glued it shut.  One side of it was neon orange, so I colored that black with a sharpie, and then covered it in glue and wrapped it in the same cord the whip was made of.  I really didn't want it to show through the braid.  I tied the paracord core around it long wise to attach it to the whip.  I did this about two or three inches away from where the braid currently was.  About an inch below the knob I took four long strand of cord and wrapped and stitched them to the paracord.  I don't know exactly how long they were, they were leftover bits, probably roughly 6' long.  I continued the 4 strand braid up to where I'd attached the other four strands.  when I met up with those, I added them to the braid, switching back to an 8 strand braid to cover the knobby bit.  In order to work the knobby bit I actually had to cut the hole in my kumihimo disk bigger so it would fit.  Luckily I have a bunch of them since they're cheap as crap.  it's just a foam disk with notches.  So I continued with an 8 strand braid around the knobby bit.  when I got it about half covered I covered the top half of the knobby bit in glue, and continued braiding.  This way the top half of strands were glued to the knob and I wouldn't have any problems with it sliding around.  That was probably pure paranoia, but better safe than sorry.  I braided about a half inch after the top, and then with a needle and thread carefully gathered up each strand and stitched them together at the top.  I used a lighter and singed all the strands, then squished them together.  They melted into a lovely plastic mass.  I did this anytime I cut or tied any of the strands, to make sure there would be no fraying or coming apart.

The handle is wrapped in three layers of cord, just wrapped around it.  The knob at the end is made of a basic three strand braid, wrapped and tied to make the wrist strap and the base.  I didn't do anything tricky there, it's just wrapped until I liked it, and then ends strategically melted and hidden.

The whole thing took me three days at work, working on it about 3-4 hours each day.  so really not that bad.  It measures 91 1/2" from tip of knob to end of wrist strap,  87 1/2" if you don't count the wrist strap, which really makes more sense.  So that's 7.2 feet.  just about perfect.  I'm extremely happy with it.

Incidentally, like I said, I way overshot with how much cord I would need.  I probably had at least 6' of each left over.  But I've always been of the opinion that too much is better than not enough.

Saturday, September 7, 2013

Mako-Chan's Jewelry


Something I threw together just this morning:  Makoto Kino's earrings from Sailor Moon.  I've always wanted them, they're simple and pretty.  So, a little while ago I found these gold rose shaped buttons at Walmart.  Simple coat of paint, glue them to some posts and there you go.


Oh, and it was a set of three buttons, so I made a simple chain choker to go with.   I thought the simplicity was very in character for Mako-chan.  she'd never wear anything big or flashy jewelry-wise.

Friday, September 6, 2013

Thrift Store Overhaul!


So, I find those blogs that buy nasty thrift store clothes and remake them extremely inspiring, so I decided to try it myself.  I got this suit from Goodwill for $3.  It was a size 16, I think, which is several sizes too big.  The jacket was shapeless and I'm really not sure if the sleeves were supposed to be 3/4 sleeves, or were just really short.  The pants had a gathered elastic waistband and were super baggy.  They looked awful.  The nature of the black suit is such that you can't really see how bad it fit, but it was really awful.  So I took the thing apart.

First, the skirt.  I have lots of practice turning pants into skirts, I've done it half a dozen times this summer, the challenge this time was I wanted to do away with the gathered elastic waist and go to a much smoother pencil shape with a zipper.  So I cut the waistband off, cut the length to where I wanted, took out the crotch seam and stitched it into a skirt shape.  I added a zipper using some techniques I'd picked up from a pair of pants I recently made. (which I really ought to get a picture of, they turned out nice.) I added a lovely smooth waistband that you cant see, you'll just have to trust me that it's much nicer.

The jacket I cut down based on this tutorial here: http://autnott.deviantart.com/art/Up-Cycled-Hobbit-Vest-Tutorial-339969518

The jacket was big enough that it lent itself perfectly for the kind of double breasted look I was going for.  In fact, I may add a second row of buttons, but I'll have to go buy more first.  I had to reshape it to fit, taking in the side seams, and the seams on the back so it would actually fit me, giving the nice curvy shape you see here.  I relearned how to do buttonholes, and bound everything up with bias tape.

All in all, I'm pretty happy with how it came out.  Much, much sexier.

Also, for the record, it's not plain black, it's got a light blue pinstripe that doesn't show at all in the pictures.

Saturday, August 24, 2013

A Steampunk Excursion!

So, I agreed to escort Amanda to Beerfest today.  Since I don't like beer, I make an excellent designated driver for this kind of thing.  And, kind of out of nowhere, Amanda and I decided to dress steampunk for it.

So, I’ve been creative lately. I’ve been playing around with steampunk and have made some things. Me (the tall one) and my sister in law (the shorter one) all dressed up. I altered the black shirt and skirt Amanda’s wearing, made the jewelry and the gloves we’re both wearing. She made her own hair clip. I decorated my hat, and Amanda helped. I also made the skirt I’m wearing, the little belt with the pouches, and, my by far proudest achievement, the corset I’m wearing. Corsets are hard to make but very satisfying. 

I'm very proud of the steampunk things I've made so far. The corset turned out really good, and fits perfectly.  My sewing machine hates me, though.  It did not like that thick fabric.  In reference to my first steampunk post, here's what you see here: 


The hat and sunglasses are from the Amazon set I bought.  I decorated the hat, and Amanda added the chains on the side.  You can't really see them. I'm gonna get a better pic of the hat soon.  The necklace came from my general jewelry supplies.  The corset is the one that used to be a suitcase and a duffle bag.  You've seen the belt and watch already.  And the gloves. Both sets of gloves were made from my pattern.  The skirt is from the curtains I bought from Goodwill, trimmed with the lace I painstakingly picked from the yellow dress.

Thursday, August 1, 2013

Crochet Fishnet Fingerless Gloves (Now with pictures!)

So, I felt I needed some fishnet fingerless gloves to go with my whole steampunk look, and after an exhausting internet search could not find a pattern for exactly what I wanted.  Not for free, anyways.  So I made one up.  And I'm going to share them here for anyone else that wants them.

Crochet Fishnet Fingerless Gloves

3.5 mm hook
sock weight yarn
2 buttons

Abbreviations:
St- stitch
sc- single crochet
htr- half triple crochet
ch- chain
sl st- slip stitch

I made these to fit me, and I have fairly average sized hands.  If you need a different size glove, change the length of the base chain, just make sure you increase or decrease by 2. The placement for the fingers is made by trying it on and marking the correct spot, so keep that in mind if you change the size.

This pattern is for the left hand, but it does not create a visible right side/wrong side. So for the right hand you can either reverse what you did for the left, or do what I did, and just make two lefts and turn one inside out.  It works either way, and I found it easier to be able to put the glove on my left hand both times to check fit.

The instructions for the fingers might get a little confusing, if something doesn't make sense, please feel free to contact me.

Base chain: Ch 29 sts

  • sc in second chain from hook, sc in each st to the end. turn. (28 sts)
  • ch 2 (this does not count as a st) htr in each st to the end. turn. (28 sts)
  • ch 3, sk st, htr in next st. *ch 1, sk st, htr in next st.* repeat from * to * to the end. turn. (28 sts, 14 open spaces)
  • ch 2 (Does not count as a st) htr in first st, htr in space. repeat to end. turn. (28 sts)
  • ch 5, skip one st, sl st into the second st from the beginning.  repeat to the end. turn. (14 loops)
  • ch 5, sl st in next ch 5 loop, repeat across. (14 loops)
  • repeat previous row 6 times.  
you should now have a rectangle of fishnet with a border on the bottom.  The fishnet should reach comfortably from your wrist to over to web of your thumb to connect to the other side.  You can increase the number of repeats if you need it a little longer to reach.  End off piece.

Thumb- Join yarn to the 4th loop from the beginning

  • Fold piece over to line up fourth loop with the sseventh loop.  sc through both loops at the same time to connect.  This will create a hole for your thumb to go through.  if you need to change the specific number of loops you're working through for fit, feel free.  You will now be working around the hole you made for the thumb.
  • ch 5, sl st in the next loop around the small opening you made.  It was three loops at this size. Do not turn, we're working in the round for this. (3 loops)
  • ch 5 sl st in next loop around one more time (3 loops)
  • Ch 2, 2 sc in next loop around,  3x, join with a sl st to beginning of first ch 2. end off.
Palm- join yarn to the original beginning of row

  • Ch 5, sl st in next loop to the end, skipping past the thumb. do not turn. (about 11-12 loops- getting past the hole in the thumb can make this number vary.  make whatever loops you need to to get past without leaving a huge gap.)
  • join end to the beginning with a sl st to create at circle- this should fit around the palm of your hand. place a stitch marker here if you need to to keep track of rounds.
  • ch 5, sl st in next loop around
  • repeat previous round 3 more times.


This part should be long enough that the fishnet can
reach up to connect between your fingers.  I used safety pins to connect the loops to check for fit.  You can repeat the last round as many times as you need to to fit.

Fingers

At this point, put on the glove. (this is where it really make more sense to make two left hand gloves.  if you're right handed, this would be impossible for the right hand glove. and vise versa if you're left handed.)  Like I said, safety pins were the easiest way for me to do this part.  Mark the stitches on the front and the back of your hand where you want the fishnet to connect
between your fingers.

I found with safety pins I could hook the stitch on the front, and carefully reach the pin between my fingers to pick up the stitch that most naturally fell on the other side.  I did this with each finger before removing the pin to get the fit for each and make sure it was fairly evenly distributed.  I then just added pins to mark each stitch as I disconnected the sides.  It worked out to about 3 loops for the first three fingers, and two for the pinky. It does not matter what order you do this, or whether you start on the front or the back.  I started on the front with the index finger.  Please note, this can be fiddly and imprecise because you're not going to always have clearly defined loops to start with.  Figure out how many loops around you want each finger to be to fit comfortably, and then make sure you have that many loops on your first round around the finger opening.

Join yarn to first marked st.

  •  ch 1, sc to its partner on the other side of the glove. 
  • ch 5, sl st into next loop around the small opening you made with the join. (3 loops)
  • ch 5, sl st into next loop around again.
  • Ch 2, 2 sc in next loop around,  3x, join with a sl st to beginning of first ch 2. end off.
Repeat this for each finger, omitting the first step where it's unnecessary.   The pinky finger was the most difficult, doing this with only two loops was not easy.  In order to keep track of where I was working I had to have my finger in the opening and try really awkwardly to work around it. And I only went around the pinky finger once, since the finger is shorter.

Add a sc border around the opening on the back of the glove to neaten it up.  tuck in all your ends, add buttons and loops at the two solid htr rows on the cuffs to connect the back and you are done.

As you can see, I haven't added the button yet... I'm getting to it! If this wasn't for a steampunk outfit I might go with safety pins, actually, they give it a cool normal-punk look.

Monday, July 29, 2013

New finished crochet thing!

So, I don't remember if I mentioned it, but last month we drove to Las Vegas for the Magic the Gathering Grand Prix.  It was a lot of fun, crowded, busy, SO MUCH MAGIC.  But I went 5-4, won more rounds than I lost and that's all I wanted.  Anyways, faced with the prospect of a 12 hour drive with my husband and some of our rowdy Magic friends, I knew I wouldn't be able to sleep or concentrate on a book, so I decided it was time to start a new project.  I'd really been wanting a crocheted skirt for summer and it just so happened my grandma had just given me a bunch of cheap crappy red heart yarn.  Red Heart is not my first choice of yarn, but I figured since I had it I should use it.  So I started a new skirt.  And here, about a month later, it's done.


Of course, by the time I got to the end of this, I was so bored I was going crazy.  And I was trying to work on this while obsessing over steampunk stuff, so I really didn't want to be working on this.  I made myself finish it, though, cuz I knew I never would if I didn't do it now.  I'm glad I did, the skirt is cute, and fun to wear.  It flares like a flamenco dancer's skirt when I spin, so I spin constantly like a little girl when I wear it.  I went down a size on the pattern because I was worried about stretch, which turns out was a valid concern.  It's a bit snug getting in to right out of the wash, but after about an hour it fits perfectly.  Oh, and the cheap yarn softened up significantly after a round in the washer with some fabric softener. I'm pretty happy with it, even if I got annoyed there towards the end.  The thing took a crap ton of yarn, too, 7 1/2 skeins!  just for a skirt! geez.

Sunday, July 28, 2013

My newest obsession- Steampunk!

So, I've got a new obsession, obviously.  I've been aware of steampunk for some time, but for some reason it just finally caught my fancy and I can't think about anything else. Basically, if you're not familiar, steampunk is kinda a science fiction Victorian age alternate history where steam power became the dominant technology.  And the clothes are fantastic.  As a result of the newly found fabulousness of this, I am making my own steampunk outfit.  Some of the pieces I'll be able to wear in my normal wardrobe, some I won't and I don't know what I'll  do with them, but I don't care.


First in my collection is these two shirts.  just really awesome Goodwill finds.


And these two corset belts, brown and black, from amazon.com for about $5 each.  I love these, they're rad.  I want to wear them over my long tunic sweaters that I wear all winter.

These two dresses are being sacrificed to my project. The black one was my bridesmaid dress to my sister in law's wedding that I will never wear again, and I want the black lace.  The yellow one is a Goodwill find that, again, I just want the lace.

This is the fabric for my big bustled skirt and the bolero jacket I'm going to make.  They are velvety curtains I found at Goodwill for $2 each. I was pleased with myself.
This is the fabric and liner for one of the two corsets I'm planning. Slightly shiny for some contrast against the skirt and jacket.
This is for the second corset.  This one will be an underbust corset and is made up of leather like pieces cut from a suitcase and a duffle bag, also purchased from Goodwill for about $3 each.  I like the idea of different colored panels.
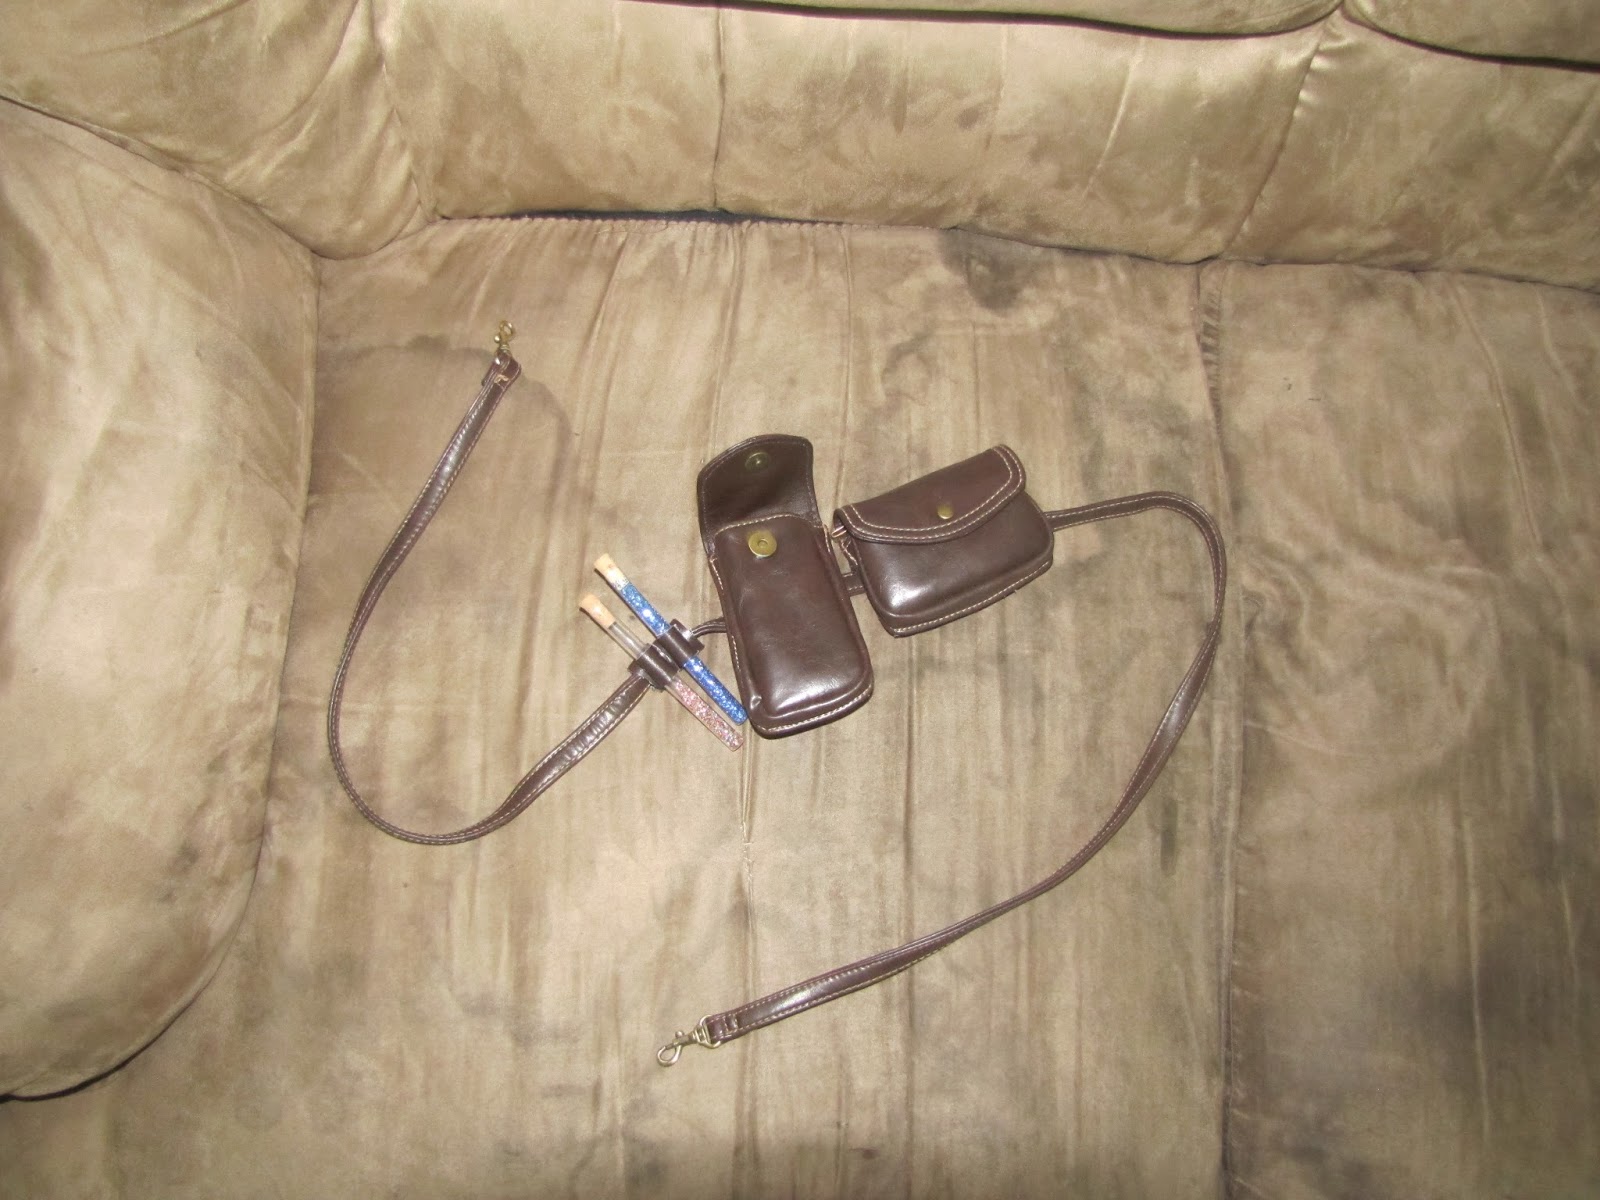
This is a, I guess you could call it a utility belt? It was a purse I bought at Goodwill for $2.50.  I cut out the patches, sewed strips on the back, made holders for the tubes out of scraps, and strung them on the shoulder strap, which I can hook around my waist.  The longer pocket is exactly the size of my phone and the other is perfect for ID, or debit card or whatever.  perfect so I don't need to carry a purse.

Nothing more Victorian than a pocket watch, right? Just something I picked up at Walmart.  The left is a crappy phone pic of how it looked originally, and then I painted it with special metal paints to give it more the color and look I was going for.


This box is full of all my little embellishments. Beads, chains, gears, rivets and whatnot.  I will make jewelry and decorate my outfit with these.
                                    
The glasses were kinda a failed project. I ordered the ones on the left, and they were too big and dumb looking, so after lots of drama I was able to grind them smaller, and dipped them in epoxy to cover scratches, which warped any ability to see through them- right.  Plus they're rough, uneven and they don't look nice. I am not happy.


So I ordered this set here. It's the hat, glasses and choker.  Glasses should be perfect.  I was gonna make a hat, but this might be better. I wanted a black hat, but we'll see how this looks. I figure I can paint it if I need to. And I'll play with the choker.  I figure I can use the ruined lenses to make goggles or something.  Goggles don't really go with my steampunk persona I've created, but I think they'd be fun t make.


This is a picture of some swing clasps I've order so I can have some fancy closures on at least one of my corsets.


Currently I'm working on the first corset.  For the burgundy one I have a pattern I got online- it's an overbust corset.  I've made a mock  up to perfect the fit. Turns out the waist is too high and of course the whole damn thing is too short.  makes sense with how tall I am, I suppose.  I've altered the pattern, lengthening, and changing the shape of the neckline, so I need to do another mockup now to check my changes.


This is the pattern that I'm working off of for the underbust corset and the jacket.  Not so much the skirt, I have an online tutorial that I'm planning to follow for that.  And I plan to make a bustle pad to go under the skirt.


So, the main purpose of this image heavy post was because I wanted to take pictures of all the pieces before they're complete, just for a before/after kind of thing.  I've got no idea how long this will take.


Ooh! one extra thing that this project gave me an excuse to do:
 I made me a duct tape dress form.  it has it's quirks, but it does the job.  It's nice for taking pictures of clothes, as I'm sure you noticed above.  It was a pain to make, my daughter helped me.  But I got it done.  It's handy.  and a little creepy just sitting there in the corner of my office when I'm not using it.  I call her Tipsy.  My husband likes to move it and put it in front of doorways when I'm not expecting it and scare me.